
22. Using DCM Rest Services
This guide provides information about how you can use the REST API Web Services to incorporate AppBase functions into custom applications and integrations with third-party software.
In the examples that follow, we are going to use Postman (https://www.getpostman.com/) which is a free API Development tool. You can use other tools like SOAPUI to build your own AppBase API before embedding them into any other third-party application or platform that would be calling the AppBase platform.
After this lesson you will be skilled in:
Getting a Security Token
This practice covers how to make your first call which involves getting a security token. For every web service call to an AppBase solution, you must first generate a security token and use it in any subsequent web service calls to ensure the operation is authorized.
This tutorial also assumes you have a third-party API development tool - such as Postman - installed and ready for use. Though the screenshots below use Postman v9.10, you can use any API development tool of choice.
- Open the Postman app and create a new Collection as Training tryDCM.
Create a new Request in the recently created Collection and name it get DCM Security Token.
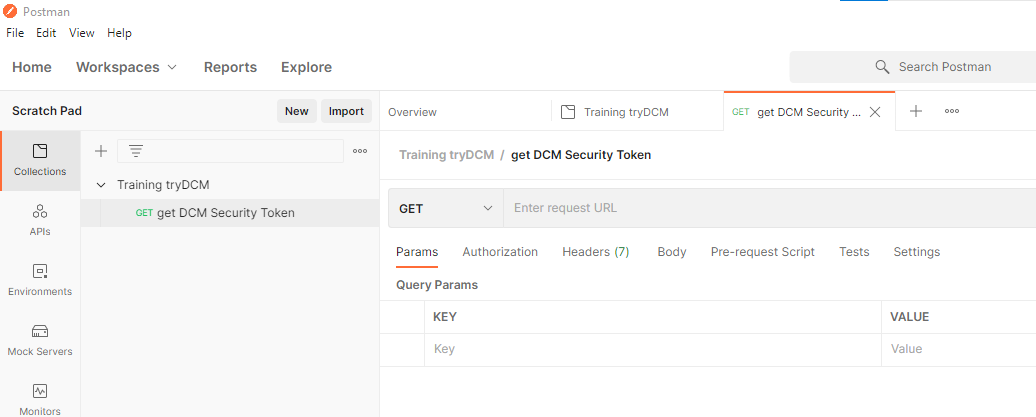
Click on Save to Training tryDCM.
Configure your new request for a POST method and insert the following URL https://trydcm.eccentex.com/Security.WebService/AuthenticationServiceRest.svc/login.
In the Body tab, select raw format. Copy and paste the following JSON variables
{"Username":"","Password":""}.Update the fields with your valid credentials.
Click on the Send button to request a token string. Your screen might look like the following:

The response you receive should be a long GUID that represents the security token that we need to be included in any subsequent call to the REST API.
Copy the token to Notepad or any text editor for further use.
Save your updated Request.
Getting Case Types XML Structure
Each Case Type typically has its own custom form with fields specific to that Case Type. When the user clicks "Save" in DM, the page collects all of the case and custom form data into an XML string.
To get the XML structure of our case, we can use the Developer Tools feature in the Chrome or Firefox web browsers. The following steps assume you are using Chrome.
The following is the XML structure example of the Auto Loan Case Type:
<CustomData>
<Attributes>
<Object ObjectCode="CASE">
<Item>
<OBJECTCODE><![CDATA[CASE]]></OBJECTCODE>
<ID>-3</ID>
<PARENTID>0</PARENTID>
<PARENTCODE></PARENTCODE>
<_KEY><![CDATA[CASE]]></_KEY>
<SUMMARY><![CDATA[Testing]]></SUMMARY>
<DESCRIPTION></DESCRIPTION>
<PRIORITY_ID>4</PRIORITY_ID>
<CASESYSTYPE_ID>1</CASESYSTYPE_ID>
<DRAFT>0</DRAFT>
<OWNER_WORKBASKET_ID>21</OWNER_WORKBASKET_ID>
</Item>
</Object>
<Object ObjectCode="CDM_AUTO_LOAN">
<Item>
<CASETYPEID>1</CASETYPEID>
<OBJECTCODE><![CDATA[CDM_AUTO_LOAN]]></OBJECTCODE>
<PARENTID>-3</PARENTID>
<ID>-2</ID>
<PARENTCODE></PARENTCODE>
<_KEY><![CDATA[CDM_AUTO_LOAN--2]]></_KEY>
<MODELID>1</MODELID>
<DOMOBJECTCODE><![CDATA[CDM_AUTO_LOAN]]></DOMOBJECTCODE>
<CDM_AUTO_LOAN_CUSTOMER_NAME><![CDATA[John Smith]]></CDM_AUTO_LOAN_CUSTOMER_NAME>
<EMPLOYMENT_TYPE_ID>1</EMPLOYMENT_TYPE_ID>
<CDM_AUTO_LOAN_EMPLOYER><![CDATA[ACME INC]]></CDM_AUTO_LOAN_EMPLOYER>
<CDM_AUTO_LOAN_LOAN_AMOUNT>10000</CDM_AUTO_LOAN_LOAN_AMOUNT>
<CDM_AUTO_LOAN_ANNUAL_INCOME>100000</CDM_AUTO_LOAN_ANNUAL_INCOME>
<CDM_AUTO_LOAN_CREDIT_SCORE>678</CDM_AUTO_LOAN_CREDIT_SCORE>
</Item>
</Object>
</Attributes>
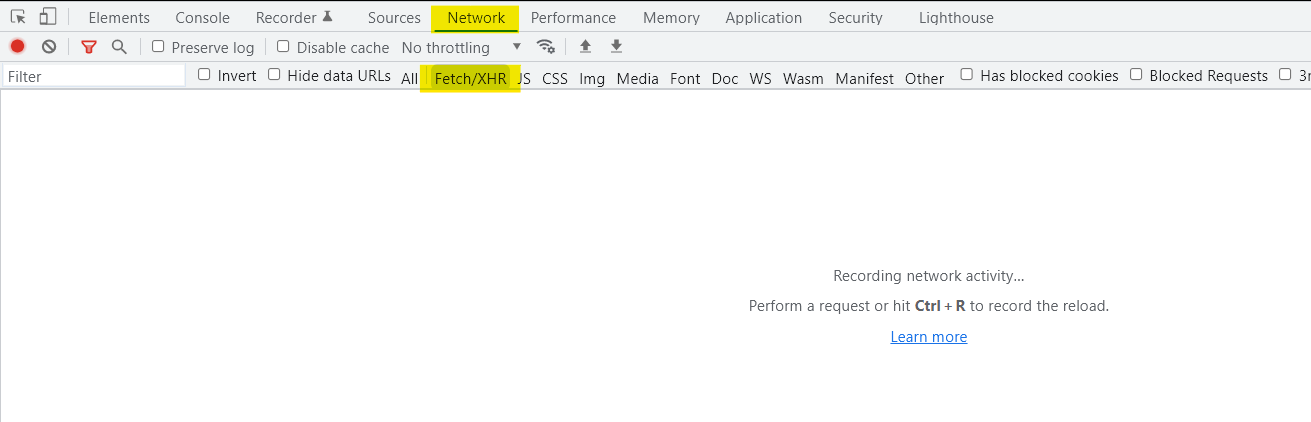
</CustomData>In Google Chrome press CTRL-SHIFT- I to open the Developer Tools Select the Network tab, Unselect All and select Fetch/XHR. Clean the screen.
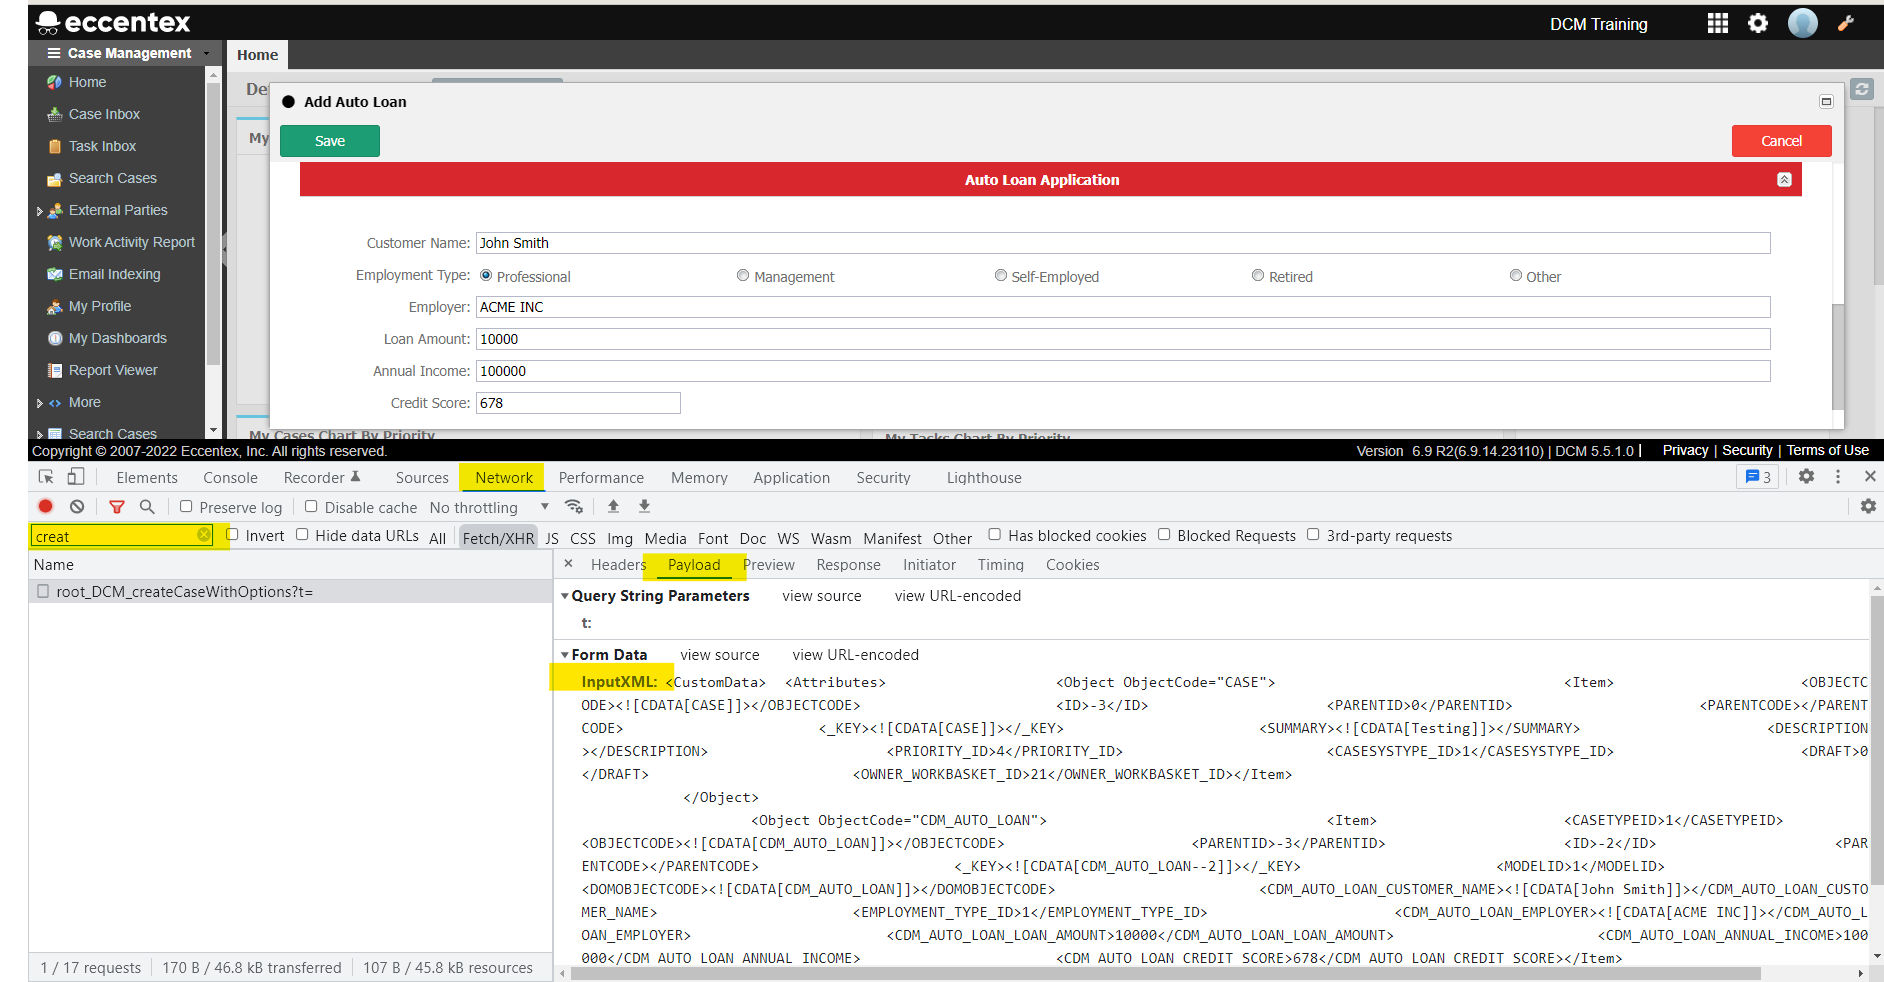
In DCM, create a new Auto Loan case as usual and fill the form with values that you can identify later.
After creating the new case, go to the Network tab and filter the view for ‘CreateCase’ you will see the root_DCM_createCaseWithOptions call.
Click on root_DCM_createCaseWithOptions to check the content of the Payload section, scroll down to see the value of the InputXML field .
This is the XML structure we need to use to insert new cases through REST API.Copy the InputXML value into Notepad or other editor and save it for later reference.
Creating an Auto Loan Case Using REST API
In situations when an external system needs to integrate with AppBase to create a Case, they can use the default REST rule to create cases called “MDM_CreateCaseWithOptions”.
The next task is to create a case using the default rule with the same data you use to create a sample Auto Loan in the previous task.
Identify the server URL, or IP address, that contains the solution you wish to integrate with.
In our training, we have a small solution on the server 'https://trydcm.eccentex.com/' called DCM Training that we would like to interface with.
We need to identify the Domain ID of the solution. Navigate to System Setup Home -> Solutions. Click on the blue hyperlinked name of your solution (DCM Production).
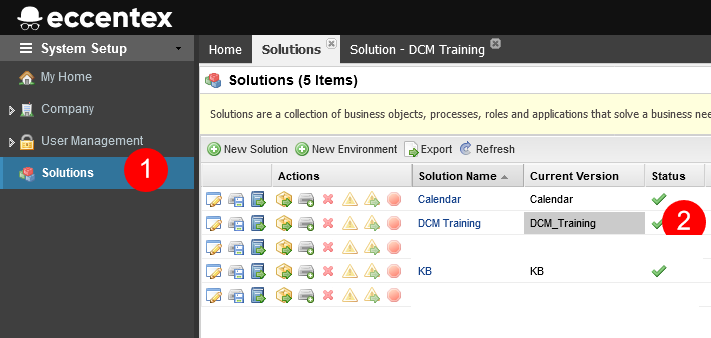
Go to the Environment Details tab. The domain code name can be found in the Domain field as shown below (i.e. DCM_TRAINING.TENANT99):
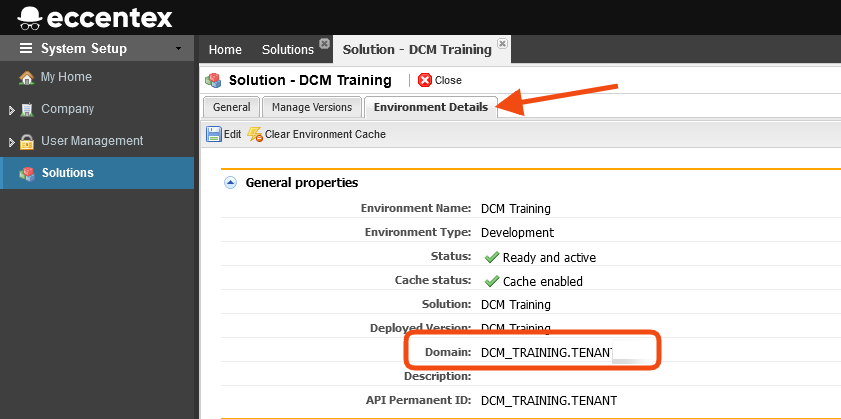
- Save the domain ID for further use.
In Postman create a new Request and name it ‘Create MDM Case’ and ‘Save to Training tryDCM’.
Select POST and copy the following URL
https://trydcm.eccentex.com/BDS.WebService/DataServiceRest.svc/post/<<domain>>/root_DCM_createCaseWithOptions?t=- Replace the <<domain>> in the URL with the domain ID obtained in the previous step.
- In the Body section selected the x-www-form-urlencoded option insert a new KEY called InputXML, copy the XML structure from the previous task on the InputXML params VALUE.

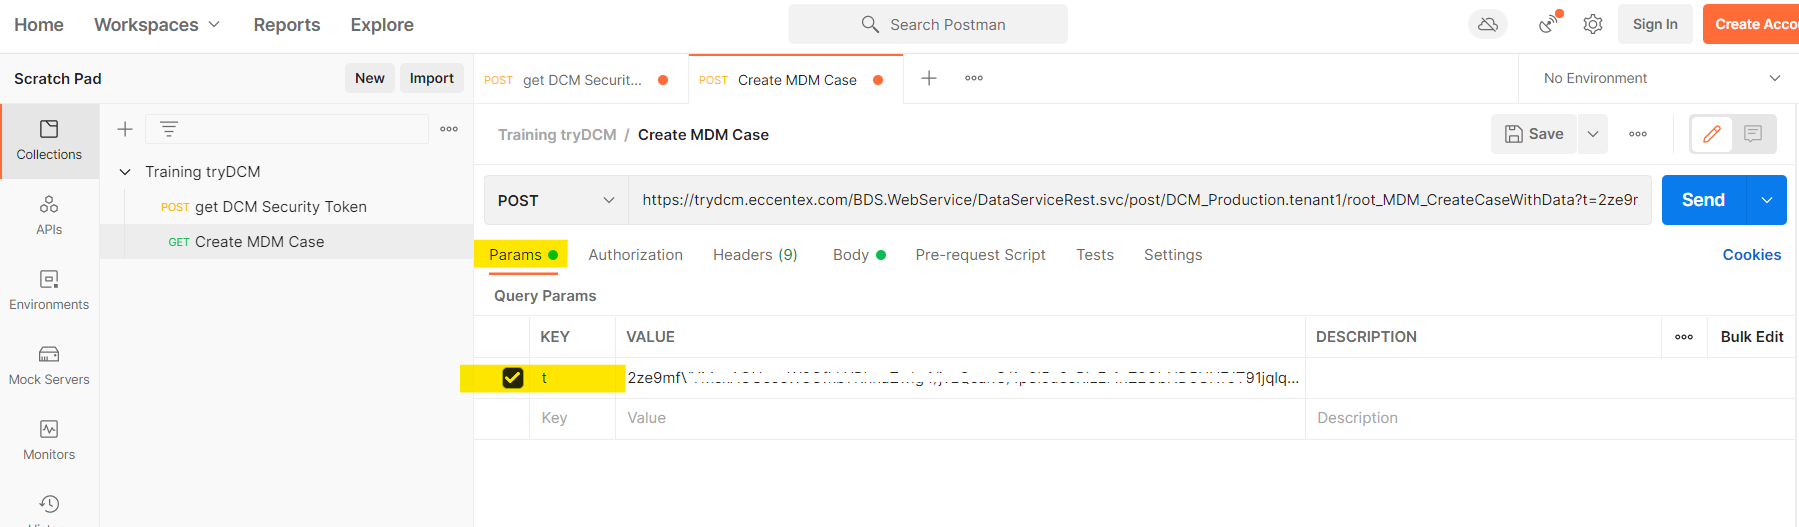
In the Params section update the token value (t) with the one obtained in the previous task.
Click theSend button. You will get a response like follow:
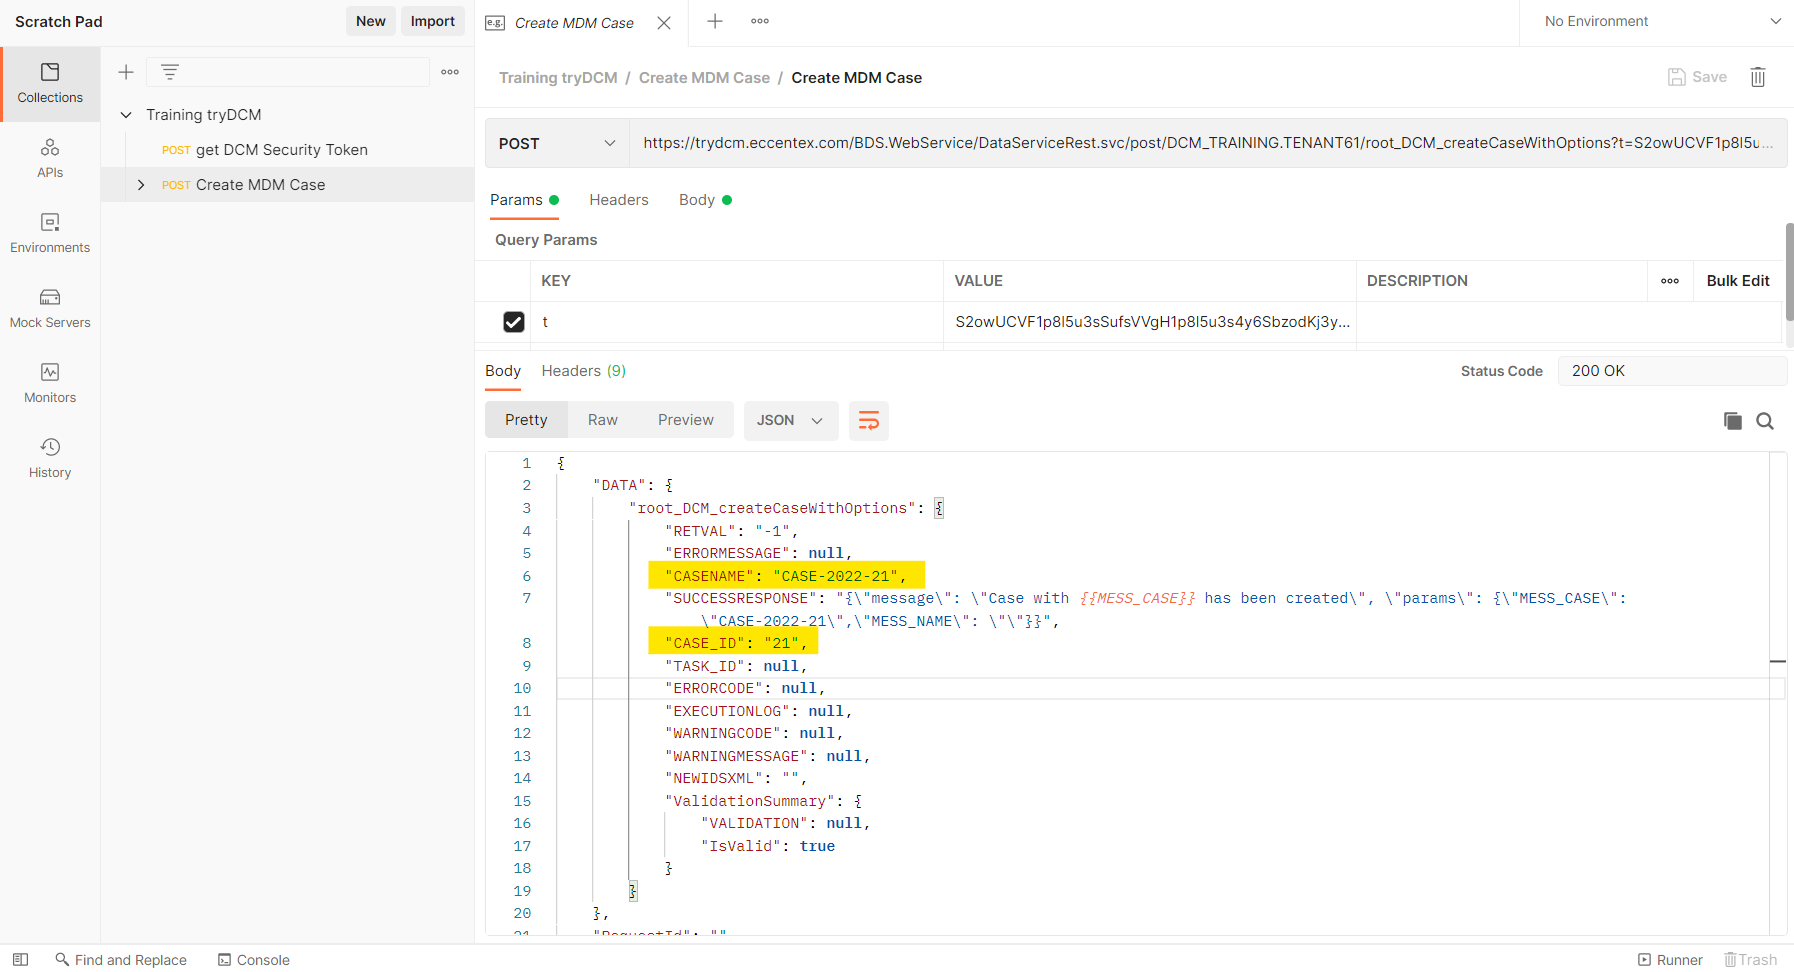
Identify from the Body section the Case_ID (21) and CaseName (CASE-2022-21).
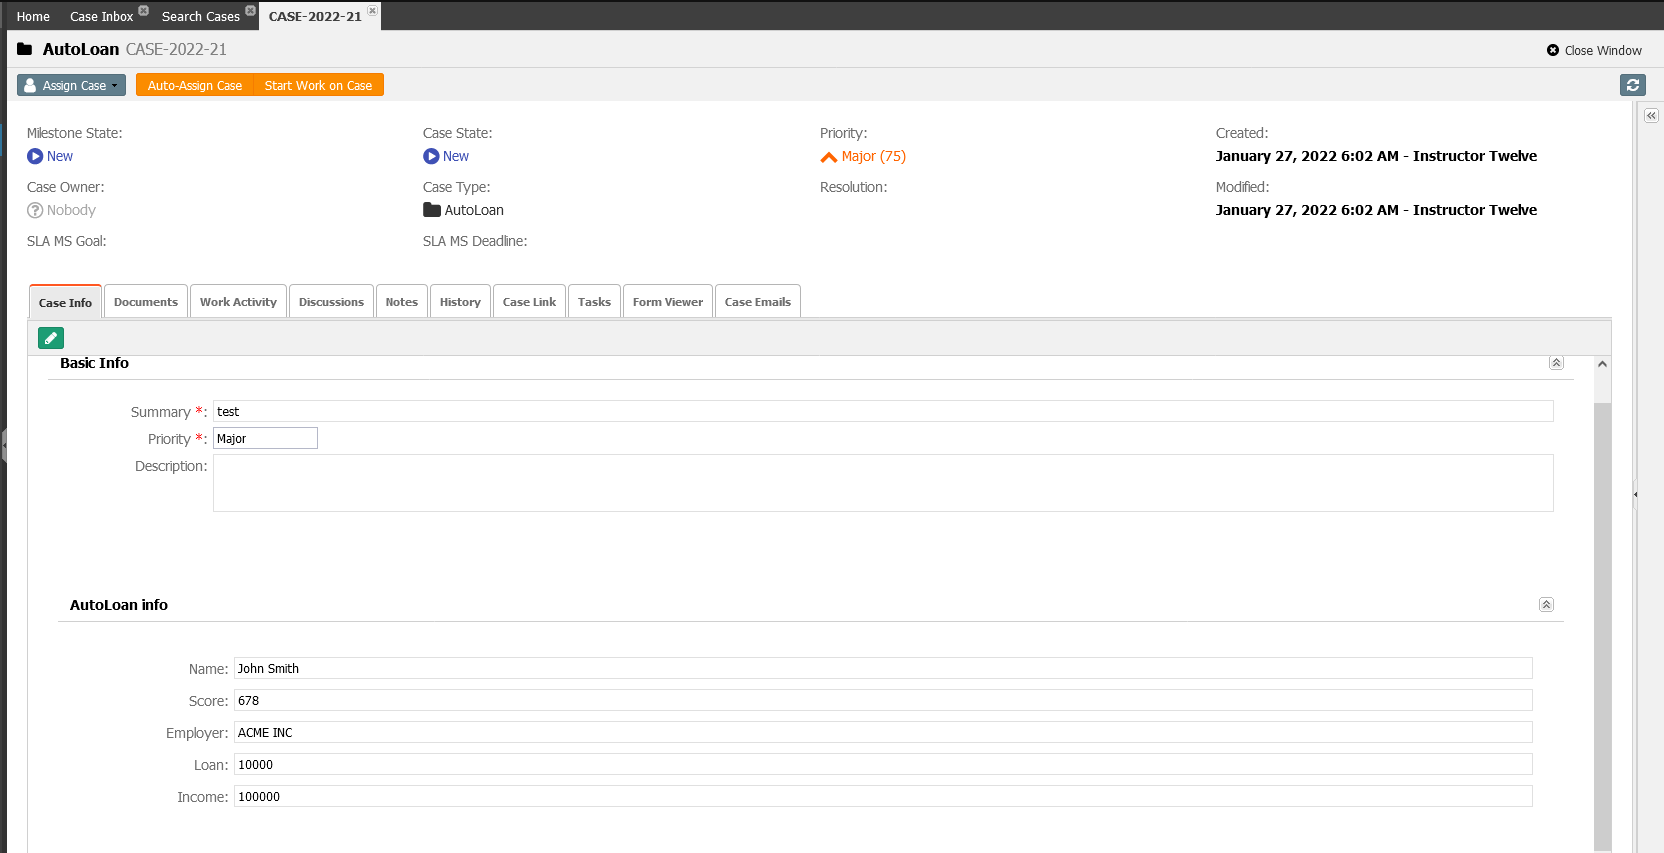
JS{ "DATA": { "root_DCM_createCaseWithOptions": { "RETVAL": "-1", "ERRORMESSAGE": null, "CASENAME": "CASE-2022-21", "CASE_ID": "21", "ERRORCODE": null, "ValidationSummary": { "VALIDATION": null, "IsValid": true } } }, }Go back to DCM to check the new case. In Case Management area, navigate to Search Cases and open the case with the ID recently created (81 in our example) using the REST API.
NodeJS Example Code to Call DCM APIs
The DCM REST APIs can be called using NodeJS technology too. The following is an example code to create a new case:
JSvar https = require('follow-redirects').https; var fs = require('fs'); var qs = require('querystring'); var options = { 'method': 'POST', 'hostname': 'mydcmexampledomain.com', 'path': '/BDS.WebService/DataServiceRest.svc/post/<<solution_domain>>/root_DCM_createCaseWithOptions?t=<<session_token>>', 'headers': { }, 'maxRedirects': 20 }; var req = https.request(options, function (res) { var chunks = []; res.on("data", function (chunk) { chunks.push(chunk); }); res.on("end", function (chunk) { var body = Buffer.concat(chunks); console.log(body.toString()); }); res.on("error", function (error) { console.error(error); }); }); var postData = qs.stringify({ 'InputXML': '<CustomData><Attributes><Object ObjectCode="CASE"><Item><OBJECTCODE><![CDATA[CASE]]></OBJECTCODE><ID>-3</ID><PARENTID>0</PARENTID><PARENTCODE></PARENTCODE><_KEY><![CDATA[CASE]]></_KEY><SUMMARY><![CDATA[Sample Code]]></SUMMARY><DESCRIPTION><![CDATA[Sample Code]]></DESCRIPTION><PRIORITY_ID>999</PRIORITY_ID><CASESYSTYPE_ID>999</CASESYSTYPE_ID></Item></Object><Object ObjectCode="CDM_AUTO_LOAN"><Item><CASETYPEID>999</CASETYPEID><OBJECTCODE><![CDATA[CDM_AUTO_LOAN]]></OBJECTCODE><PARENTID>-3</PARENTID><ID>-2</ID><PARENTCODE></PARENTCODE><_KEY><![CDATA[CDM_AUTO_LOAN]]></_KEY><MODELID>999</MODELID><DOMOBJECTCODE><![CDATA[CDM_AUTO_LOAN]]></DOMOBJECTCODE><CDM_AUTO_LOAN_NAME><![CDATA[John Smith]]></CDM_AUTO_LOAN_NAME><CDM_AUTO_LOAN_SCORE>678</CDM_AUTO_LOAN_SCORE><CDM_AUTO_LOAN_EMPLOYER><![CDATA[ACME INC]]></CDM_AUTO_LOAN_EMPLOYER><CDM_AUTO_LOAN_LOAN>10000</CDM_AUTO_LOAN_LOAN><CDM_AUTO_LOAN_INCOME>100000</CDM_AUTO_LOAN_INCOME></Item></Object></Attributes></CustomData>' }); req.write(postData); req.end();