
How To Add a Tab with MDM Case Search
The scenario involves establishing a Parent-Child relationship between two case types. In this guide, we'll work with two case types: "Auto Loan" as the Parent Case Type and "Car Quotes" as the Child Case Type.
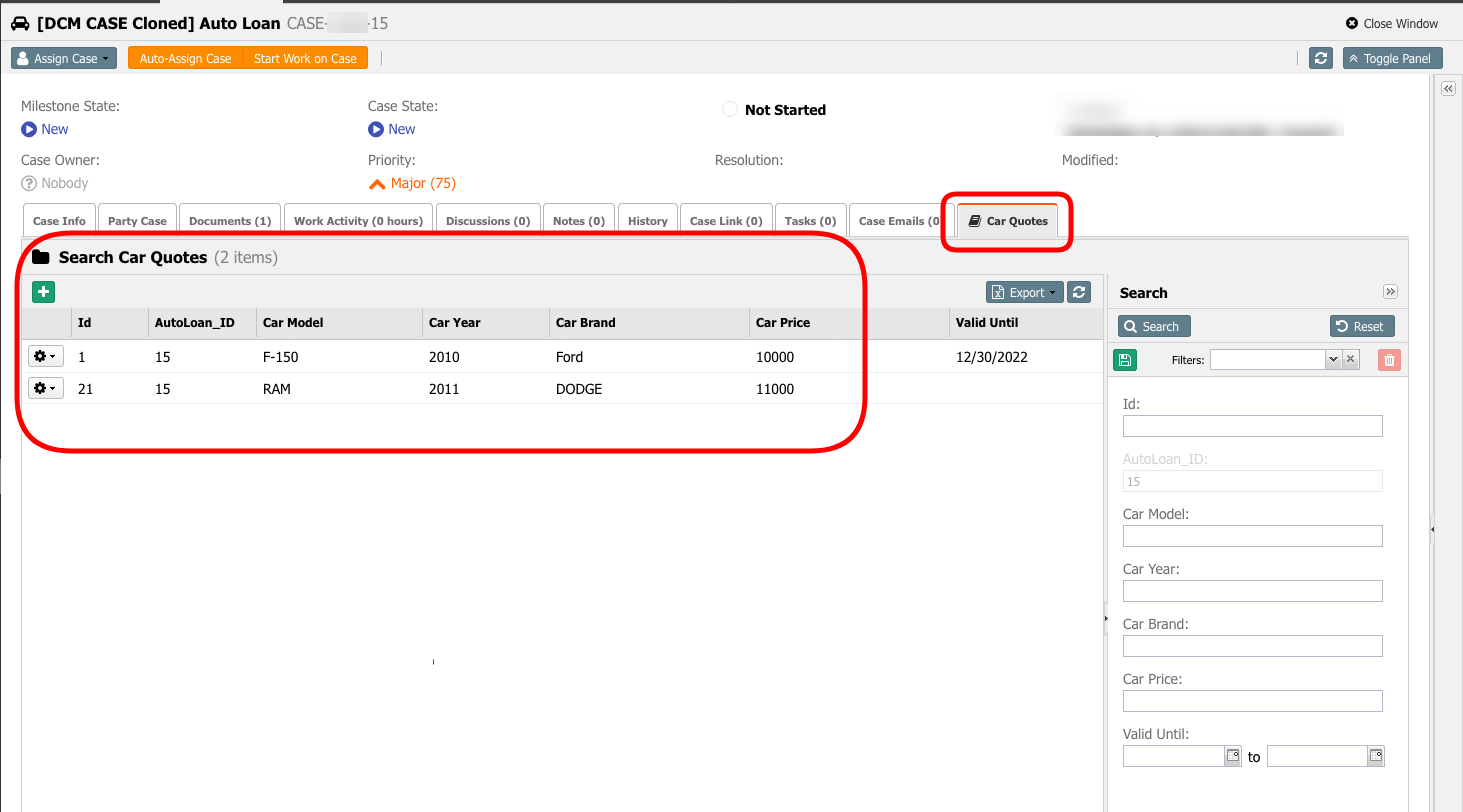
The main objective of this guide is to show how to display instances of "Car Quotes" cases (which are child cases) within a tab on the Case Detail Page of an "Auto Loan" (which is a parent case type). Additionally, this guide will show how to create a new child case from within this tab. To achieve this, a crucial step is to ensure that each Child case includes a field that stores the Case ID of the corresponding Parent case.
Here's a breakdown of the steps involved:
Case Types Setup: Define two case types - "Auto Loan" and "Car Quotes." The former will serve as the Parent case type, while the latter will function as the Child case type.
Parent-Child Relationship: Establish a relationship between the two case types. This might involve configuring the necessary metadata or fields to indicate the relationship between the parent and child cases.
Case Detail Page Customization: Modify the Case Detail Page for the "Auto Loan" case type to incorporate a dedicated tab for displaying associated "Car Quotes" child cases.
Rendering Child Cases: Within the dedicated tab on the "Auto Loan" Case Detail Page, render a list of linked "Car Quotes" child cases. This list could include essential information about each child case.
New Child Case Creation: Enable the ability to create new "Car Quotes" child cases directly from the "Auto Loan" Case Detail Page, preferably within the same tab. This might involve adding a button or interface elements to initiate the creation process.
Parent ID Field in Child Case: In the "Car Quotes" case type, include a field that captures the Case ID of the associated "Auto Loan" parent case. This field will establish the link between parent and child cases.
Steps
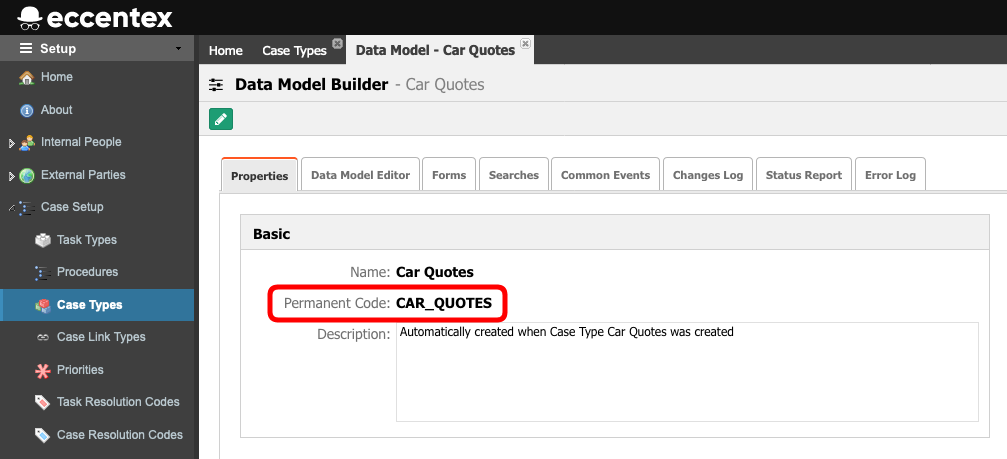
Obtain the Permanent Code of the Case Type Child
- Open the Data Model of the child case (Car Quotes)
- On the Properties tab, copy the Permanent Code of the child case type in a notebook (CAR_QUOTES)
Adding the Case ID of the Parent case
- Open the Data Model of the child case (Car Quotes)
- Add the new Attribute to the Car Quotes case. In our example, we name it AutoLoan_ID (Text).

- Save the changes
- Run a Deploy to commit all the changes on the MDM model before continuing
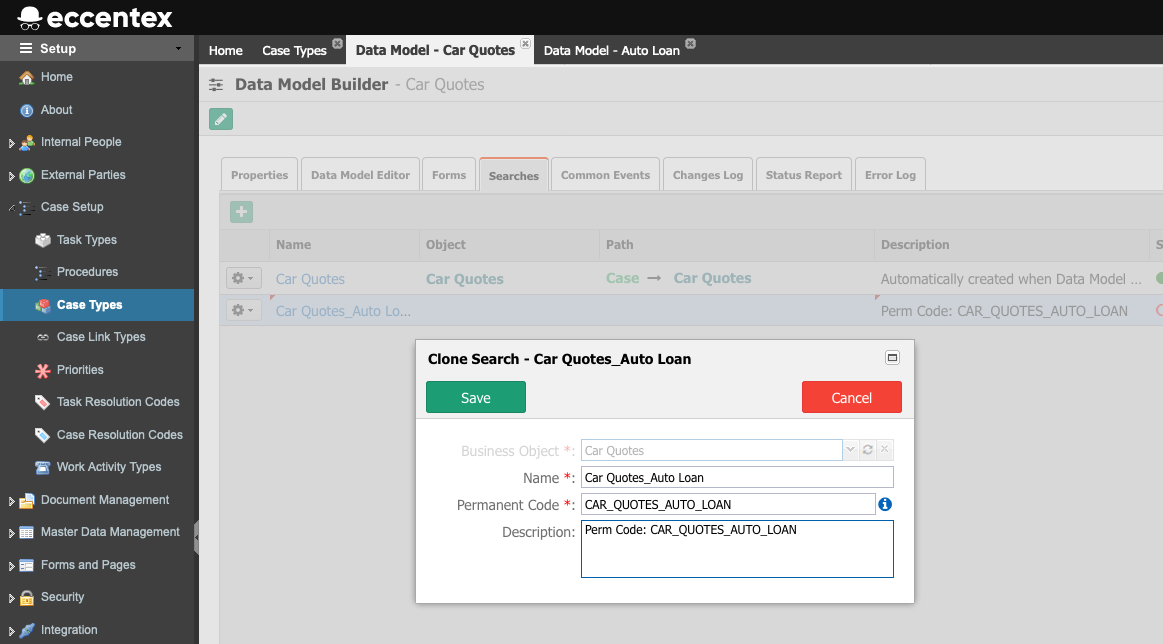
Create a New Child Search Form
- Open the Data Model of the child case (Car Quotes)
- Go to the Searches tab
- Clone the default search form. In our example, we name it Car Quotes_Auto Loan.
- Copy the Permanent Code of the Search Form in a notebook (in our example, CAR_QUOTES_AUTO_LOAN)
- Save the new search form
- Open the new Search Form
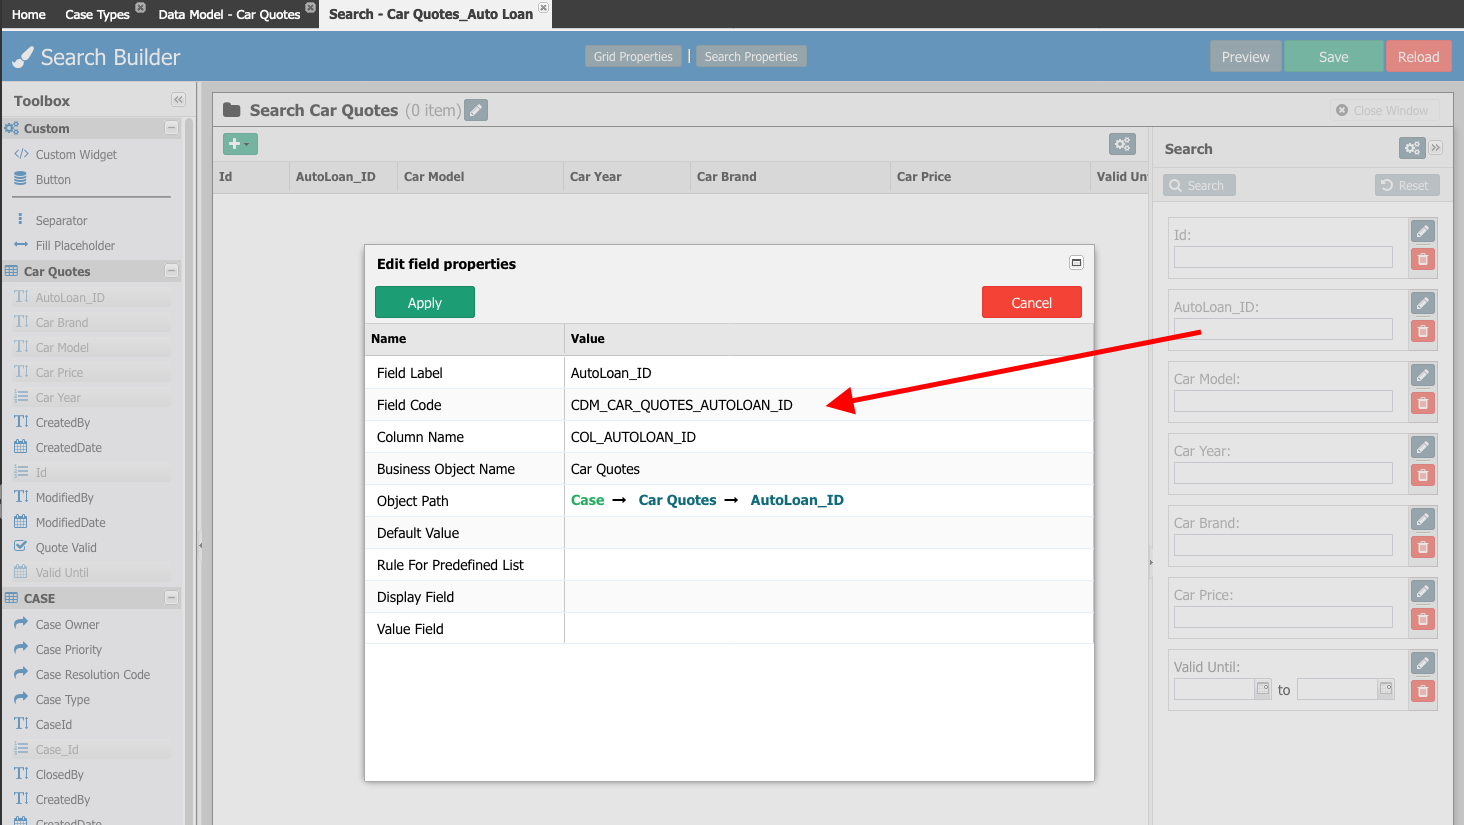
- Add the AutoLoan_ID field to the Grid and Search section
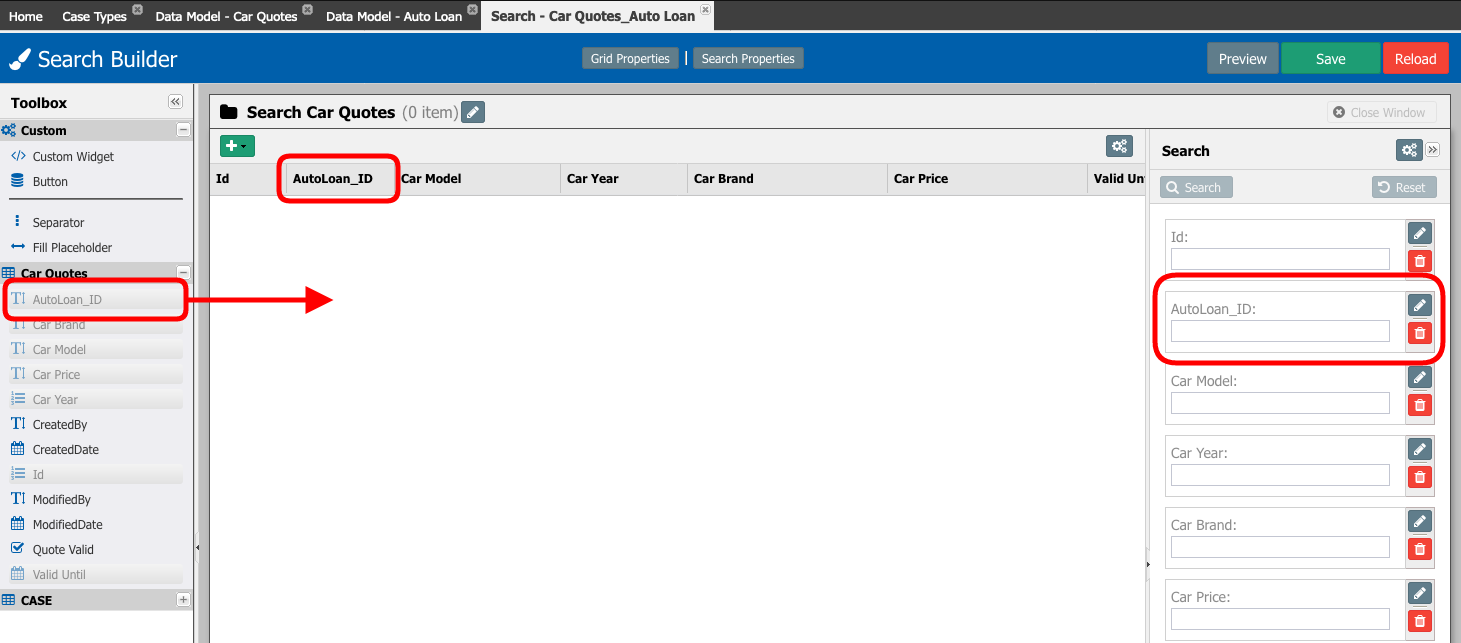
- Edit the Parent ID field (AutoLoan_ID) and copy the Field Code in a notebook (in our example, CDM_CAR_QUOTES_AUTOLOAN_ID)
Open the Grid Properties and paste the following code into the Custom JS tab
Edit the code and update the attributeCode with the value obtained in the previous step (in our example, CDM_CAR_QUOTES_AUTOLOAN_ID)
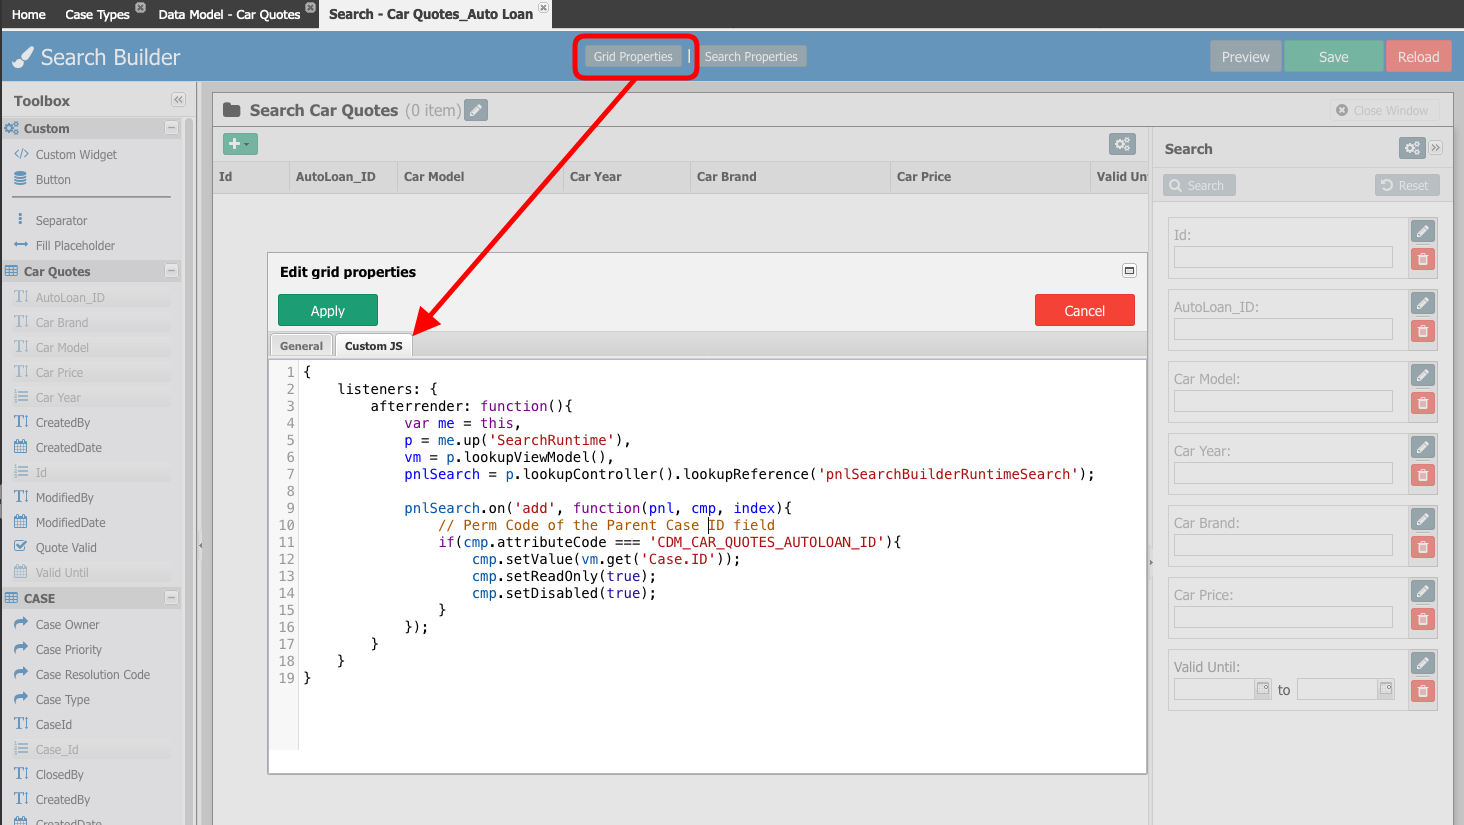
Search Form JS Code
JS{ listeners: { afterrender: function(){ var me = this, p = me.up('SearchRuntime'), vm = p.lookupViewModel(), pnlSearch = p.lookupController().lookupReference('pnlSearchBuilderRuntimeSearch'); pnlSearch.on('add', function(pnl, cmp, index){ // Perm Code of the Parent ID field if(cmp.attributeCode === 'CDM_CAR_QUOTES_AUTOLOAN_ID'){ cmp.setValue(vm.get('Case.ID')); cmp.setReadOnly(true); cmp.setDisabled(true); } }); } } }- Save the search form
Create the Coded Page to Host the Child Search Page
- Navigate to Setup → Forms and Pages → Coded Pages
- Create a new Coded Page. In our example, we name it Car Quotes List.
- Copy the code below to the new coded page
- Save & Close
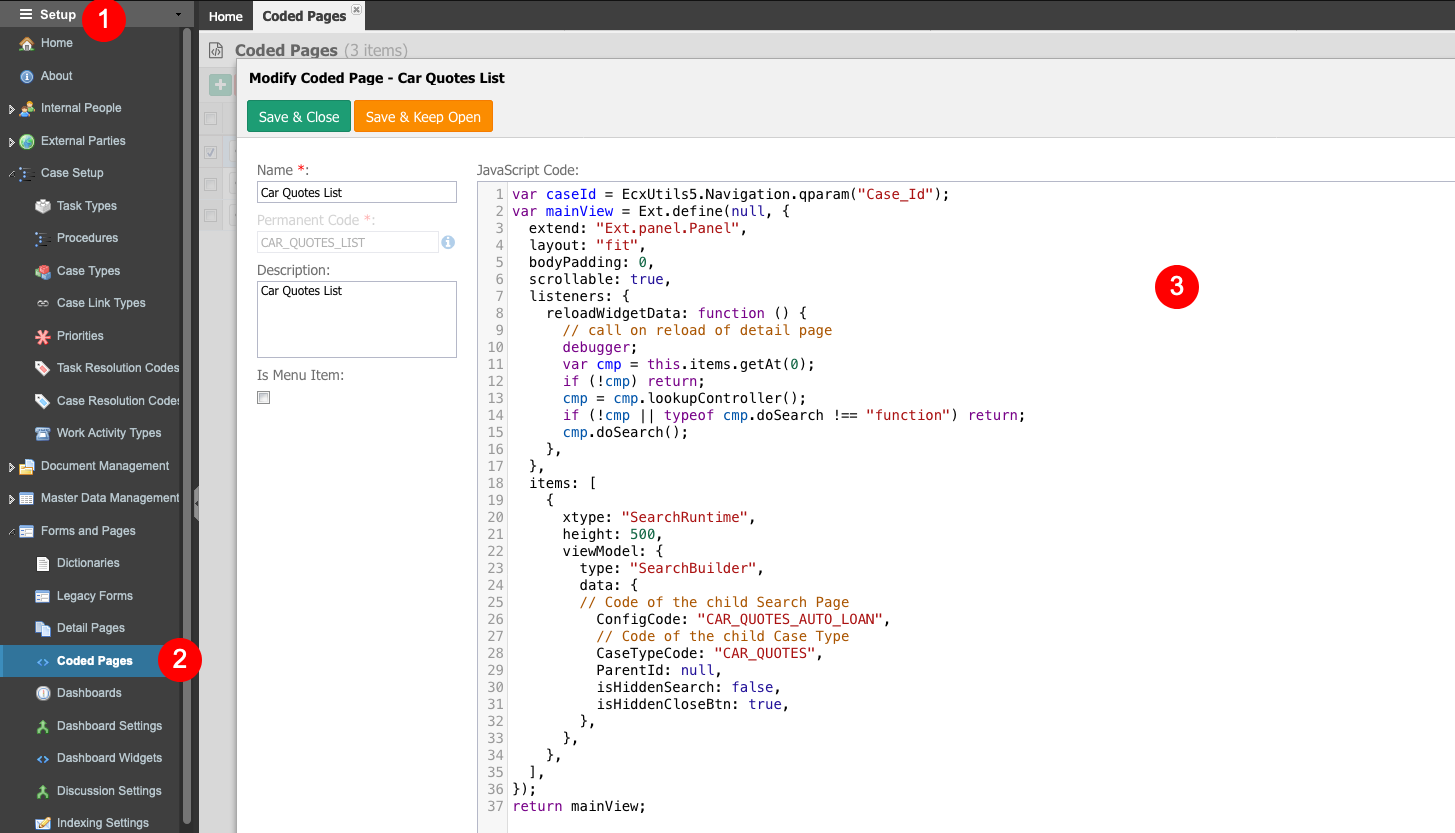
Coded Page JS Code
var caseId = EcxUtils5.Navigation.qparam("Case_Id");
var mainView = Ext.define(null, {
  extend: "Ext.panel.Panel",
  layout: "fit",
  bodyPadding: 0,
  scrollable: true,
  listeners: {
    reloadWidgetData: function () {
      // call on reload of detail page
      debugger;
      var cmp = this.items.getAt(0);
      if (!cmp) return;
      cmp = cmp.lookupController();
      if (!cmp || typeof cmp.doSearch !== "function") return;
      cmp.doSearch();
    },
  },
  items: [
    {
      xtype: "SearchRuntime",
      height: 500,
      viewModel: {
        type: "SearchBuilder",
        data: {
          // Perm Code of the child Search Page
          ConfigCode: "CAR_QUOTES_AUTO_LOAN",
          // Perm Code of the child Case Type
          CaseTypeCode: "CAR_QUOTES",
          ParentId: null,
          isHiddenSearch: false,
          isHiddenCloseBtn: true,
        },
      },
    },
  ],
});
return mainView;
Add the Custom Widget to the Parent Detail Page
- Open the parent Detail Page or clone one
- Add a Custom Widget to the tabs
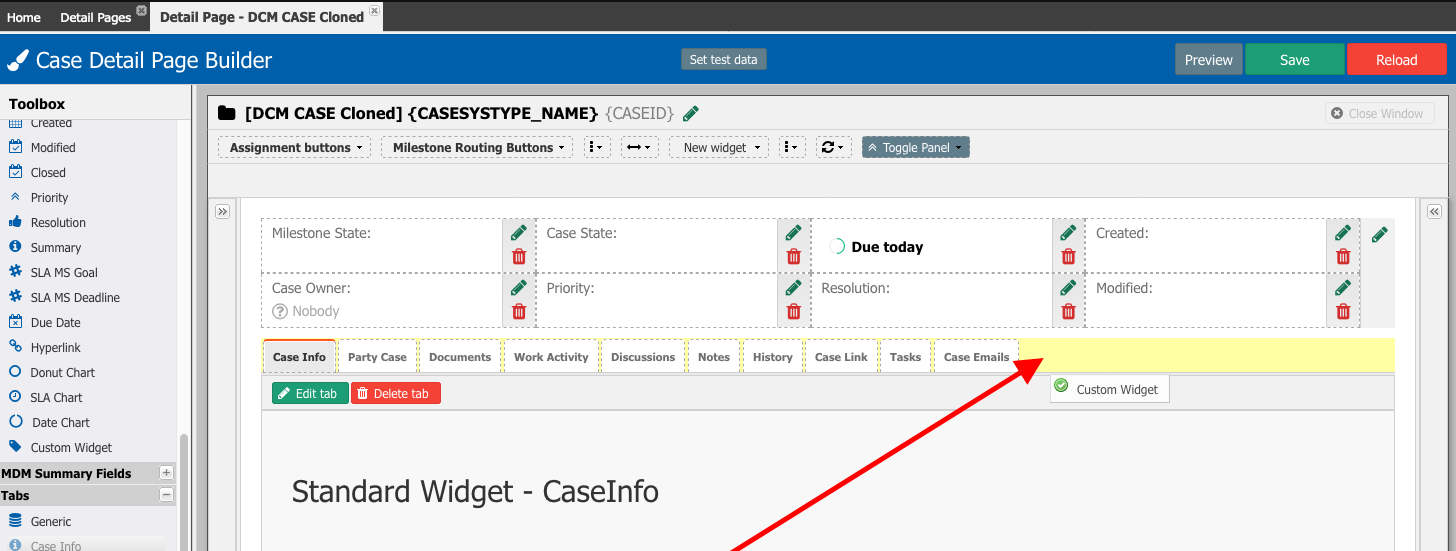
- On the Basic Settings, change the Content Type to Coded Page
- Set a Tab Title. In our example, Car Quotes
- On the Coded Page Settings, select the Coded Page created in the previous step. In our example, Car Quotes List

- Save the tab settings
- Preview the detail page
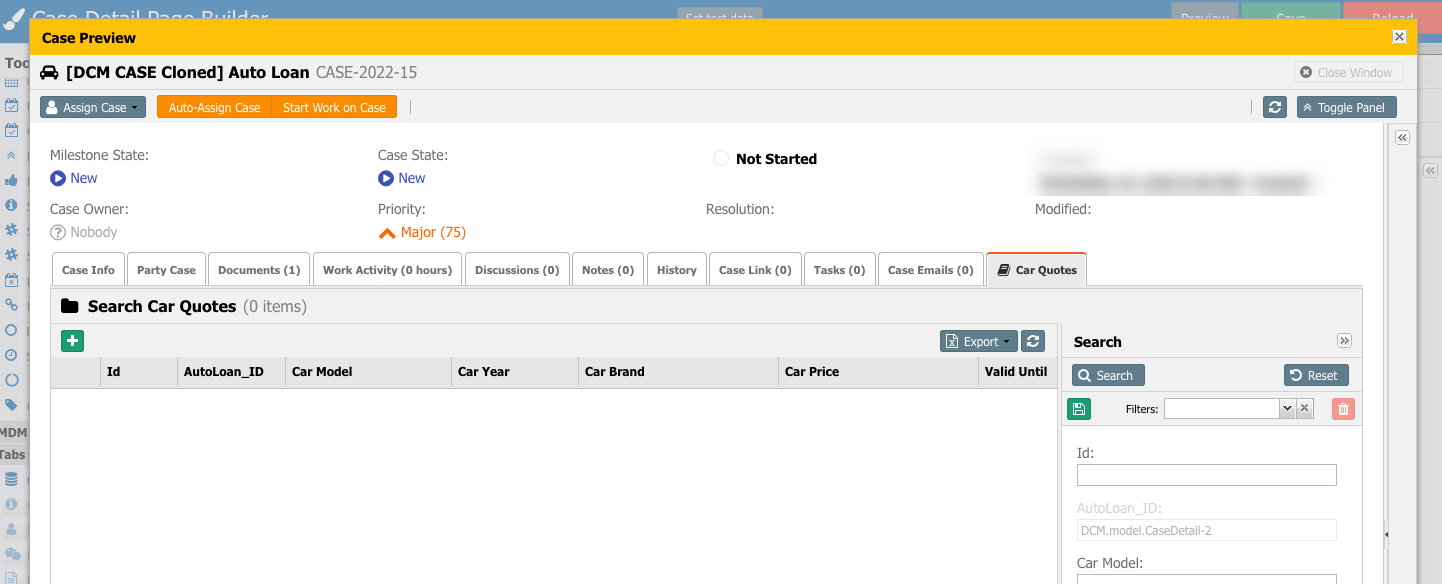
- Congratulations! You are all set.