Installing ServiceJourney in AppBase
This guide explains how to install the ServiceJourney AppBase solution.
Step 1: Import the ServiceJourney solution in AppBase
- Download latest solution build from ServiceJourney - Release Management (contact your administrator)
- Log in to your ServiceJourney environment
- On the top right, navigate to

- Click the

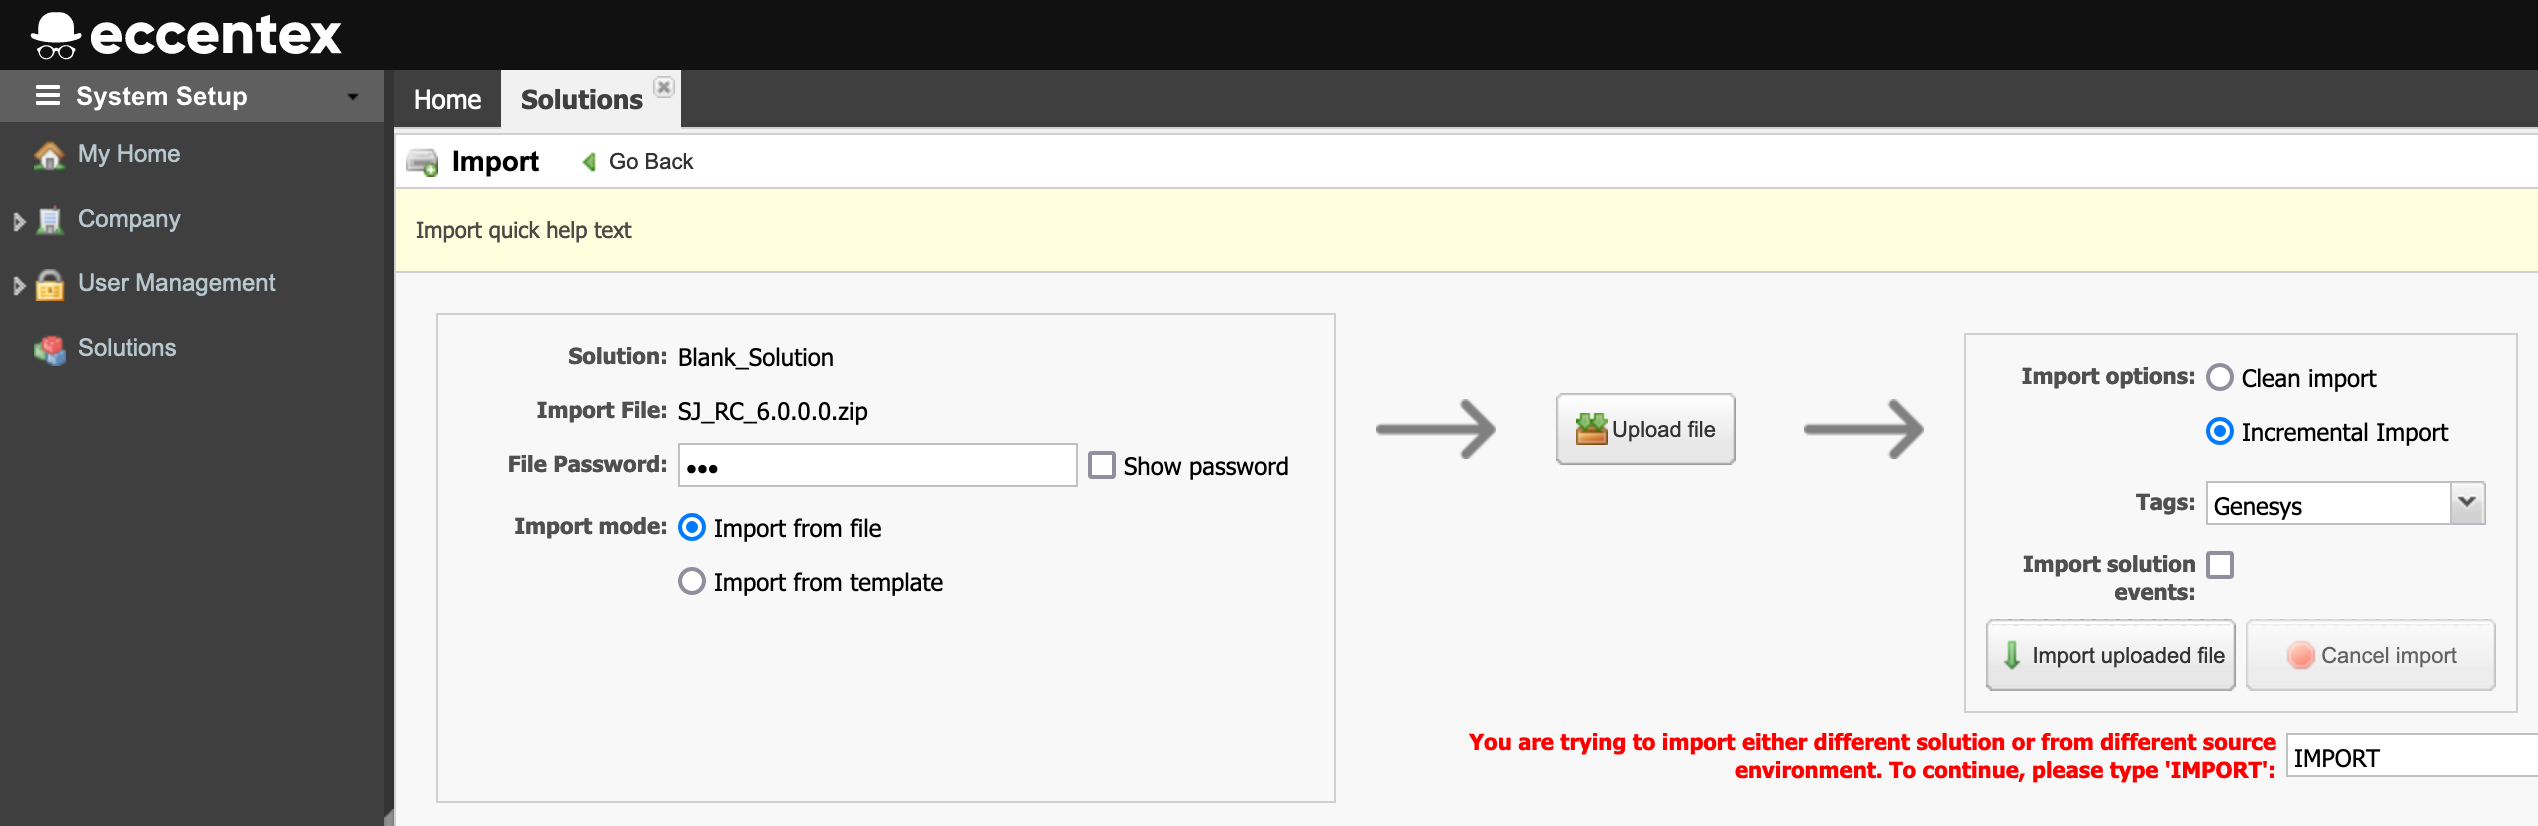
- Upload the latest ServiceSolution build (filename like SJ_RC_#.#.#.#.zip)
- Set the import options as follow:
Import options: Incremental Import
Tags: Genesys
Import solution events: Unchecked
- Click the Import uploaded file button
- Click the Confirm button
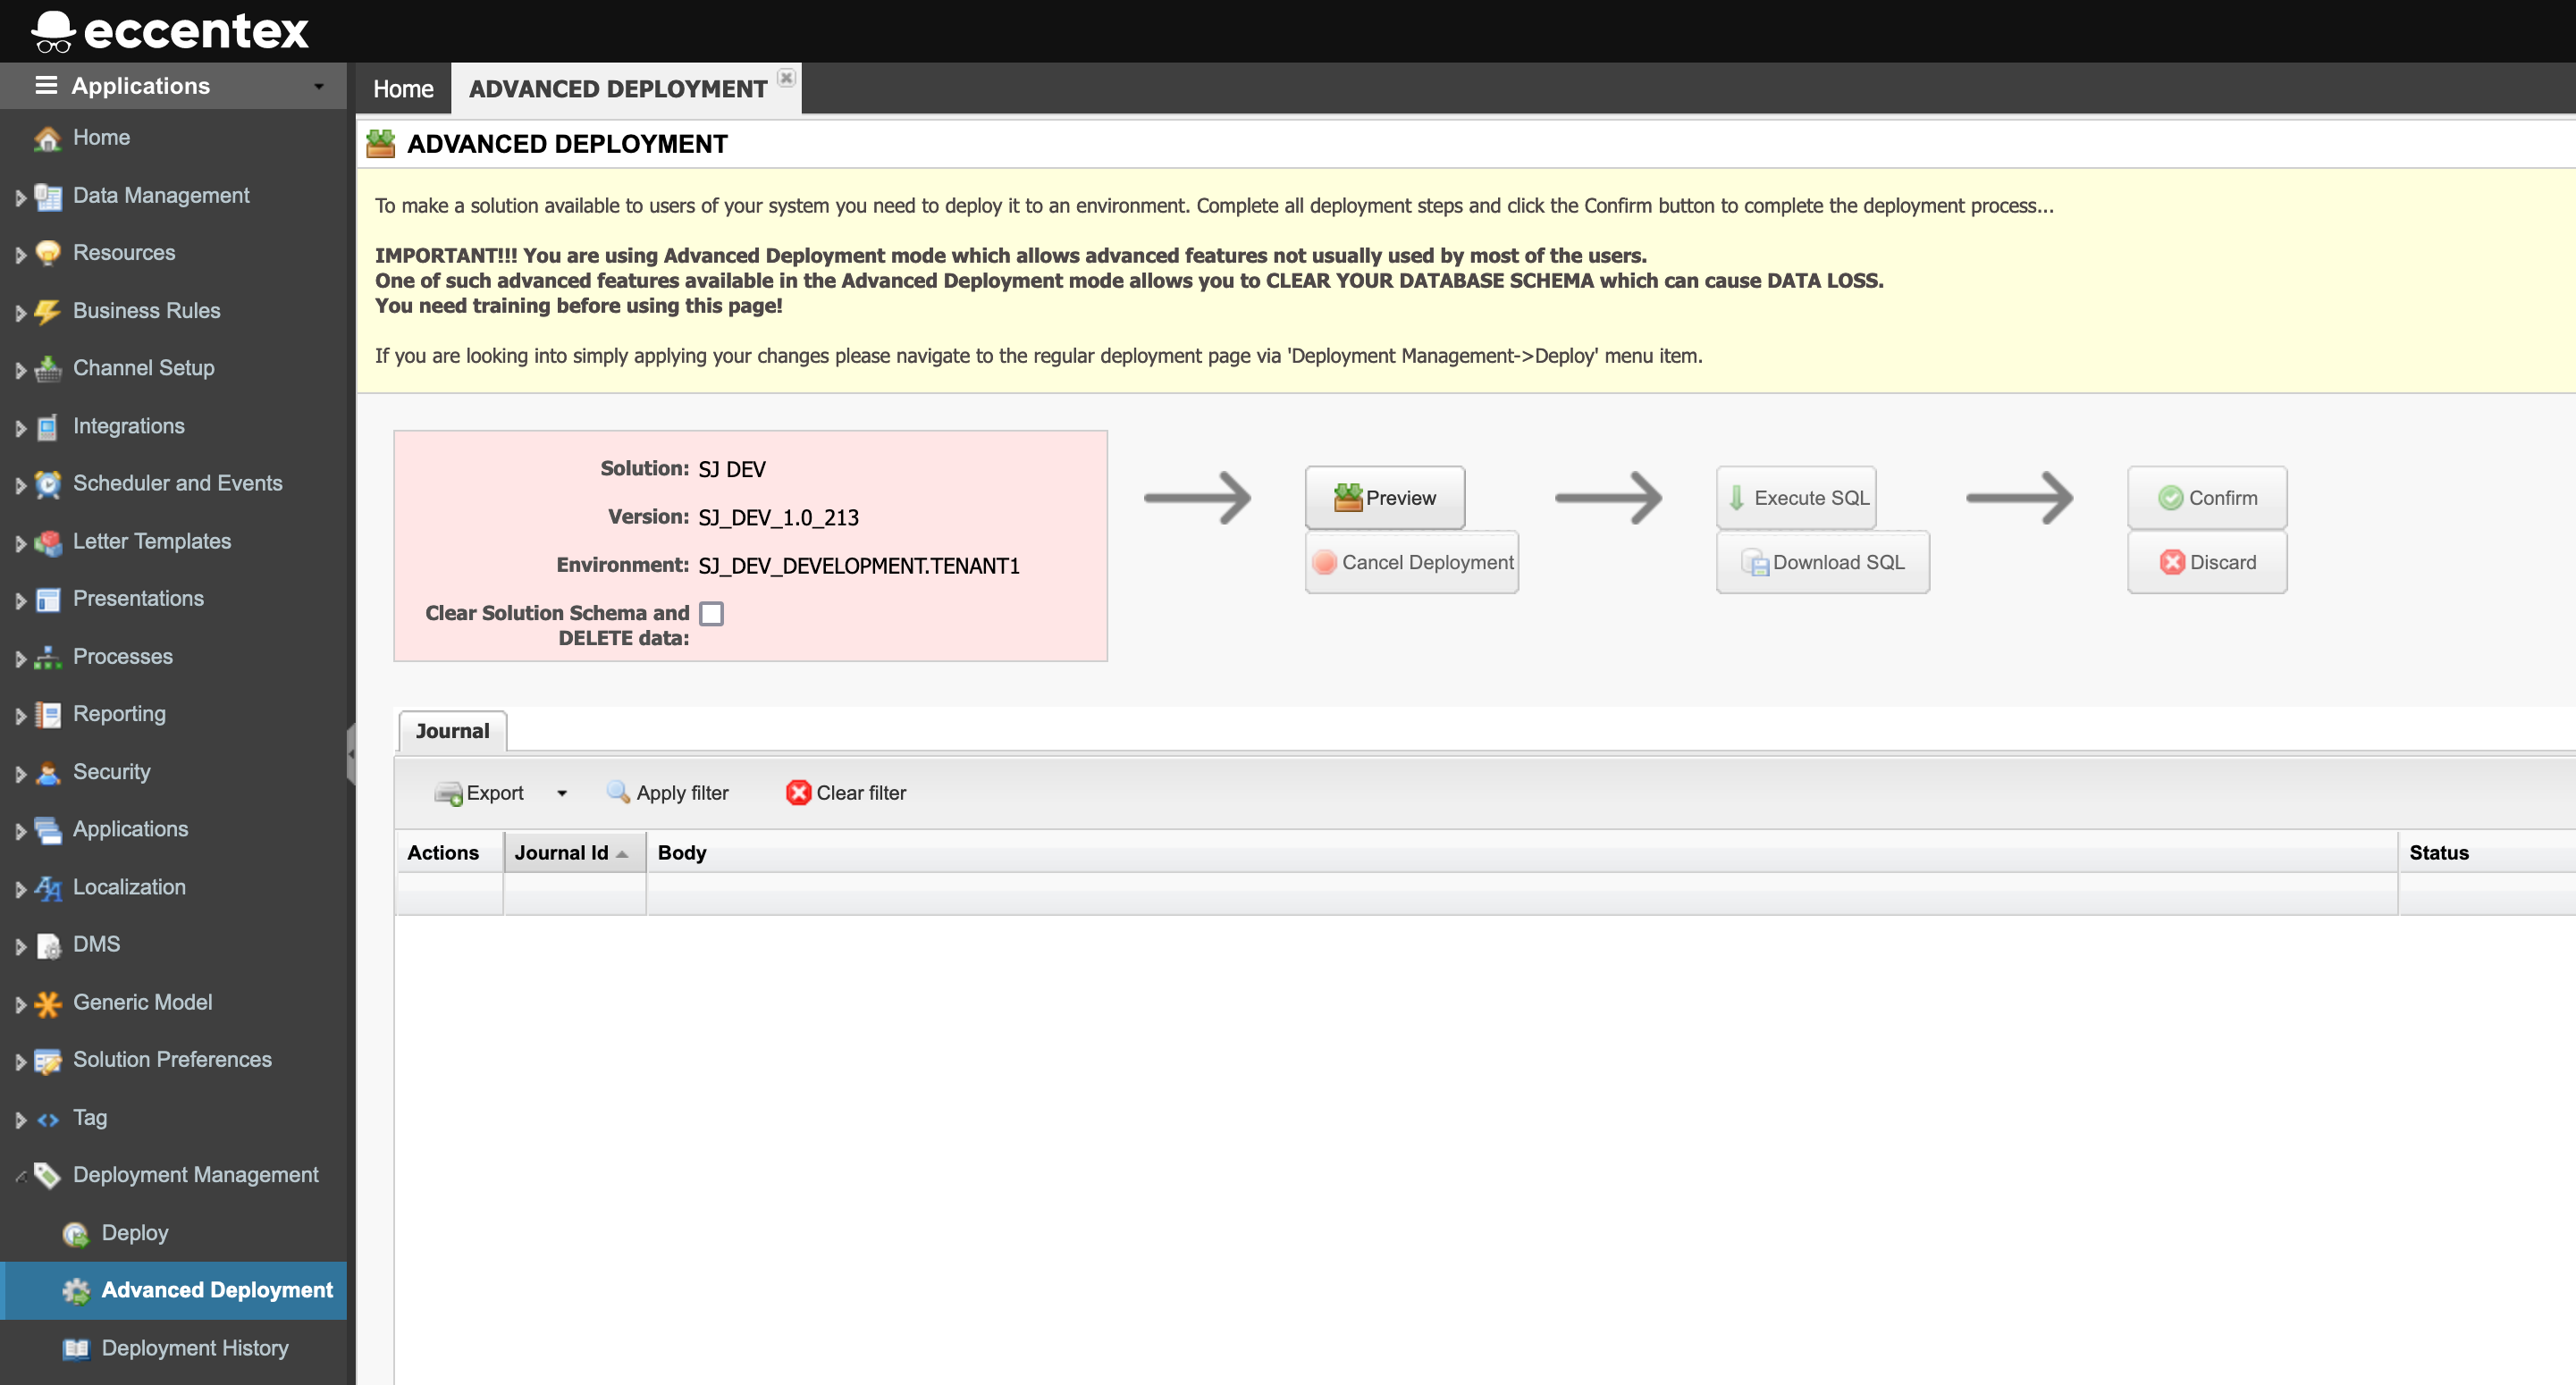
Step 2: Deploy the ServiceJourney solution
- Click the

- Navigate to Deployment Management → Advanced Deployment
- Click the Preview button to start the deployment.
- Click the Execute SQL button
- Click the Confirm button
Step 3: Set User Roles
- On the top right, navigate to
- Click the hyperlink of your user
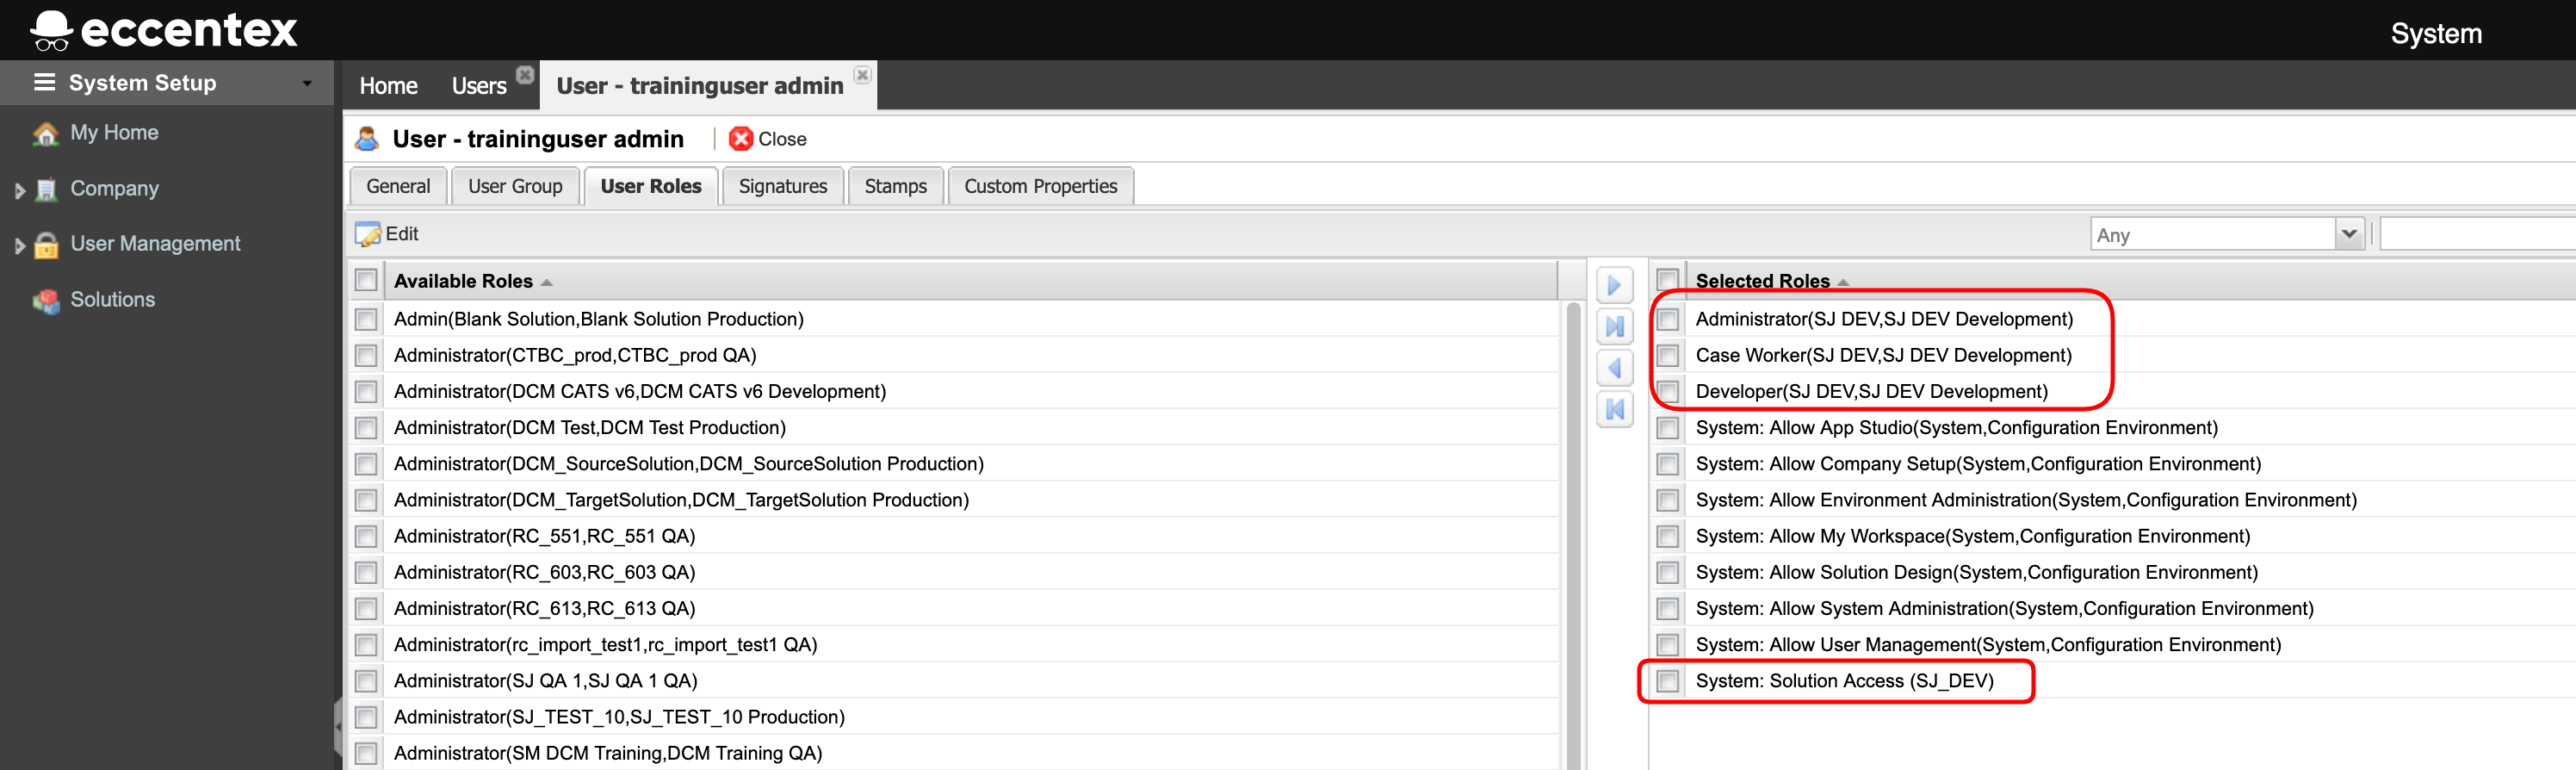
- Go to User Roles tab
- Select the ServiceJourney solution from the dropdown list
- Click the Edit

- Select the following roles from the Available Roles list
- Administrator(your solution)
- Caseworker(your solution) OPTIONAL
- Developer(your solution) OPTIONAL
- Click the Add

- Click the Save

- Select the Configuration Environment from the dropdown list
- Click the Edit

- Select the System: Solution Access(your solution) role from the Available Roles list
- Click the Add

- Click the Save

- Logout and Login again to activate the new roles
- Wait while the init configuration will be finished. You can check it in Setup → Advanced setup → Maintenance.
Step 4: Import ServiceJourney Configurations
- Download the latest configuration from ServiceJourney - Release Management (filename like SJ_FullConfiguration_#.0.zip)
- On the top right, navigate to

- On the left, navigate to

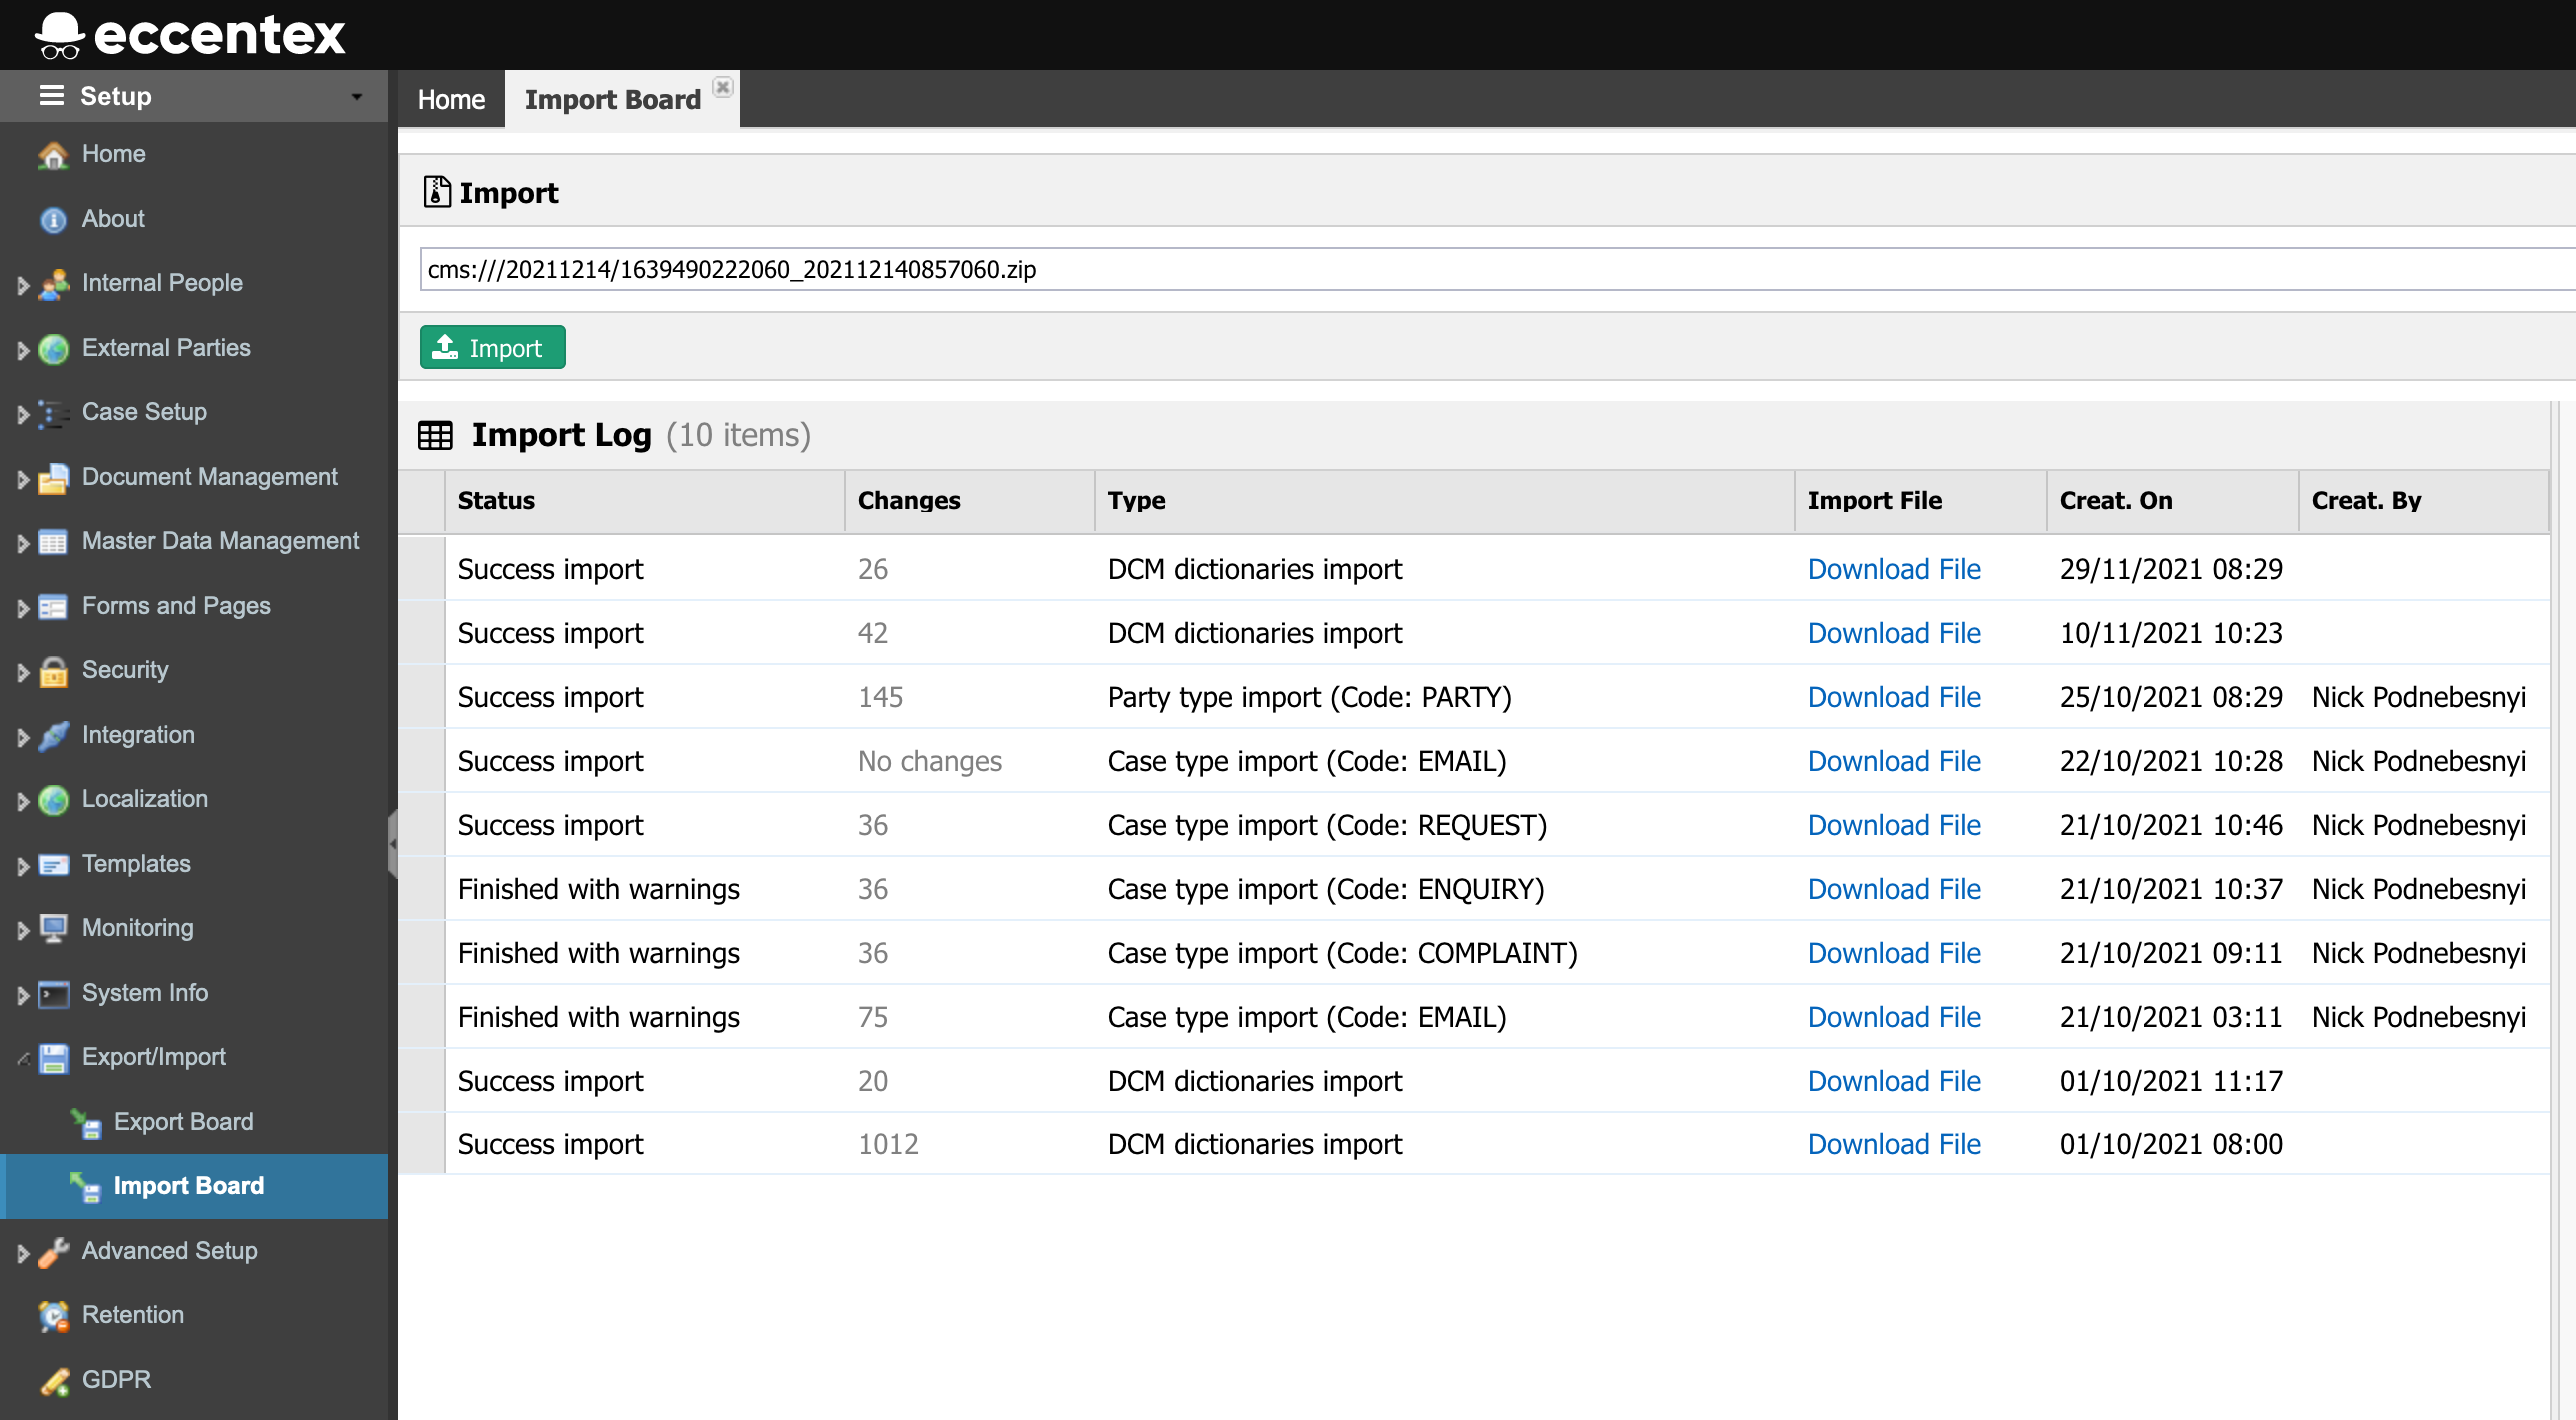
- Navigate to Export/Import → Import Board
- Click the magnifier button to select and upload the configurations file (filename like SJ_FullConfiguration_#.0.zip)
- Click the Import button
- Do an Advanced Deploy
Step 5: Add the Empty Party
- On the left, navigate to
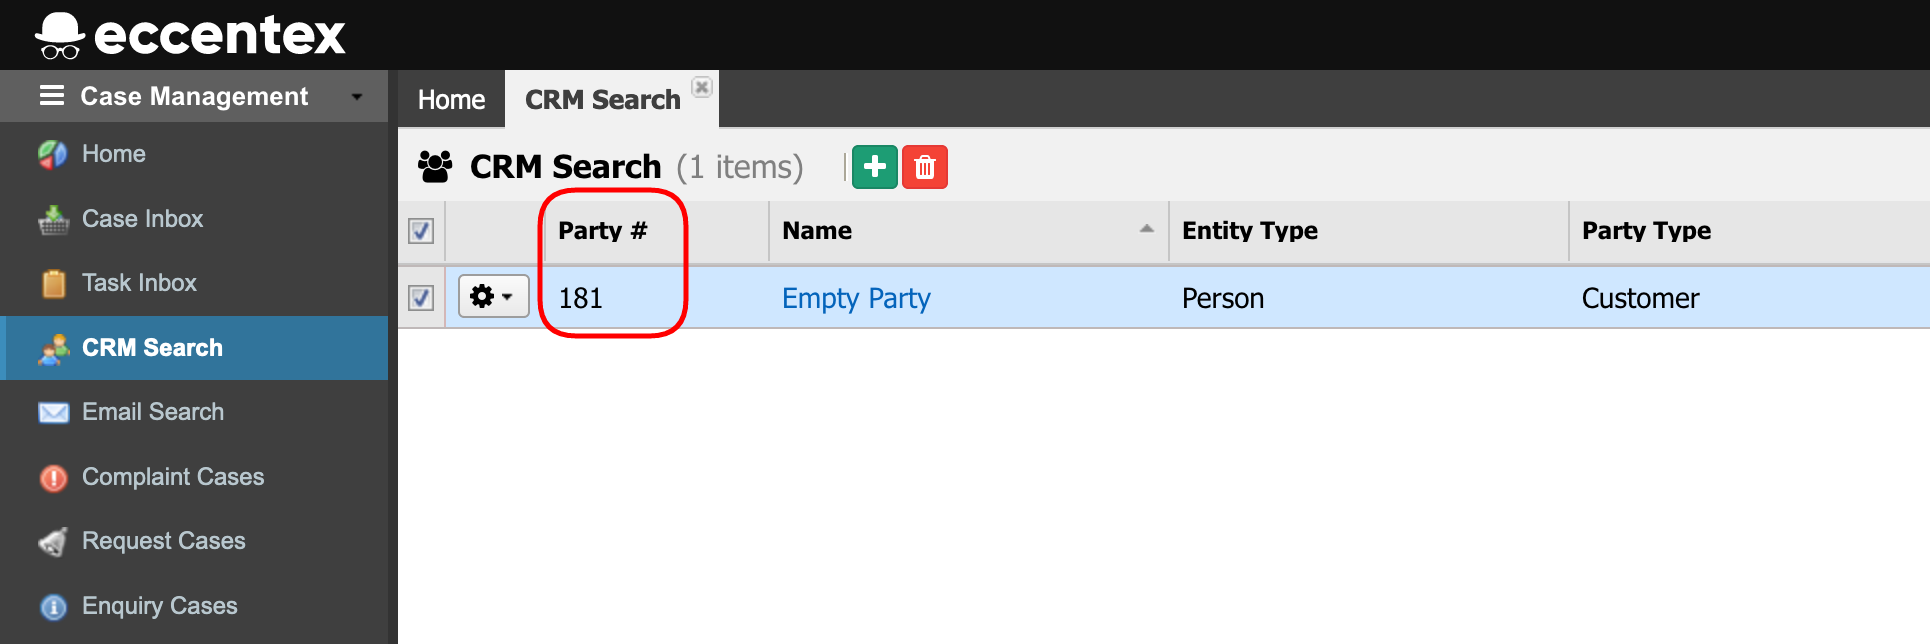
- Click the Add New button
- Fill the Add Party form using the following data:
- Entity Type: Person
- Party Type: Customer
- Name: Empty Party
- Save the new Party
- Copy the Party ID, it is needed to set the environment variables in the next step
- On the top right, navigate to
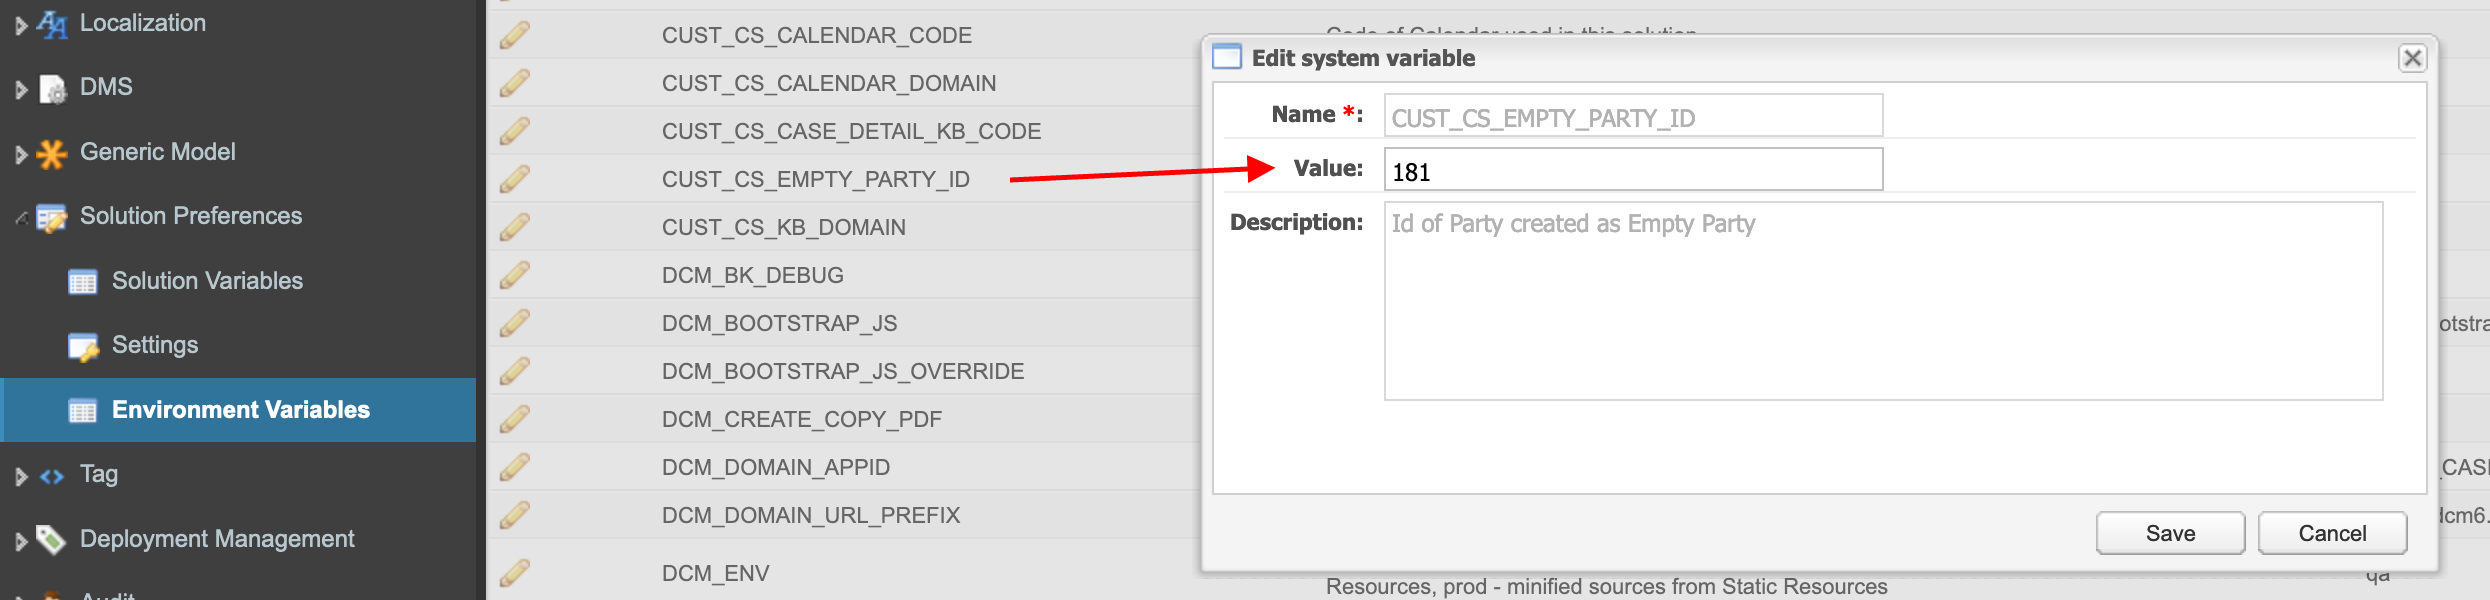
- On the left, navigate to Solution Preferences →
- Click the Edit

- Insert the Party ID of the Empty Party from the previous step in the Value field
- Save it
Step 6: Set the EMail Environment Variables
- On the top right, navigate to
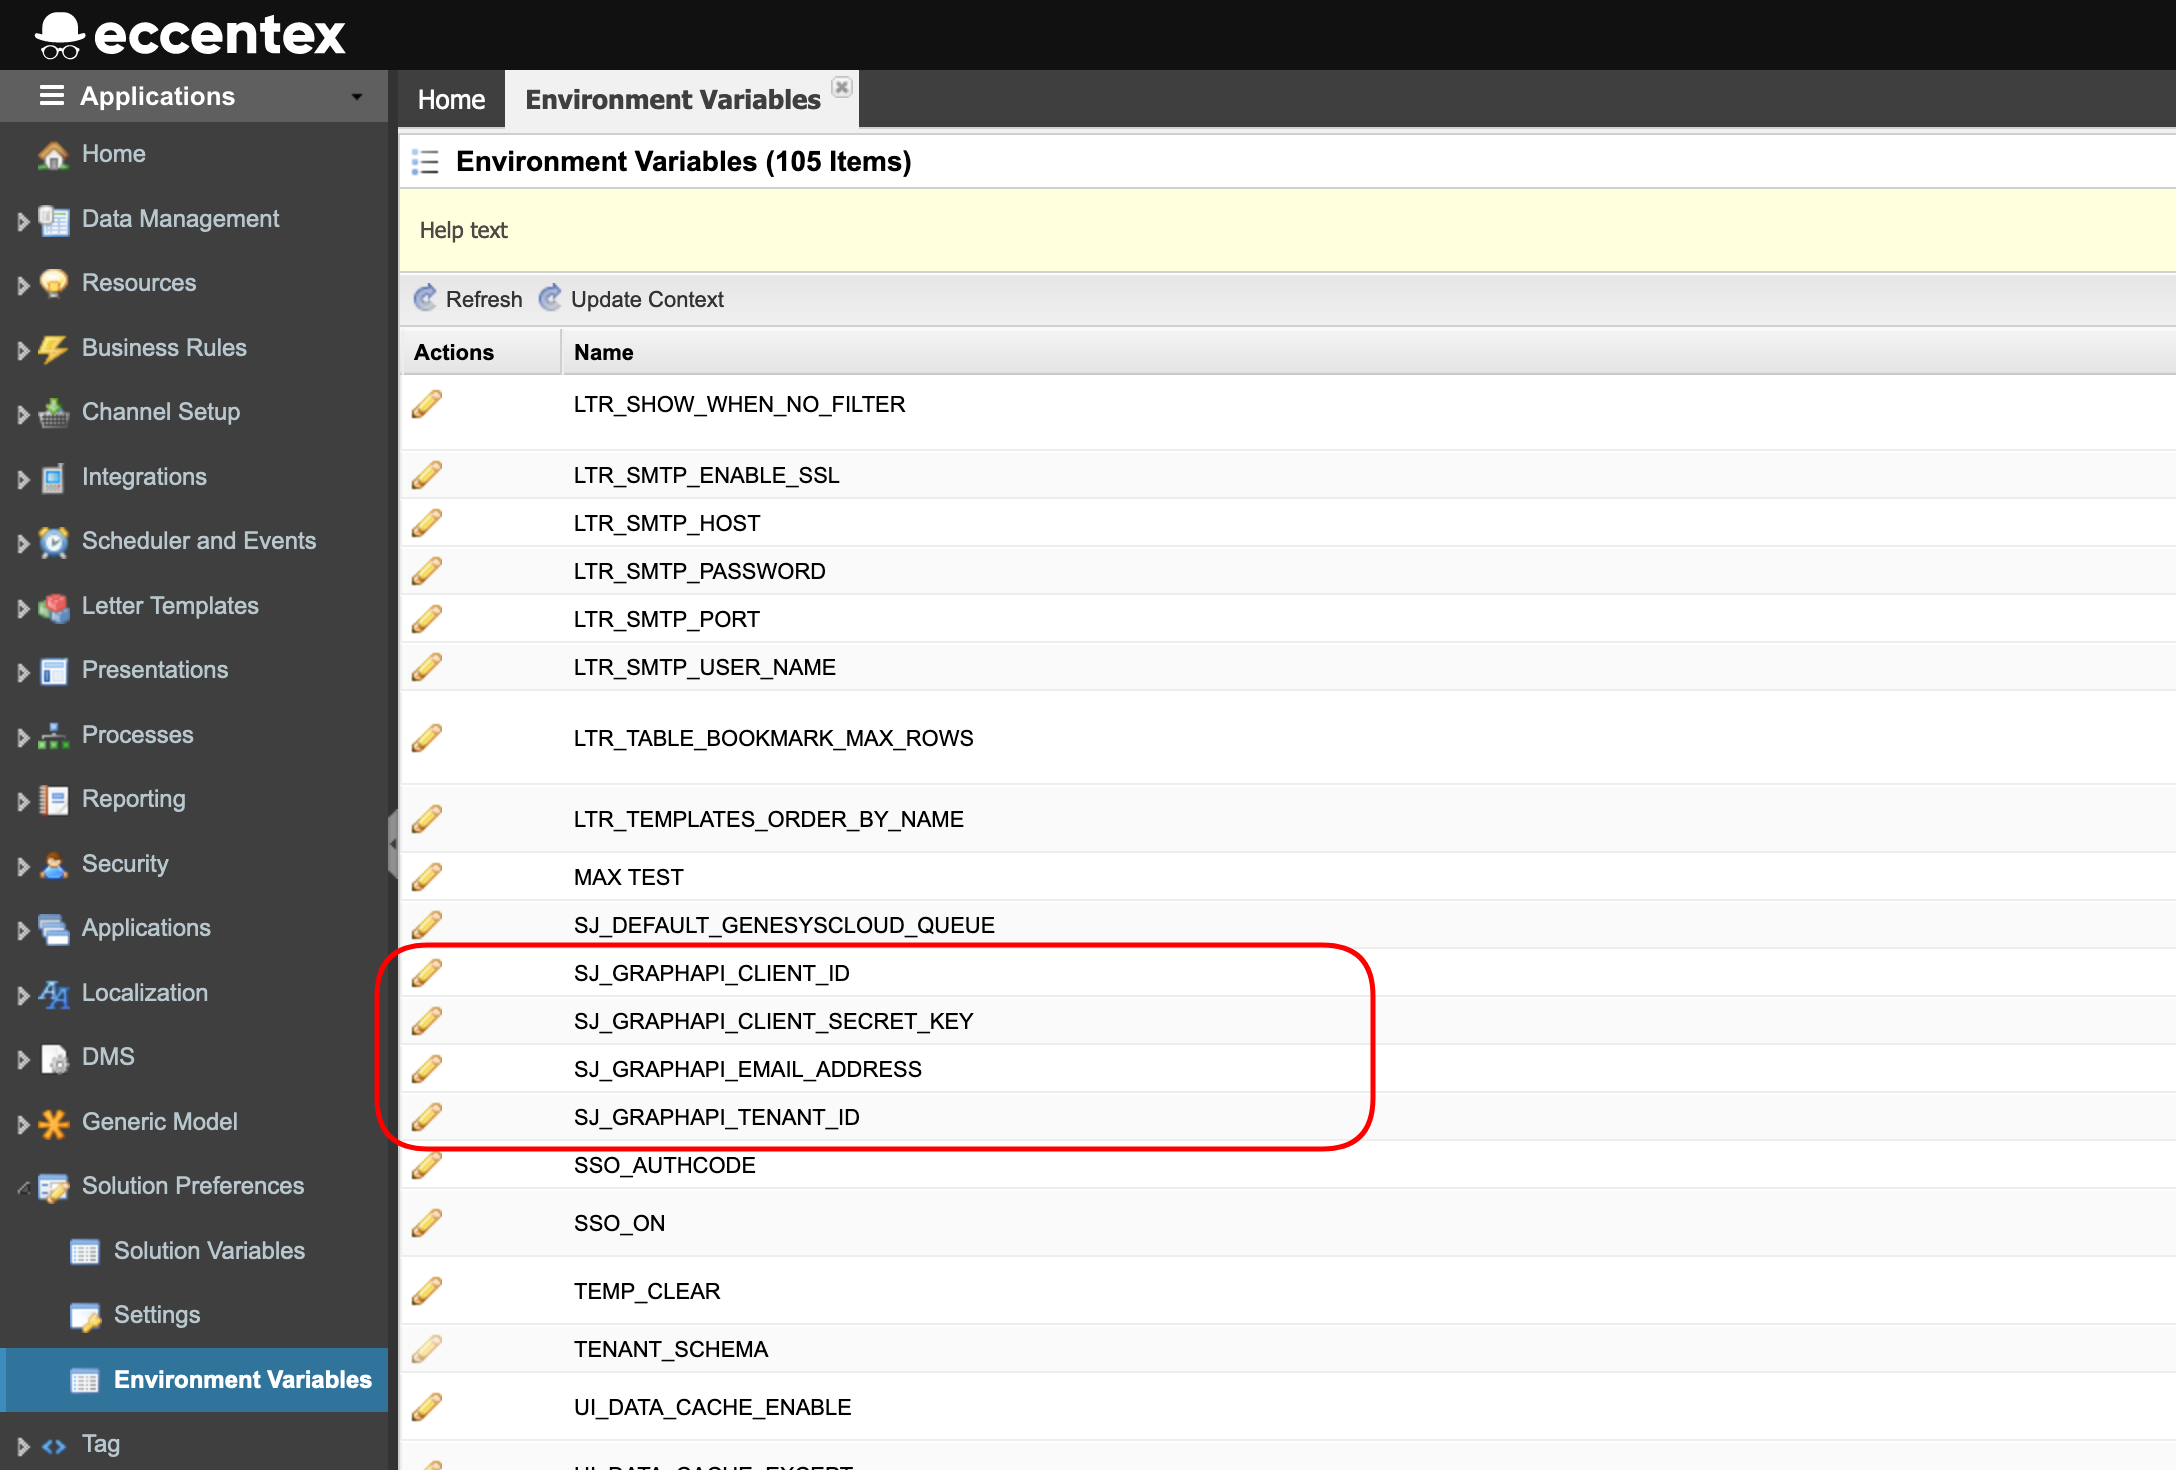
- On the left, navigate to Solution Preferences →
- Click the Edit

| Email Service | Environment Variable Name | Description | Sample |
|---|---|---|---|
Graph API | SJ_GRAPHAPI_CLIENT_ID | Graph API Client Id | b00f0abc-1234-1234-1234-54f601edec22 |
| SJ_GRAPHAPI_CLIENT_SECRET_KEY | Graph API Secret key | DEC2022~OQG0kHzhASDFG~HV75pDOSMw1QWERTY | |
| SJ_GRAPHAPI_EMAIL_ADDRESS | Graph API email address | sjtest123@servicejorneydev.onmicrosoft.com | |
| SJ_GRAPHAPI_TENANT_ID | Graph API tenant id | b00f0abc-4567-4567-4567-54f601edec22 | |
| POP3 | CAPTURE_EMAIL_ADDRESS | SMTP email address | sjtest123@mypopmail.us |
| CAPTURE_EMAIL_USERNAME | SMTP account username | sjtest123@mypopmail.us | |
| CAPTURE_EMAIL_PASSWORD | SMTP account password | 12345678 | |
| CAPTURE_EMAIL_SERVER | SMTP email server | servicejorneydev.mypopmail.us | |
| SMTP | EMAIL_PORT | SMTP port | 25 |
| EMAIL_SMTP_SERVER | SMTP server | servicejorneydev.mysmtpemail.us | |
| EMAIL_USERNAME | Email username | sjtest123@mysmtpemail.us | |
| ENV_EMAIL_FROM | Email address | sjtest123@mysmtpemail.us |
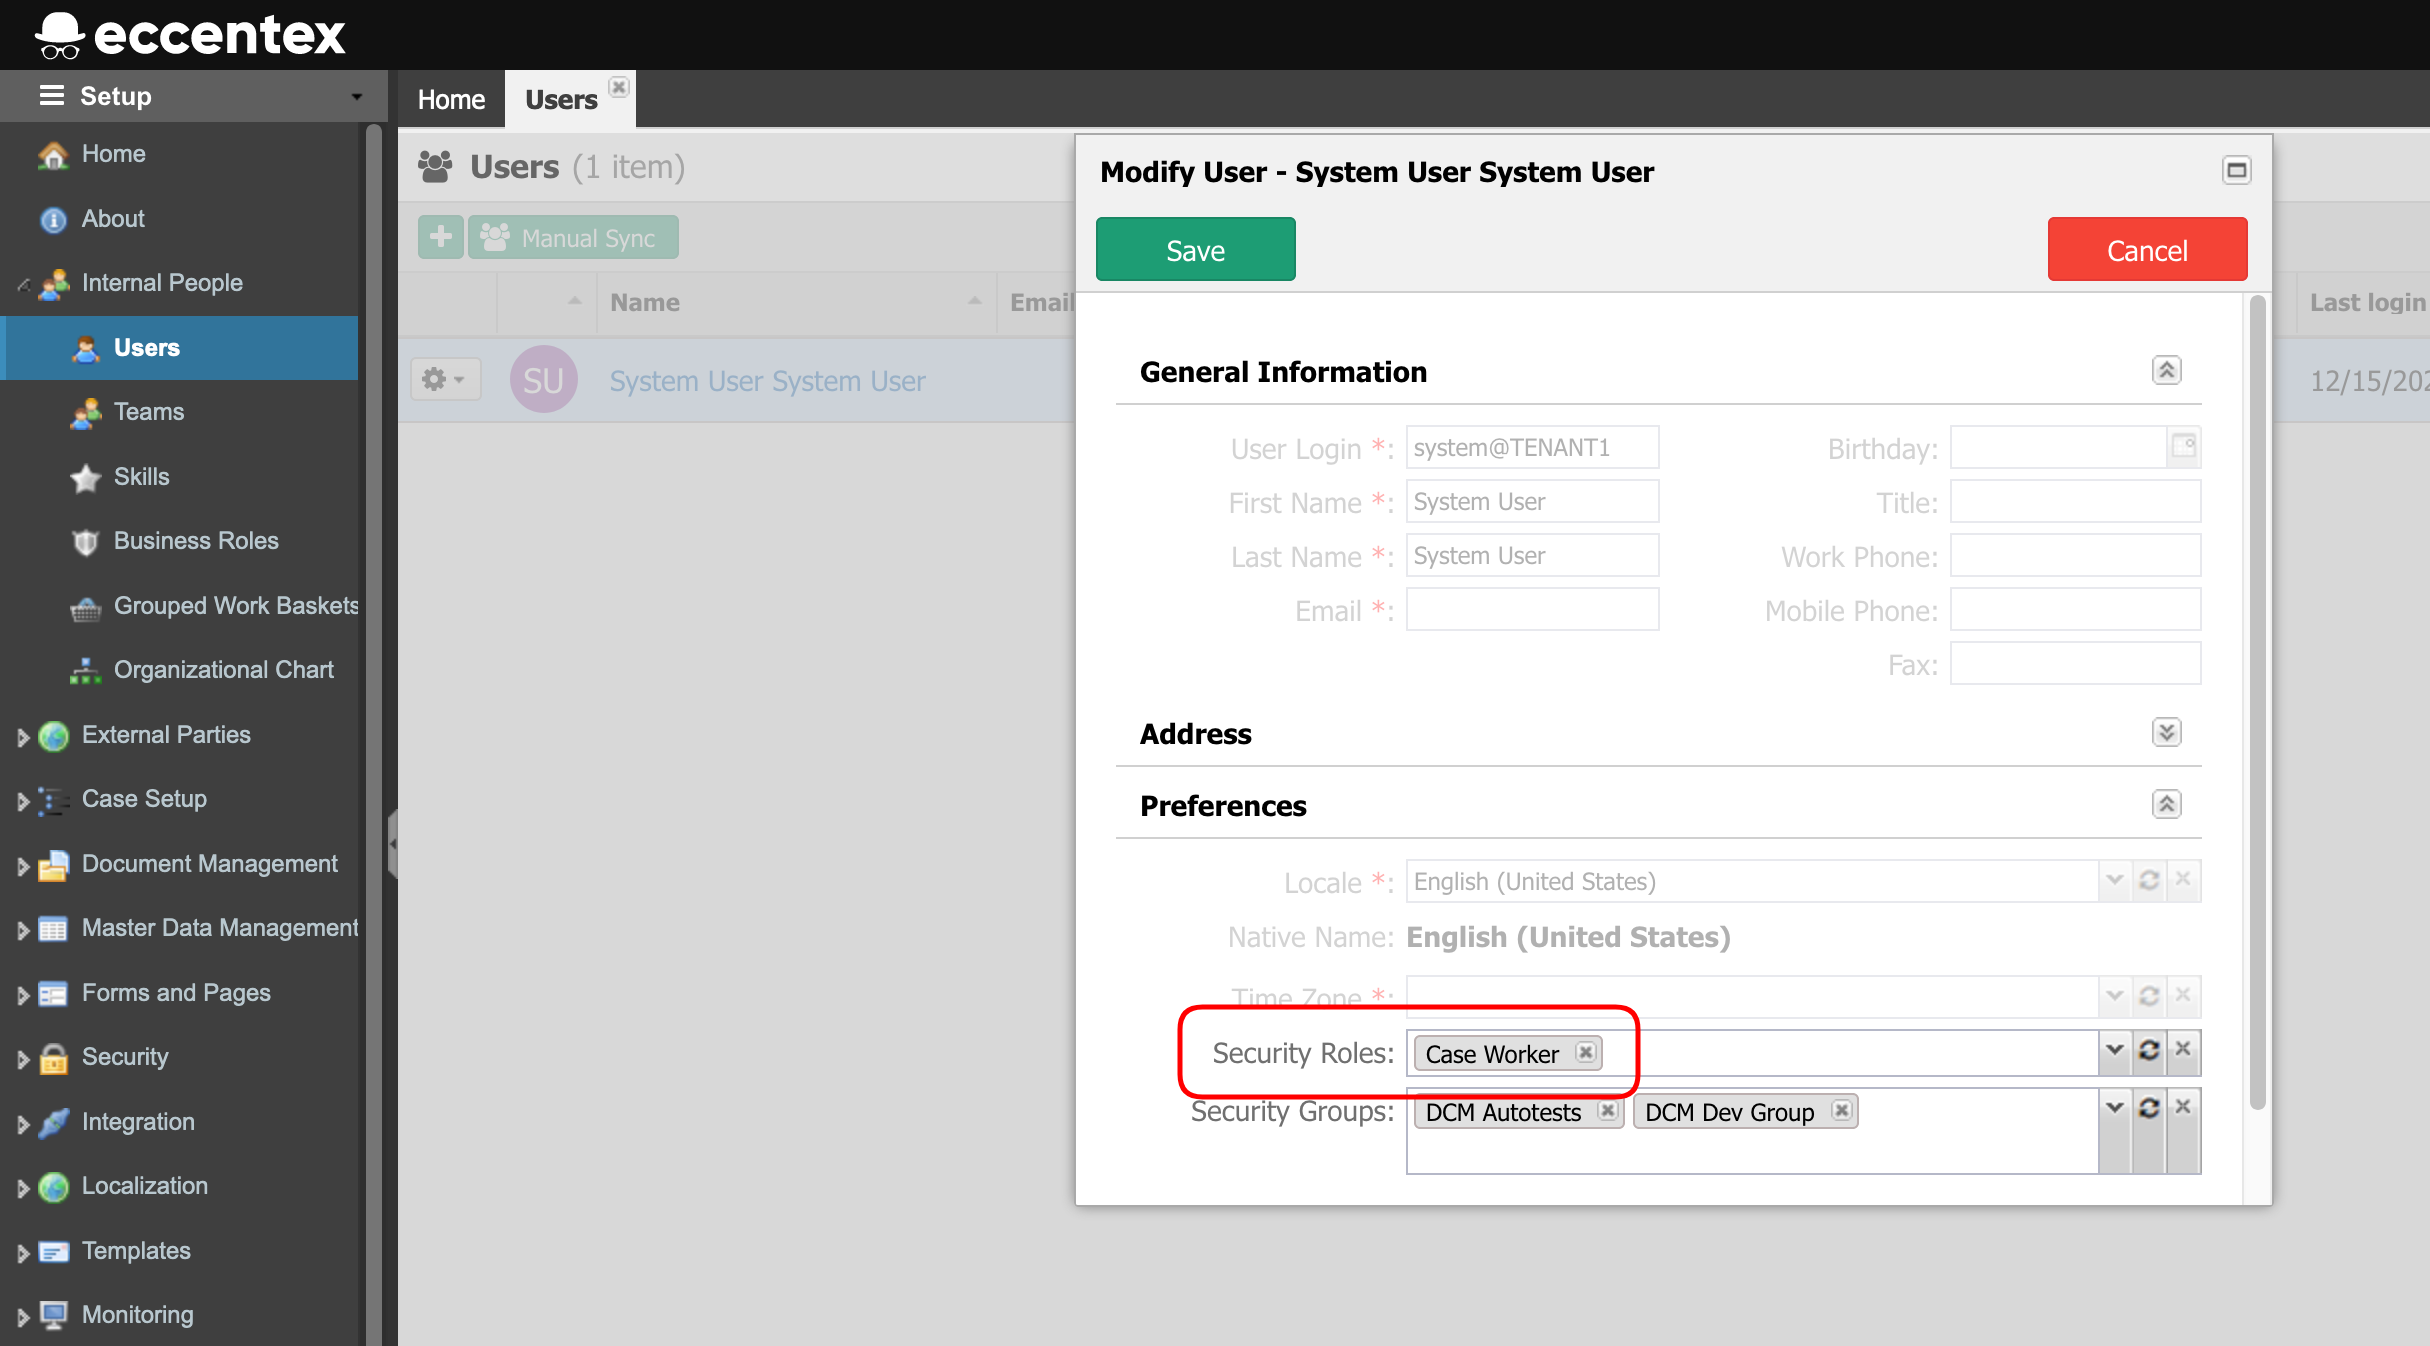
Step 7: Set Security Roles
- On the top right, navigate to
- On the left, navigate to
- Navigate to Internal People → Users
- On the right panel, search for name 'System'
- Click on the gear button
- On Security Roles select the role Case Worker from the dropdown list
- Save
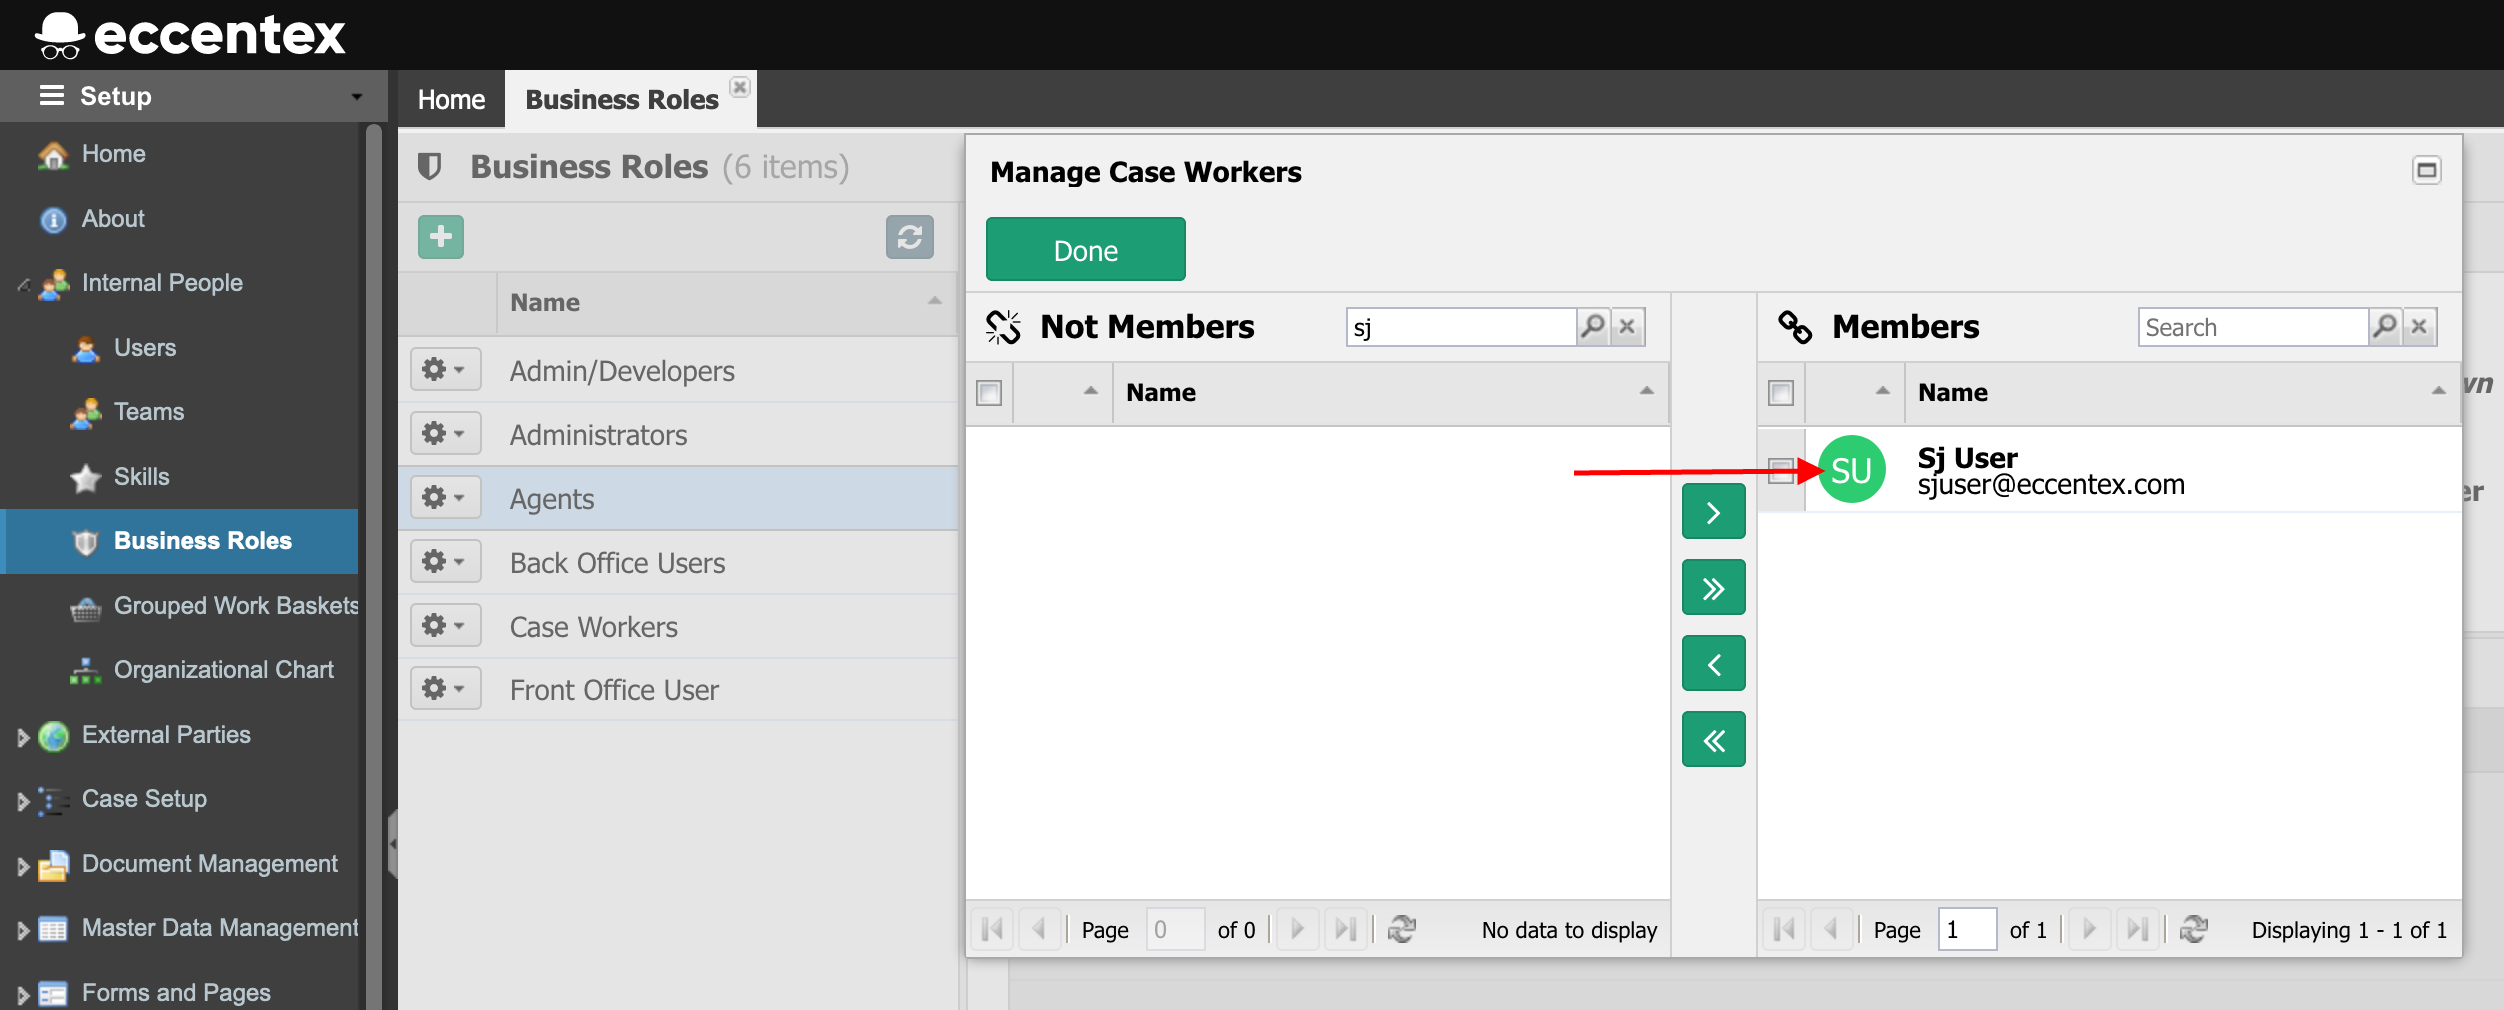
- Navigate to Internal People → Business Roles
- Add the selected Case Worker(s) to each of the ServiceJourney Business Roles
- Click Done after adding the members to the Business Role
Step 8: Configure Genesys Cloud
- Сonfigure Genesys Cloud following the Installing the ServiceJourney Connector for Genesys Cloud guide
Step 9: Import ServiceJourney Dictionary
- Download the latest configuration from ServiceJourney - Release Management (filename like export-data_export_abcd1234.zip)
- On the top right, navigate to
- On the left, navigate to
- Navigate to Export/Import → Import Board
- Click the magnifier button to select and upload the ServiceJourney Dictionaries file (filename like export-data_export_abcd1234.zip)
- Click the Import button
Step 10: Set Environment Variables
- On the top right, navigate to
- On the left, navigate to Solution Preferences →
- Click the Edit

- Set the following environment variables:
- SJ_DEFAULT_GENESYSCLOUD_QUEUE
- SJ_GRAPHAPI_EMAIL_ADDRESS

Step 11: Configure Admin Settings
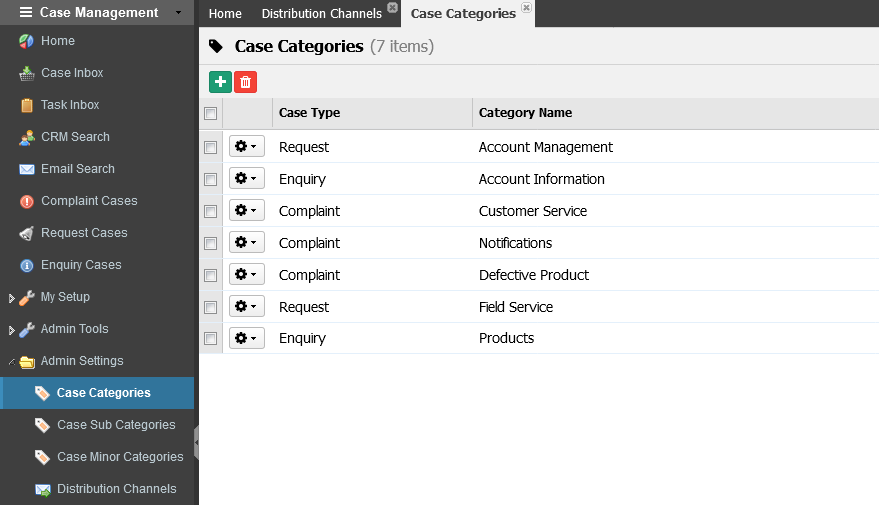
11.1 Check the Case Categories
- On the top right, navigate to
- On the left, navigate to
- Navigate to Admin Settings → Case Categories
- Check Case Type field. It should be filled such as:
| Case Type | Category Name |
|---|---|
| Complaint | Customer Service |
| Complaint | Defective Product |
| Complaint | Notifications |
| Enquiry | Account Information |
| Enquiry | Products |
| Request | Account Management |
| Request | Field Service |
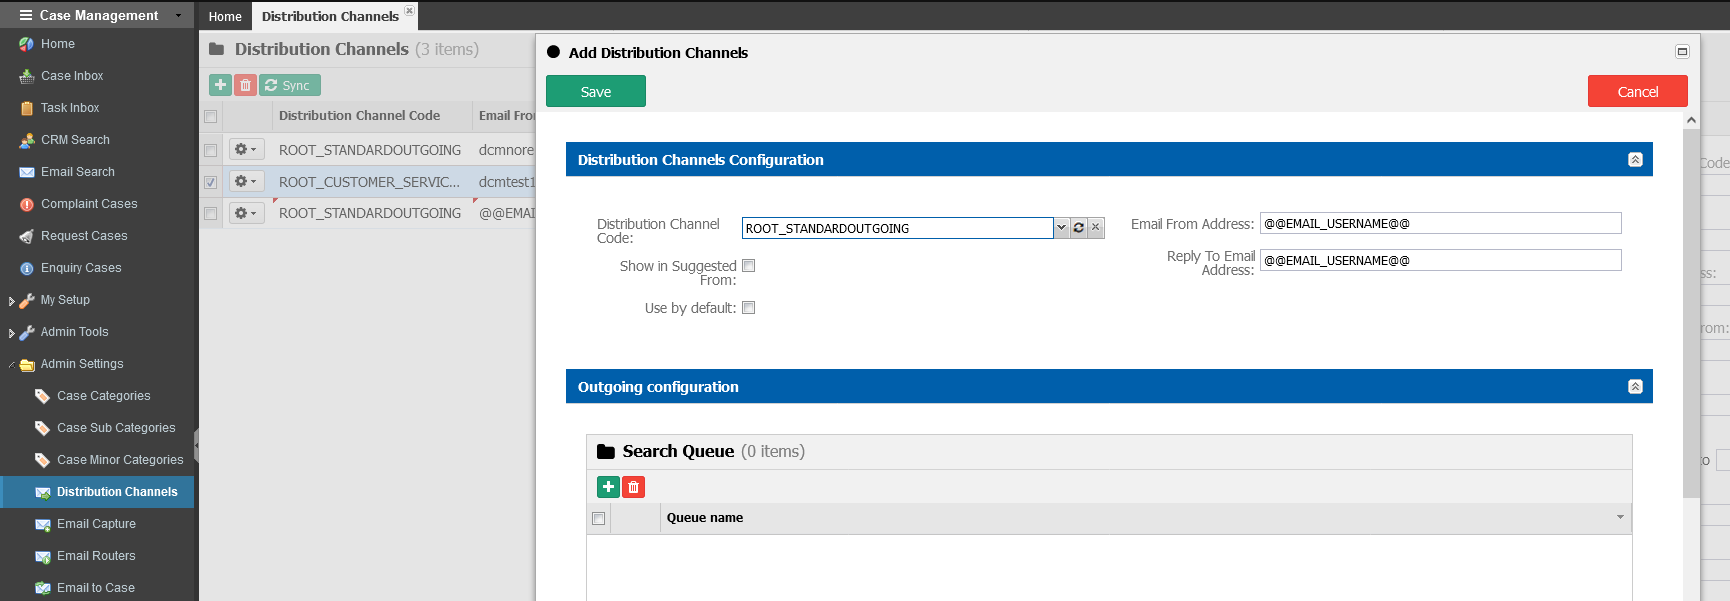
11.2 Create the Distribution Channels Config
- On the top right, navigate to
- On the left, navigate to
- Navigate to Admin Settings → Distribution Channels
- Add a default distribution channel
- Email From Address: from EMAIL_SETTINGS
- Reply-To Email Address: from EMAIL_SETTINGS
- Use by default: Checked
- Email From Address: from EMAIL_SETTINGS
There must be a default distribution channel configured
11.3 Create the Email Capture Config
- On the top right, navigate to
- On the left, navigate to
- Navigate to Admin Settings → Email Capture
- Add the email capture configuration for the default SJ Default Capture channel
- Fill the required fields as follow:
- Channel Schema: As was set in Installing ServiceJourney in AppBase
- Default Queue: As was set in DEFAULT_QUEUE
- New Party Type: Customer (from EMPTY_PARTY)
- Entity Type: Person (from EMPTY_PARTY)
- Default Priority: Normal
- Channel Schema: As was set in Installing ServiceJourney in AppBase
If you don't see the default channel schema in the dropdown list, you have to Synchronized the form using the sync 
11.4 Create the Email Routers Config
- On the top right, navigate to
- On the left, navigate to
- Navigate to Admin Settings → Email Routers
- Add an email router configuration
- Fill the required fields as follow:
- Distribution Channel: from DIST_CHANNEL
- Outbound Address: from EMAIL_SETTINGS
- Distribution Queue: from DEFAULT_QUEUE
- Distribution Channel: from DIST_CHANNEL
11.5 Check the Team Notifications Config
- On the top right, navigate to
- On the left, navigate to
- Navigate to Admin Settings → Team Notifications
- Fill the email address for the default ServiceJourney Team
- Back Office Users
- Front Office Users
- Developers
- Back Office Users
Step 12: Enabled the Embedded Mode in AppBase
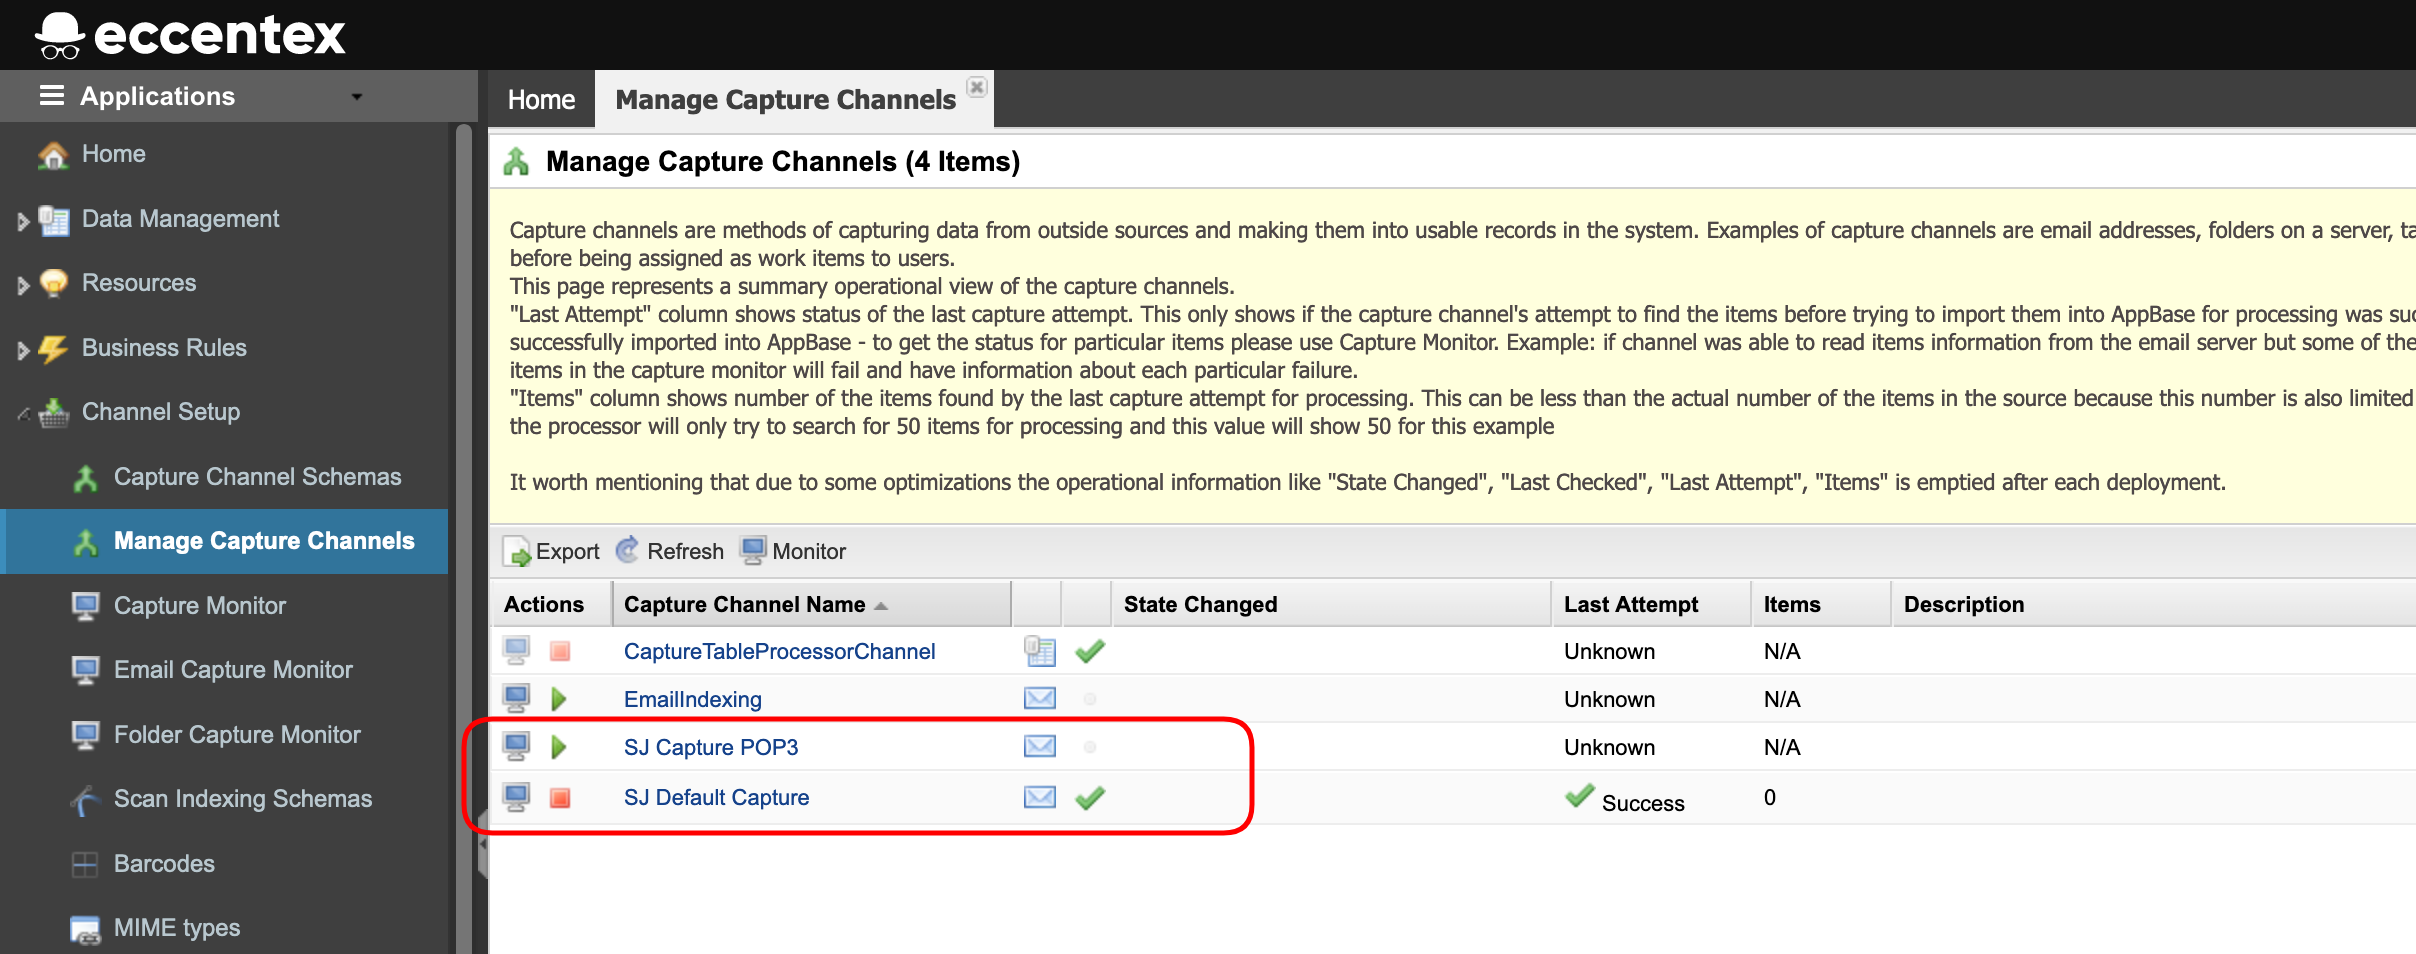
Step 13: Start the Default Capture Channel
- On the top right, navigate to
- On the left, navigate to Channel Setup → Manage Capture Channels
- If you configured the Graph API environment, enable the SJ Default Capture channel by clicking the Enable

- If you configured the POP3 environment, enable the SJ Capture POP3 channel by clicking the Enable