A Knowledge Base can be integrated into a DCM Solution utilizing a Coded Page, an URL, or lunch it by clicking a button.
The next steps will show you how to do this.
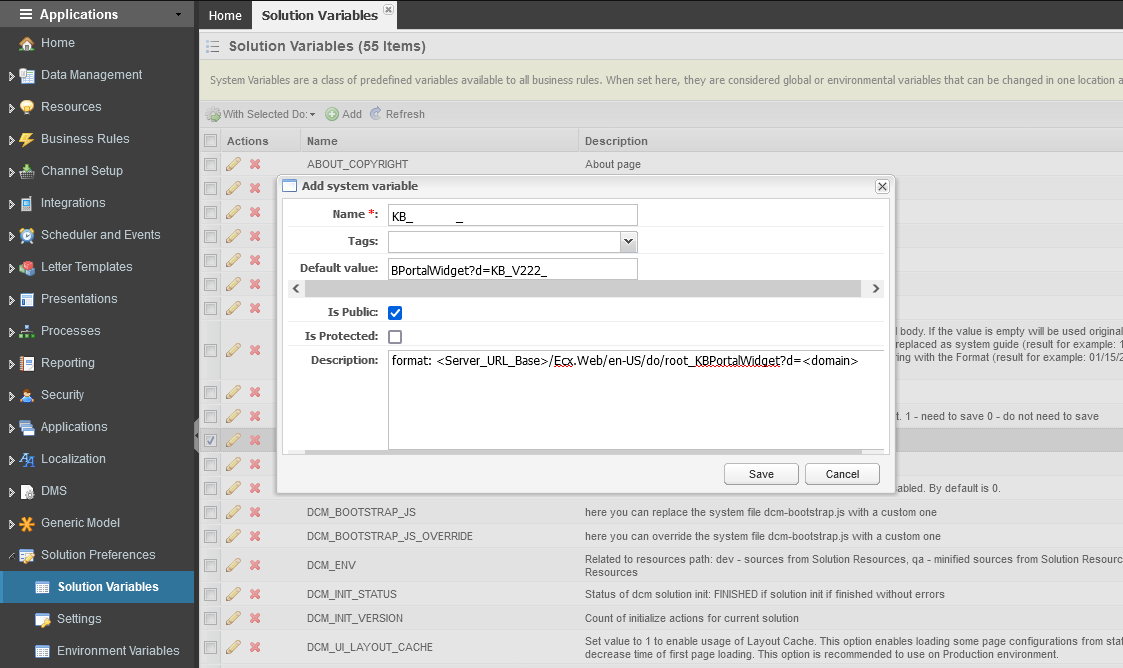
Create Solution Variable in AppSutdio
Navigate to App Studio → <<DCM Solution>>
Go to Solution Preferences → Solution Variables
Create a new variable named KB_SERVER_NAME
Set the Default value with the URL of the KB you need to access. The URL format is <Server_URL_Base>/Ecx.Web/en-US/do/{0}?appid=root_KBReaderApp&d<domain>&{1}
Do not forget to add the '{0}' and '{1}' in the URL as this will be used later in the JavaScript examples code.
Check the option Is Public (true).
Save the new variable.
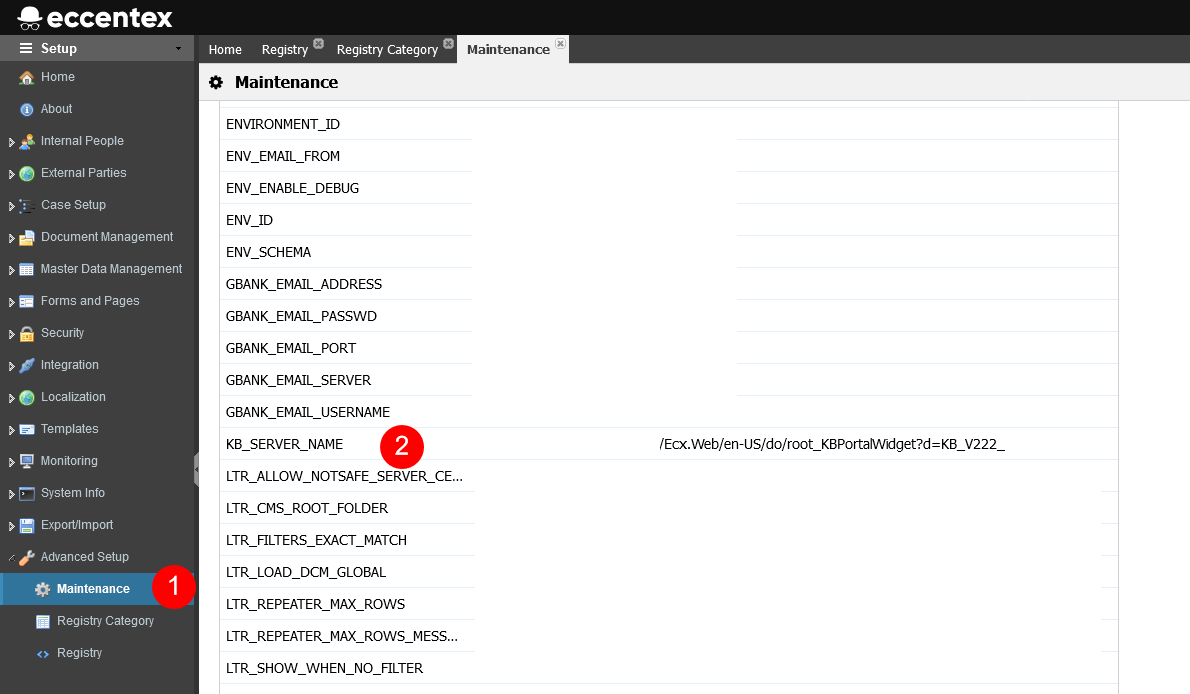
After creating the variable deploy the DCM Solution.
After the deployment, validate the value of the variable in Setup → Advanced Setup → Maintenance (1).
Getting the Sample Codes
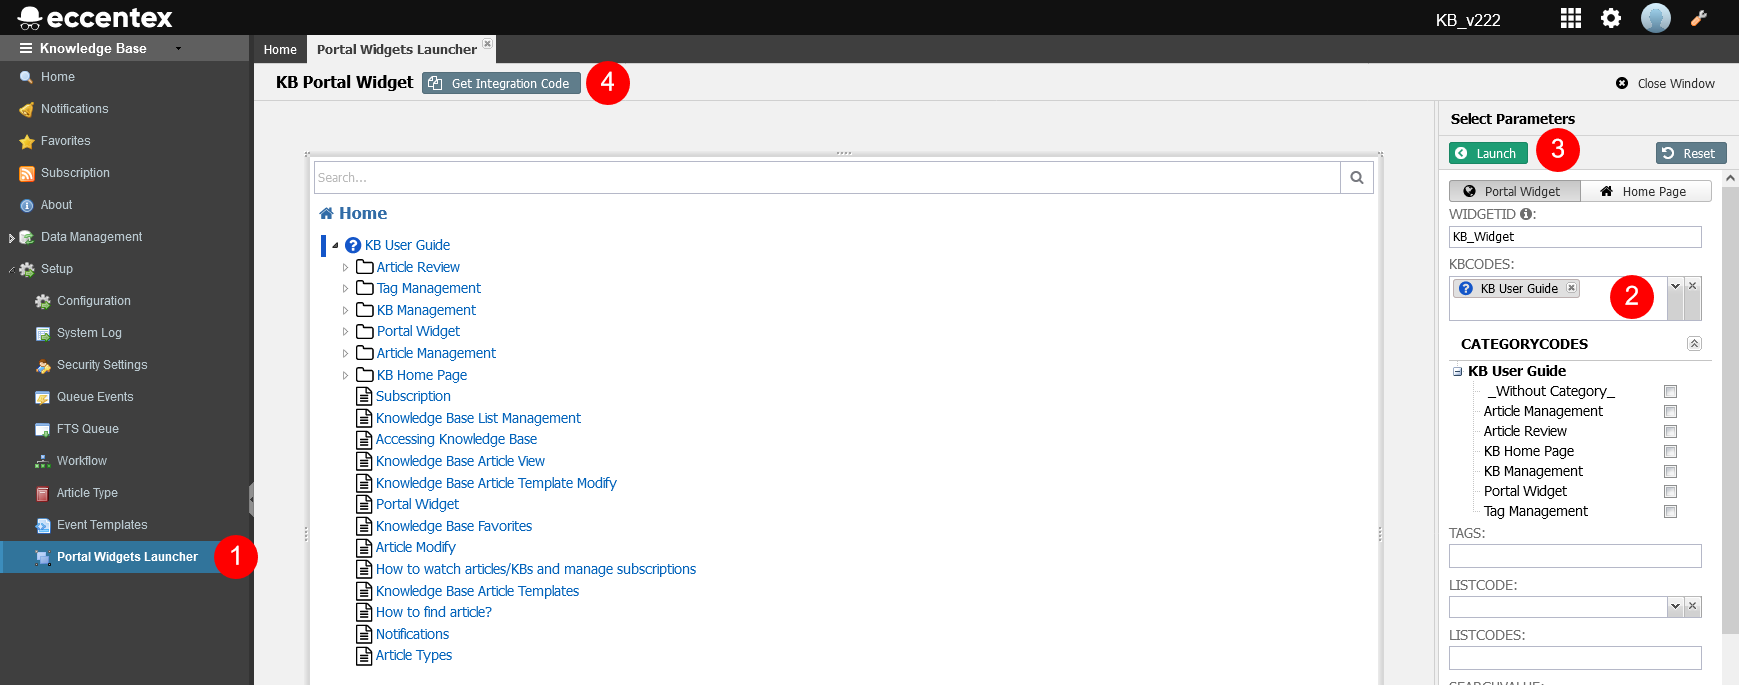
Open the Knowledge Base
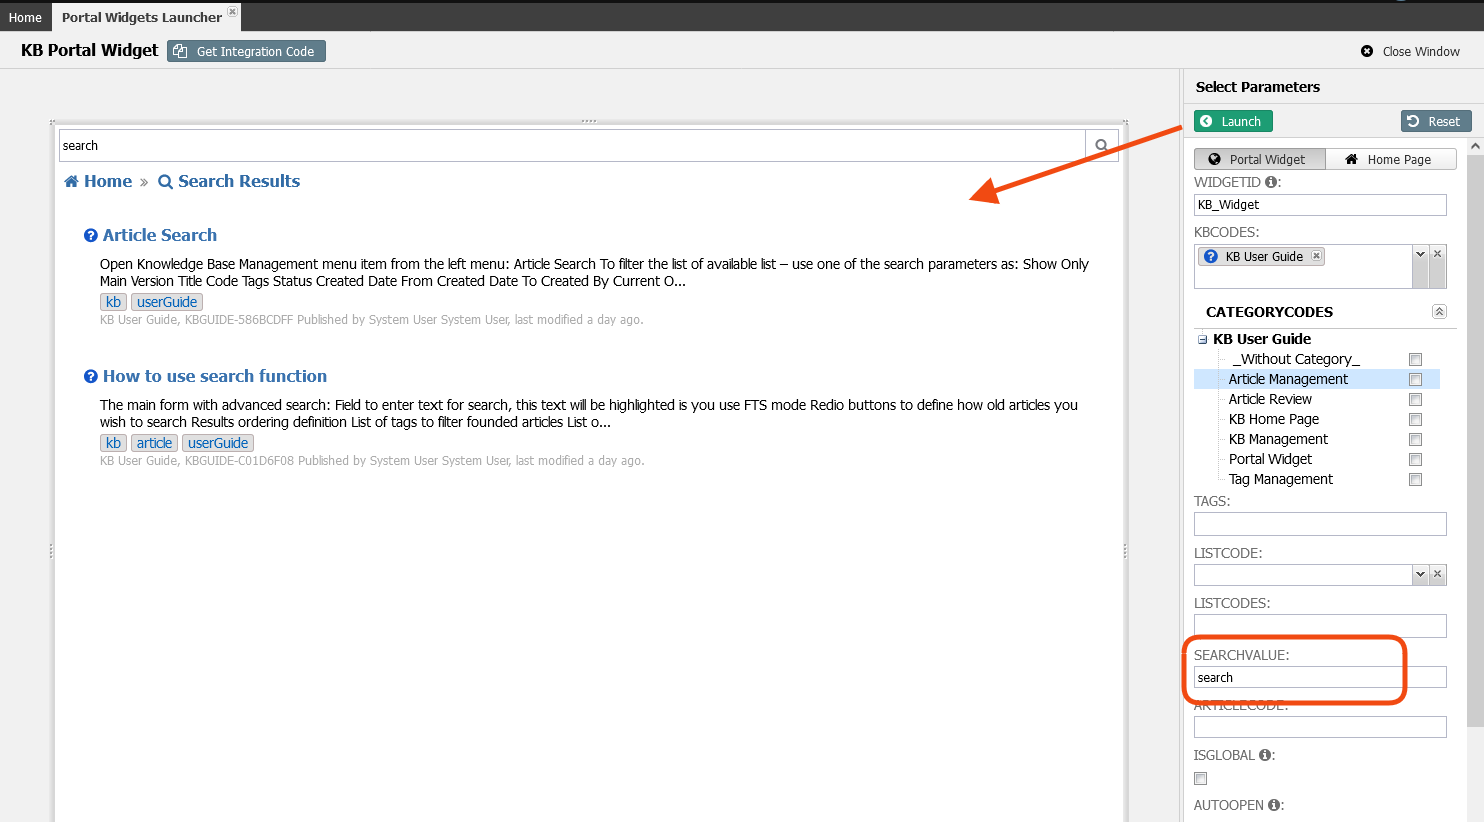
Navigate to Setup → Portal Widget Launcher (1)
In the right panel select the KBCODES of the KBs you want to access (2).
Click the Launch button to open the KB in the left panel (3).
Click the Get Integration Code button to obtain the sample codes for a Coded Page and a Button (4).
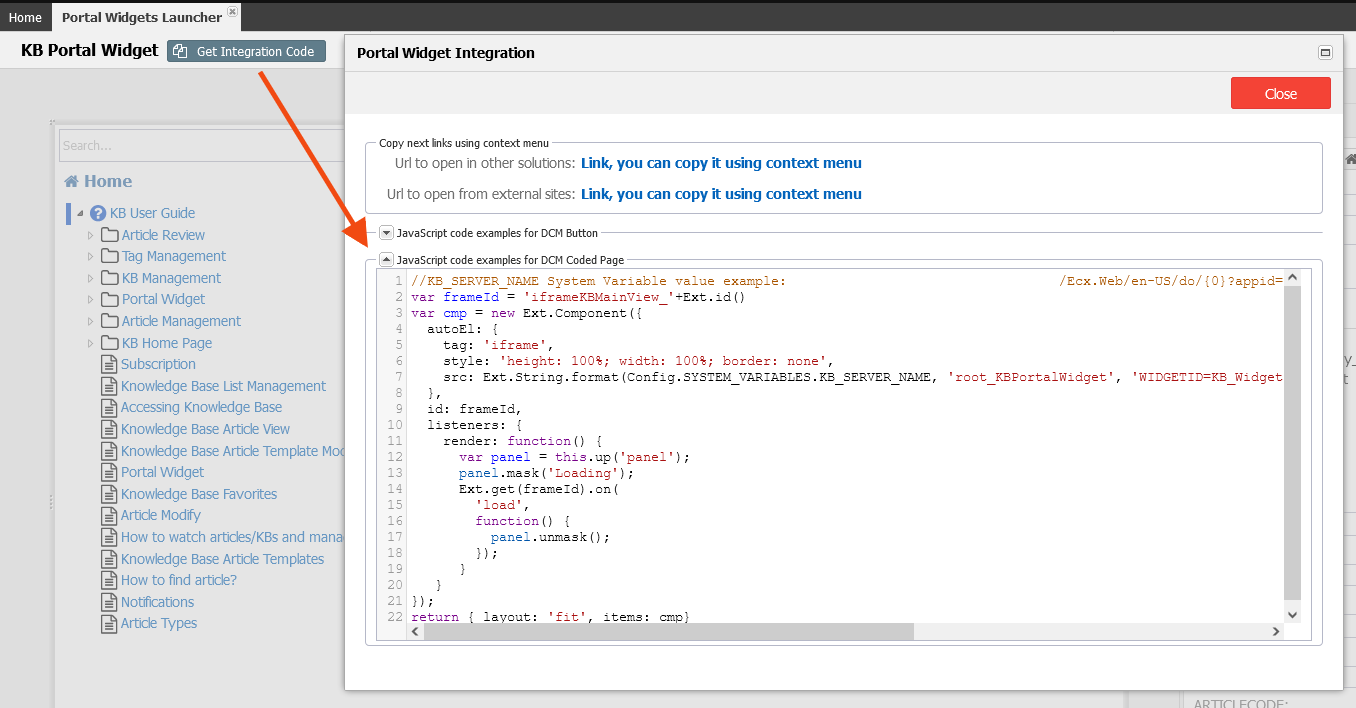
In the Portal Widget Integration pop-up window copy the JavaScript code examples for DCM Coded Page to an editor.
Close the pop-window
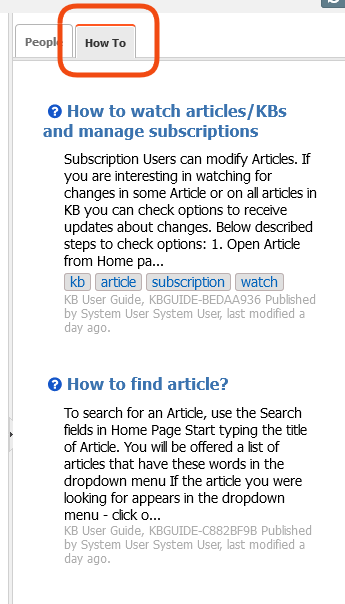
In the right panel add in the SEARCHVALUE field the word 'search' and click the Launch button. This parameter filters the articles and will show only the ones that have the word 'search' on them.
In the Portal Widget Integration pop-up window copy the JavaScript code examples for DCM Button to an editor.
Close the pop-window.
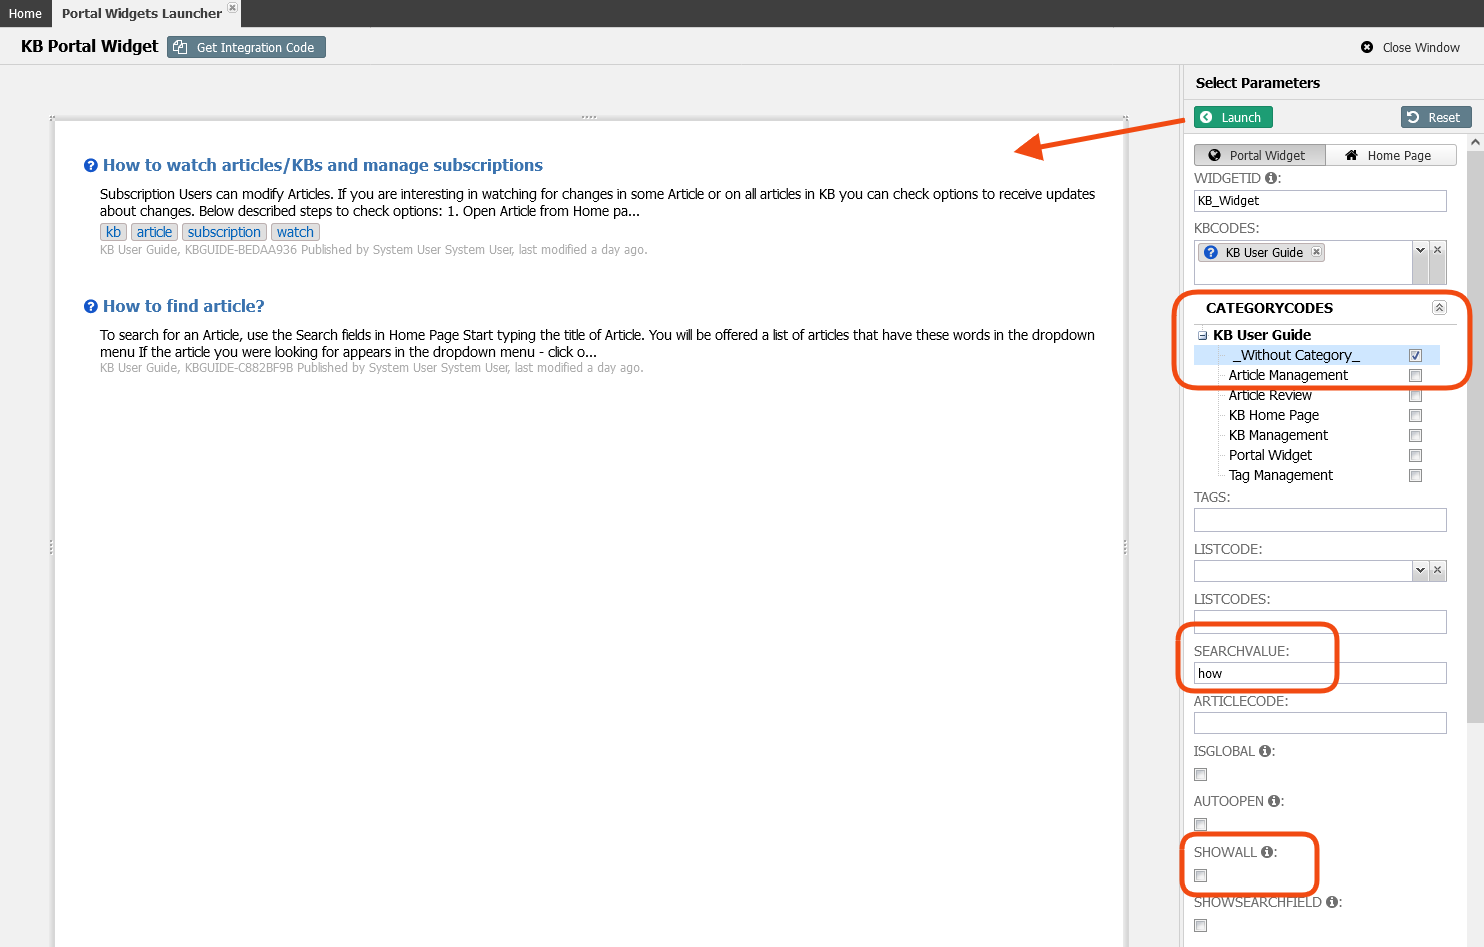
In the right panel, select _Without Category_ under CATEGORYCODES list, type the word 'how' in the SEARCHVALUE field, and uncheck the SHOWALL option. Click the Launch button.
In the Portal Widget Integration pop-up window click the Link, you can copy it using context menu. This will open a new tab in the browser, copy the URL to an editor.
Close the pop-window.
Close the Portal Widget Launcher
Adding a KB Tab into a Case Page
On the top right, navigate to → <<your solution>>
On the left, navigate to → Setup
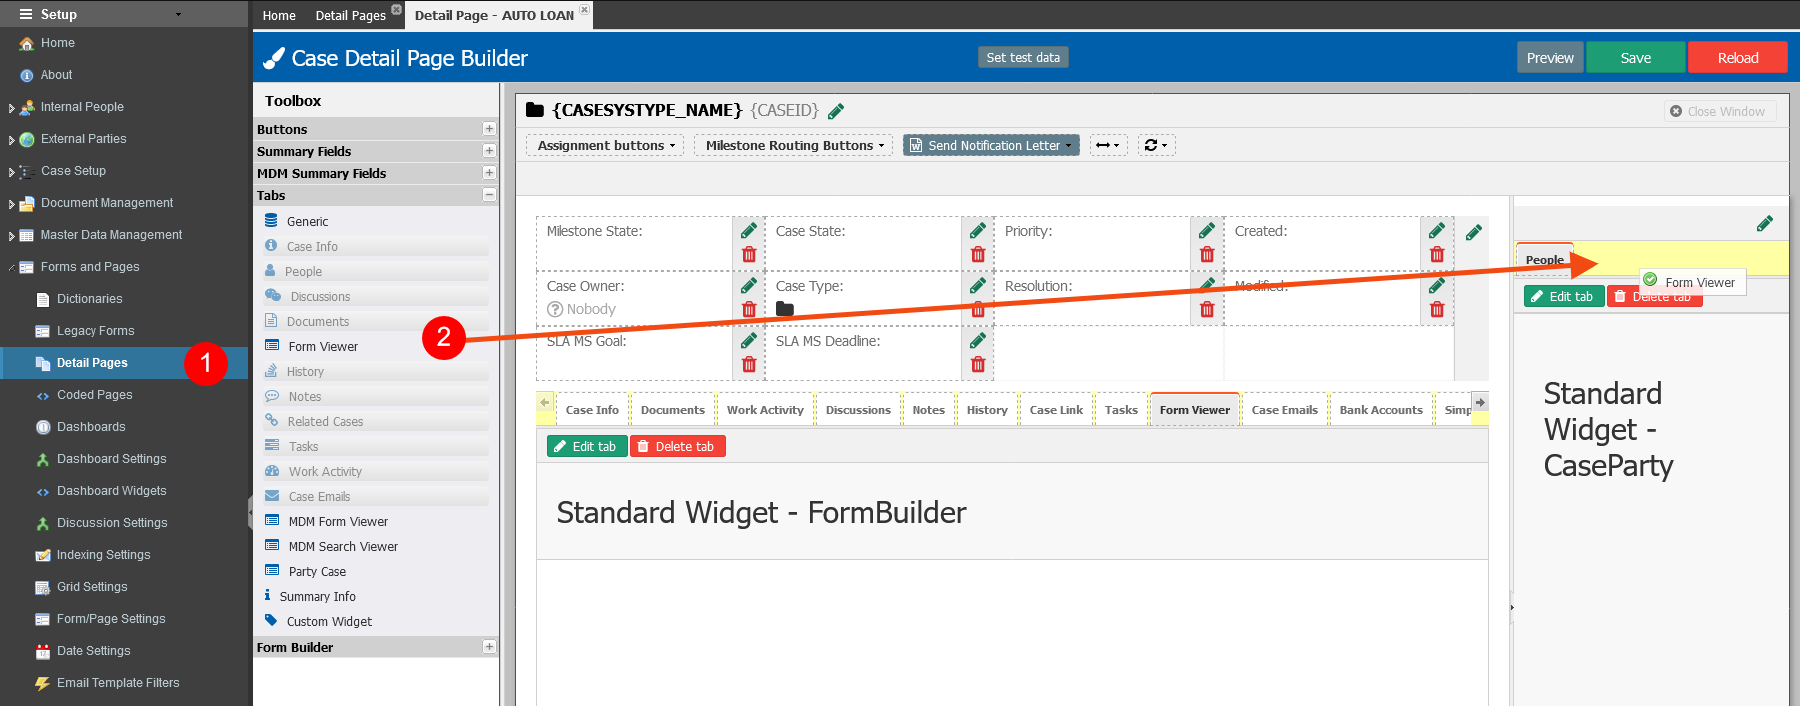
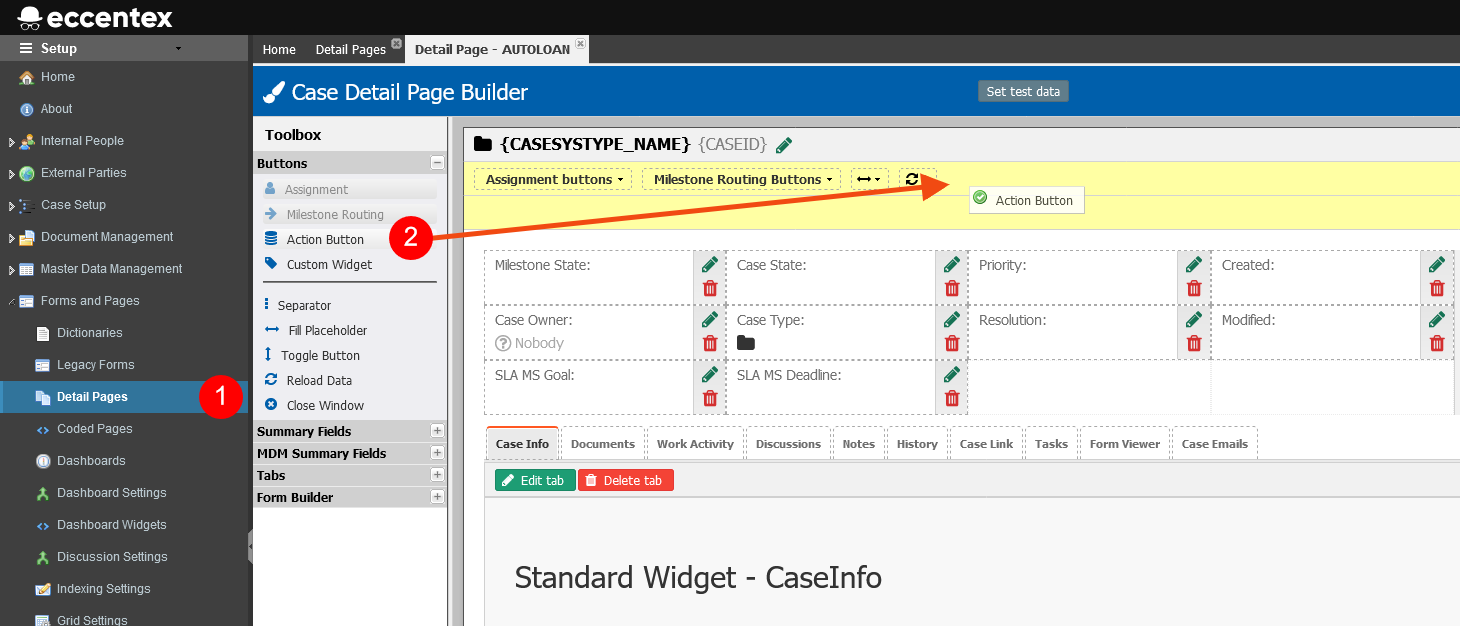
Go to Forms and Pages → Detail Pages (1)
Open a Case Detail page.
In the Case Detail Page Builder drag-and-drop a Form Viewer from the Tabs toolbox (2) to the right panel at the right side of the People tab.
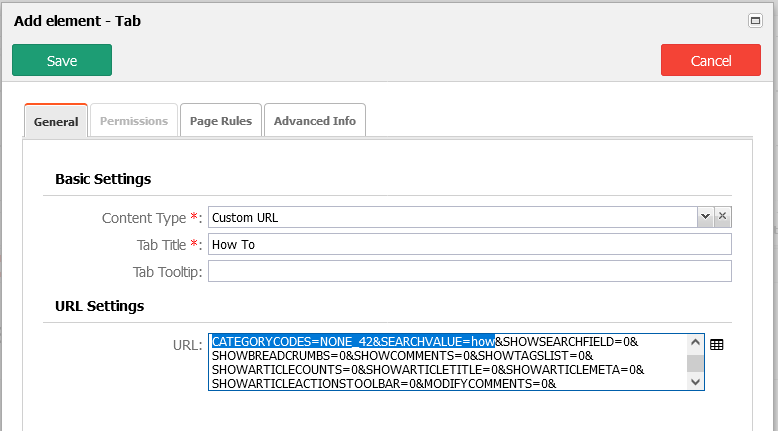
In Add element – Tab pop-up window, select Custom URL from the Content Type drop-down list.
In the Tab Title field type How To.
In the URL field under URL Settings paste the URL obtained in the previous steps.
Save the new tab.
Save the Detail Page
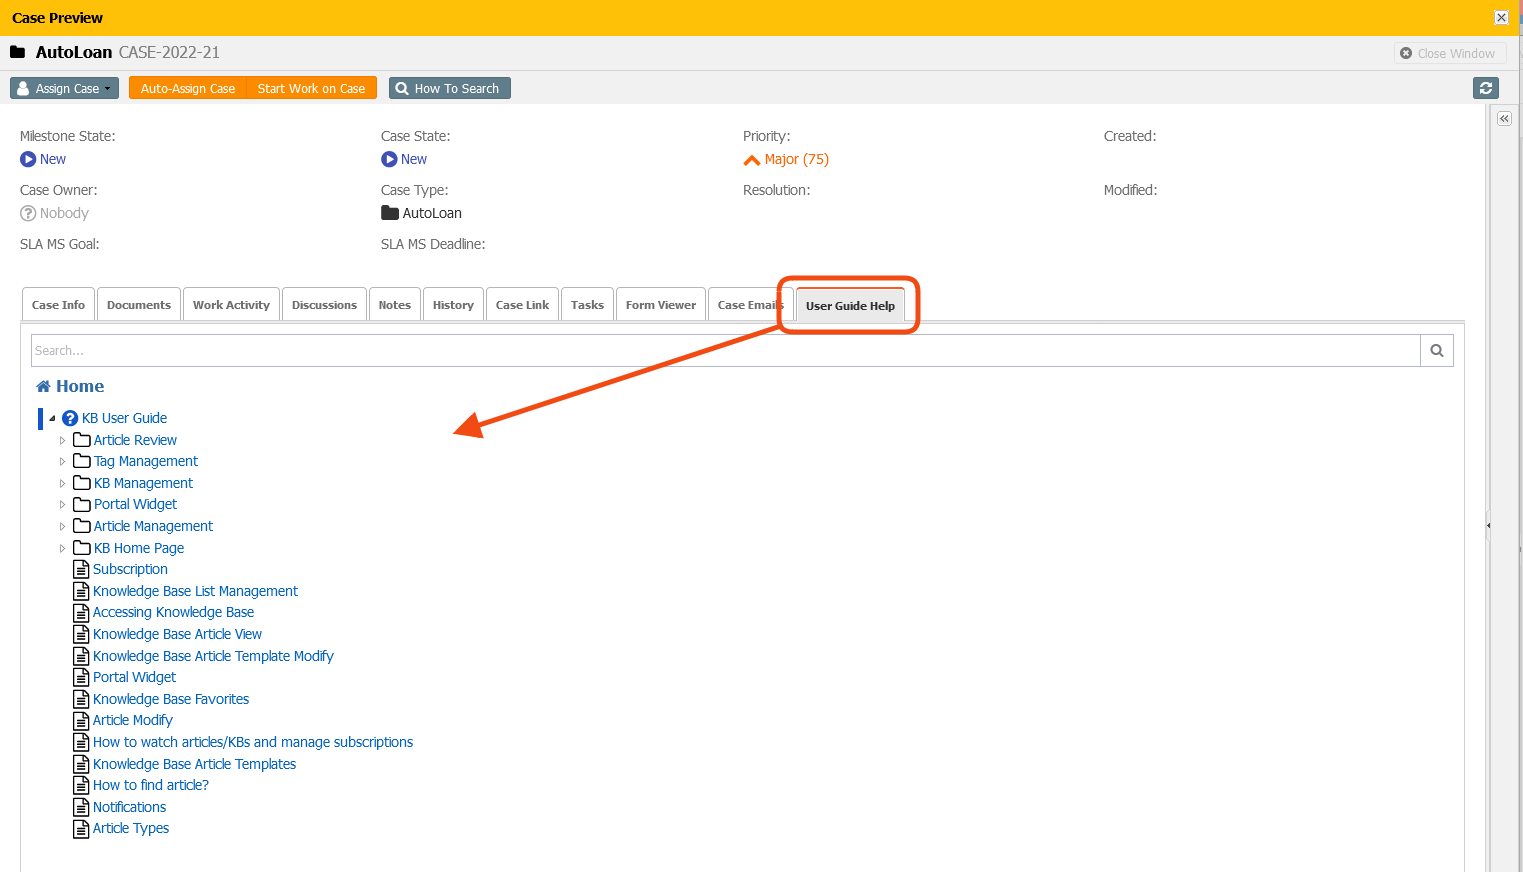
Do a Preview and validate that the How To tab is showing correctly.
Close the
Adding a Button into a Case Page to Open a KB
On the top right, navigate to → <<your solution>>
On the left, navigate to → Setup
Go to Forms and Pages → Detail Pages (1)
Open a Case Detail page.
In the Case Detail Page Builder drag-and-drop an Action Button from the Buttons toolbox (2) to the header.
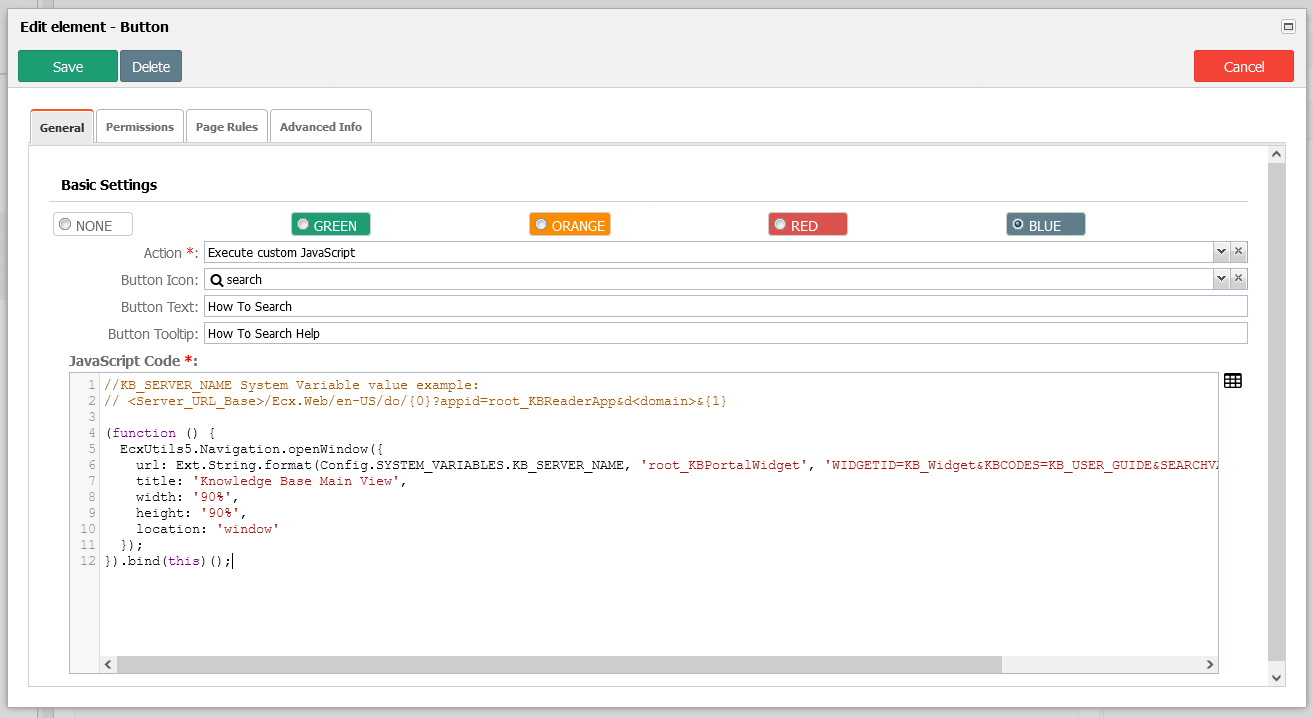
In Add element – Button pop-up window, select Execute custom JavaScript from the Action drop-down list.
For the Button Icon select search.
In the Button Text type How To Search
For the Button Tooltip type How To Search Help
In the JavaScript Code field, paste the code obtained in the previous step from "JavaScript code examples for DCM Button"
Example for DCM Button
JS
// KB_SERVER_NAME System Variable value example:
// <Server_URL_Base>/Ecx.Web/en-US/do/{0}?appid=root_KBReaderApp&d<domain>&{1}

var frameId = 'iframeKBMainView_'+Ext.id()
var cmp = new Ext.Component({
  autoEl: {
    tag: 'iframe',
    style: 'height: 100%; width: 100%; border: none',
    src: Ext.String.format(Config.SYSTEM_VARIABLES.KB_SERVER_NAME, 'root_KBPortalWidget', 'WIDGETID=KB_Widget&KBCODES=KB_USER_GUIDE&SEARCHVALUE=search&SHOWALL=1'),
  },
  id: frameId,
  listeners: {
    render: function() {
      var panel = this.up('panel');
      panel.mask('Loading');
      Ext.get(frameId).on(
        'load',
        function() {
          panel.unmask();
        });
      }
   }
});
return { layout: 'fit', items: cmp}
Change the color for the button.
Save the button configuration.
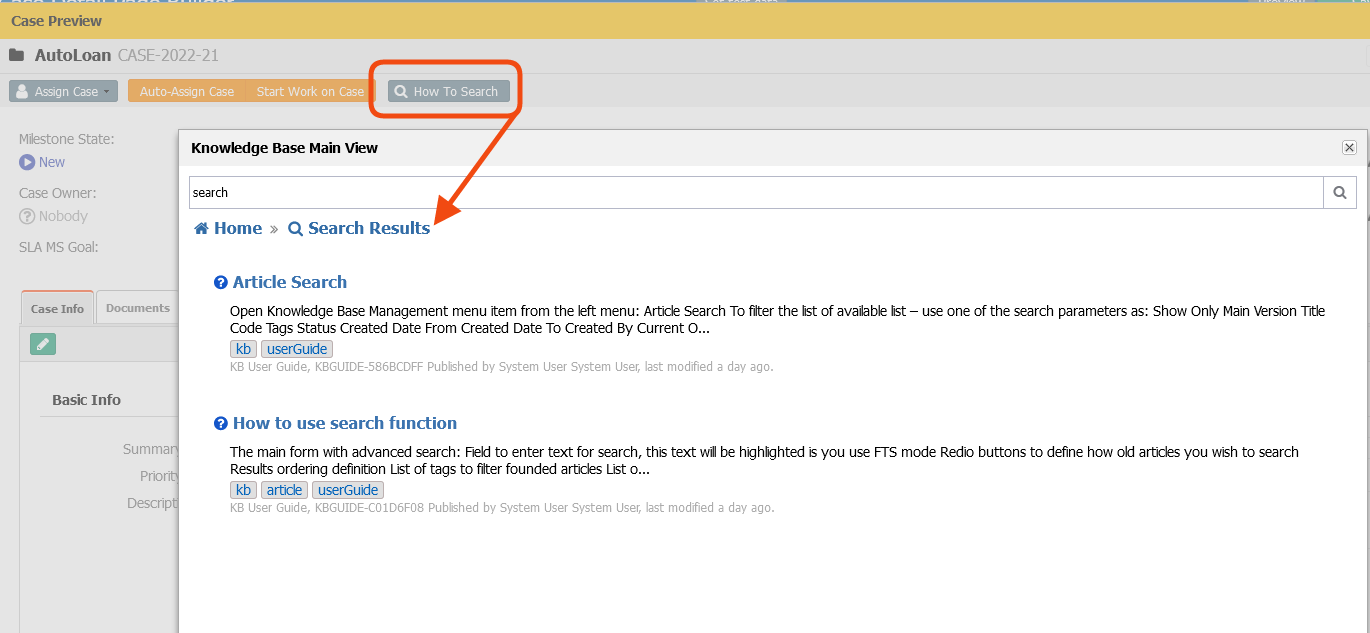
Do a Preview and validate the action of the button
Close the
Adding a Coded Page to See a KB into a Case Page
On the top right, navigate to → <<your solution>>
On the left, navigate to → Setup
Go to Forms and Pages → Coded Pages
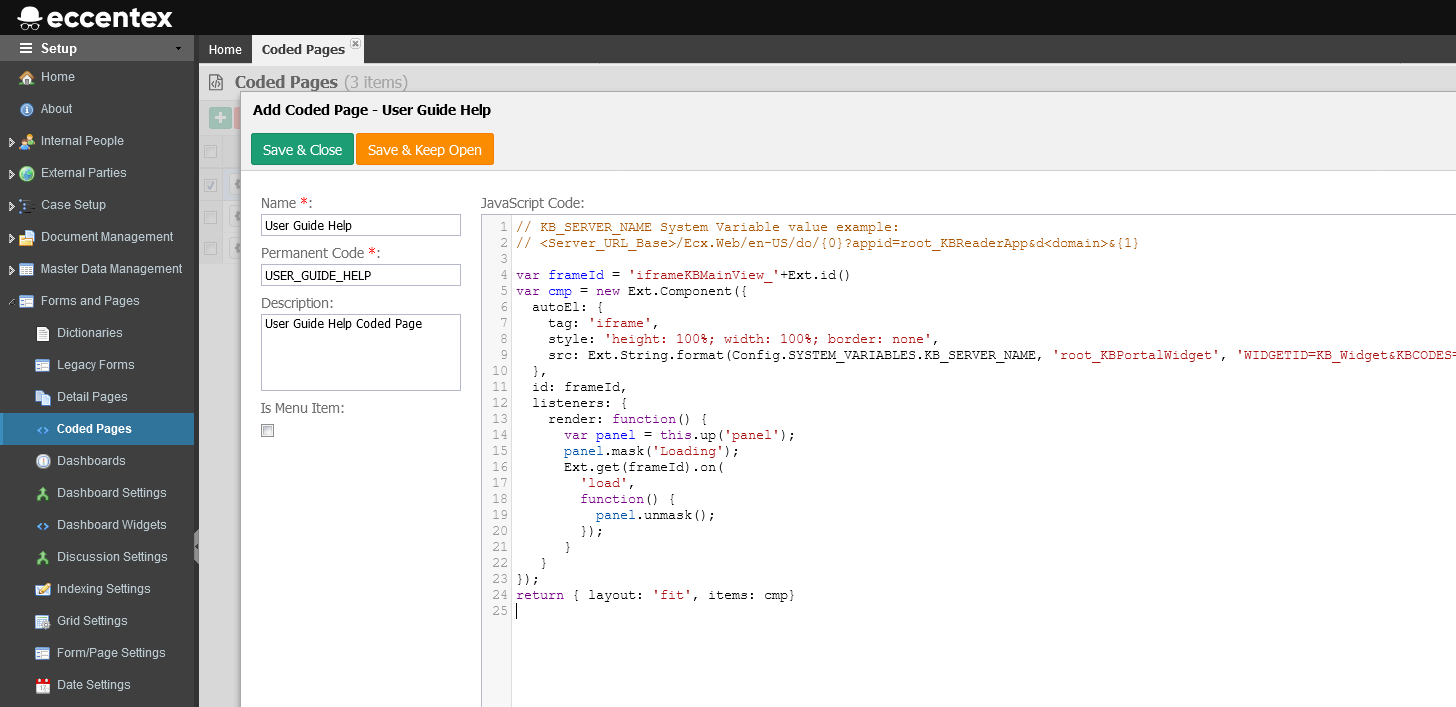
Create a new coded page by clicking the New Coded Page button
Name it User Guide Help
Add User Guide Help Coded Page for Description.
In the JavaScript Code area, paste the code obtained in the previous step from "JavaScript code examples for DCM Coded Page"
Example for DCM Coded Page
JS
// KB_SERVER_NAME System Variable value example:
// <Server_URL_Base>/Ecx.Web/en-US/do/{0}?appid=root_KBReaderApp&d<domain>&{1}

var frameId = 'iframeKBMainView_'+Ext.id()
var cmp = new Ext.Component({
  autoEl: {
    tag: 'iframe',
    style: 'height: 100%; width: 100%; border: none',
    src: Ext.String.format(Config.SYSTEM_VARIABLES.KB_SERVER_NAME, 'root_KBPortalWidget', 'WIDGETID=KB_Widget&KBCODES=KB_USER_GUIDE&SHOWALL=1'),
  },
  id: frameId,
  listeners: {
    render: function() {
      var panel = this.up('panel');
      panel.mask('Loading');
      Ext.get(frameId).on(
        'load',
        function() {
          panel.unmask();
        });
      }
   }
});
return { layout: 'fit', items: cmp}
Click the Save & Close button.
Go to Forms and Pages → Detail Pages
Open a Case Detail page.
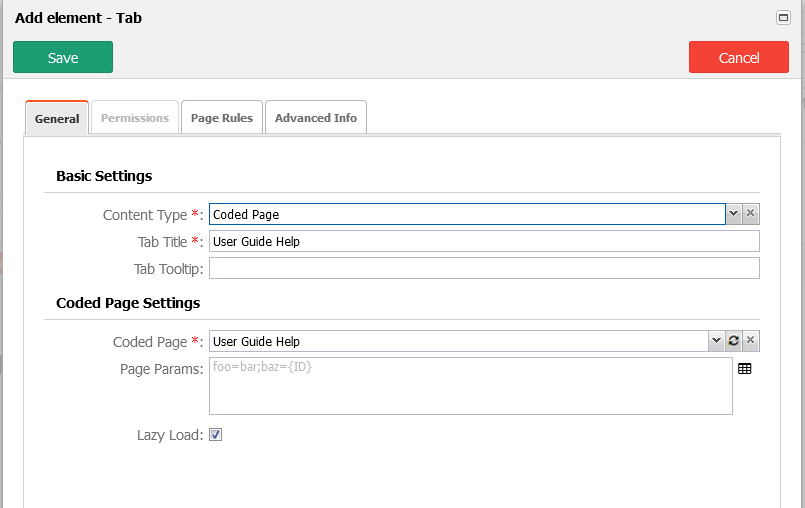
In the Case Detail Page Builder drag-and-drop a Form Viewer from the Tabs toolbox to the end of the tabs bar.
In Add element – Tab pop-up window, select Coded Page from the Content Type drop-down list.
In the Tab Title field type User Guide Help.
In the Coded Page dropdown list under Coded Page Settings select the coded page built in the previous steps.
Save the configuration
Save the updated Case Detail Page
Do a Preview and validate that the new tab shows the content of the KB