Installing the ServiceJourney Connector for Genesys Cloud
The Eccentex ServiceJourney Connector in the Genesys AppFoundry is a Premium App that helps connect your Genesys Cloud CX org to your AppBase ServiceJourney solution.
Step 1: Ensure you have access to your ServiceJourney application
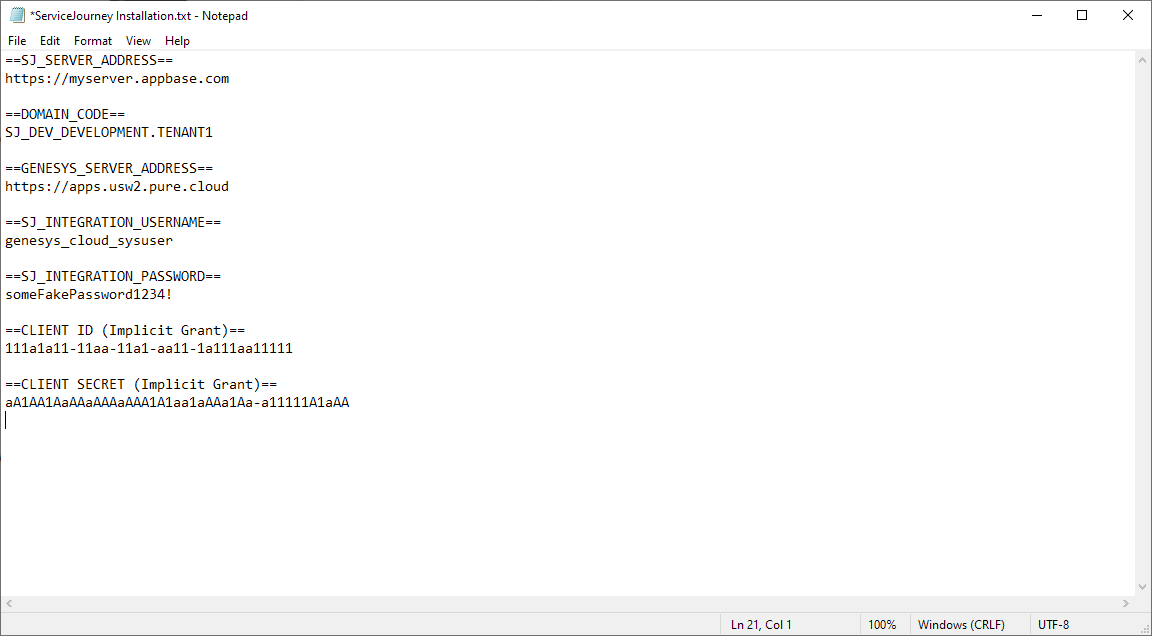
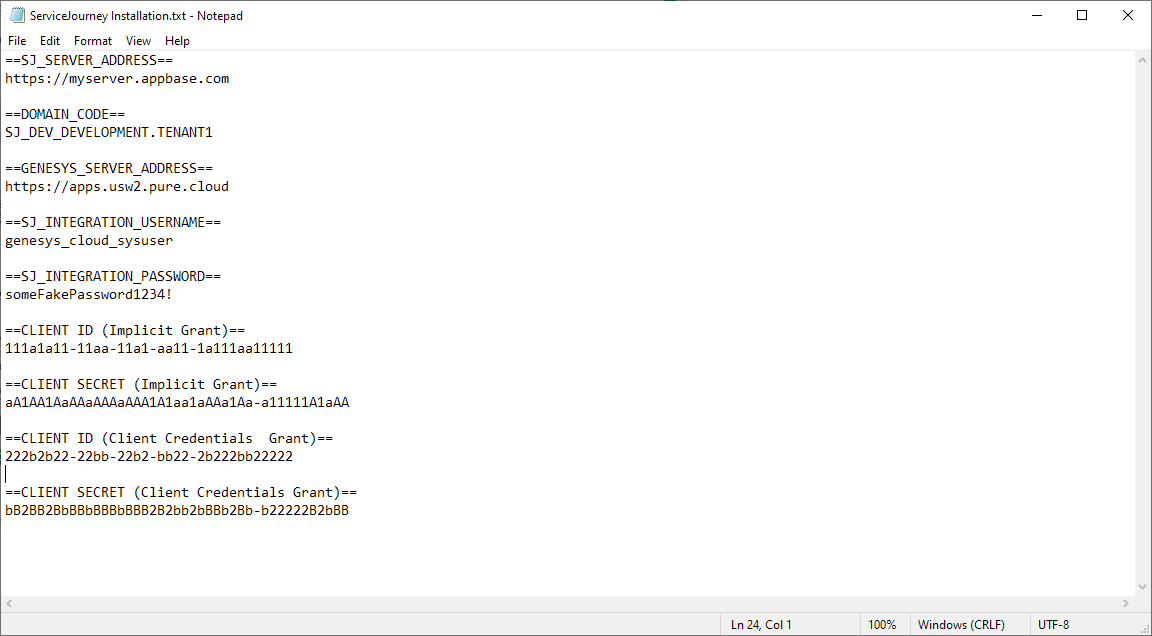
It's convenient to put some of these key values into a text editor so you can refer to them throughout the installation process.
Log in to your ServiceJourney environment
On the top right, navigate to → ServiceJourney
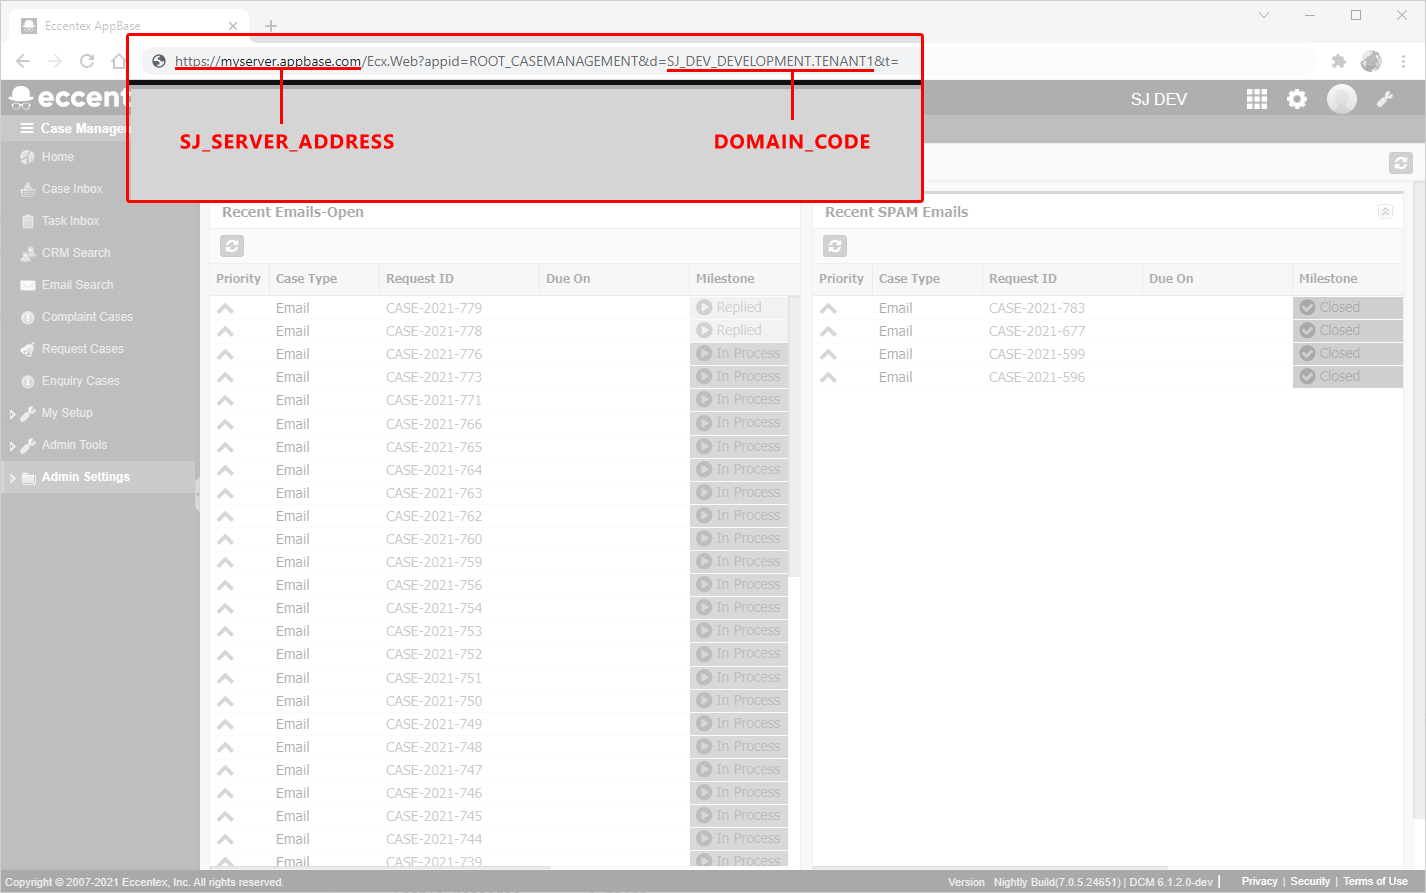
Locate the URL at the top of the browser
Copy the SJ_SERVER_ADDRESS and DOMAIN_CODE into a text editor for future use
Step 2: Ensure you have admin access to your Genesys Cloud environment
It's convenient to put some of these key values into a text editor so you can refer to them throughout the installation process.
Log in to your Genesys Cloud CX environment
Click on Admin
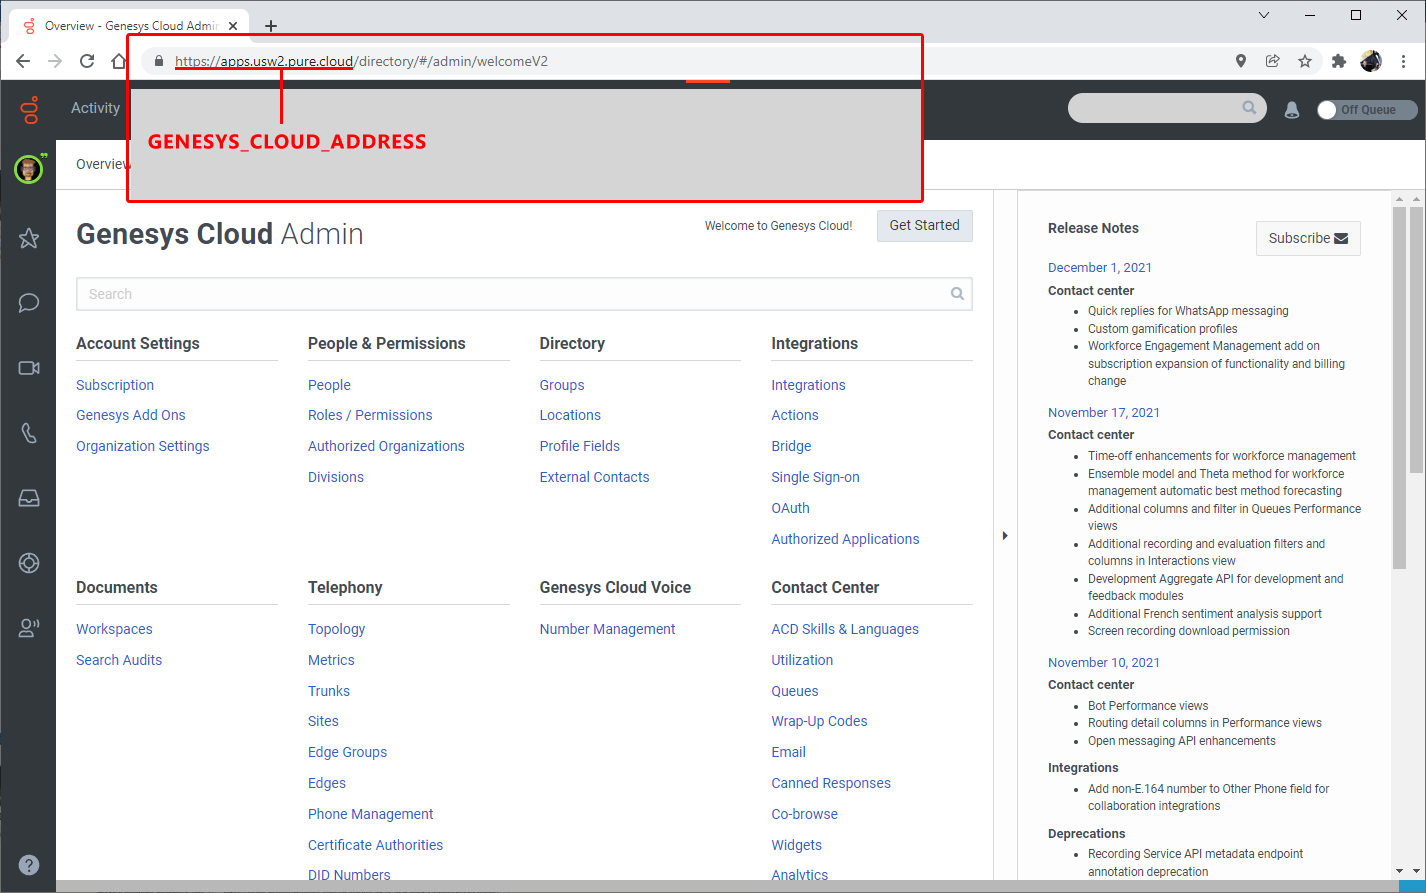
Locate the URL at the top of the browser. You can also find this information in this Genesys article.
Copy the GENESYS_CLOUD_ADDRESS into a text editor for future use
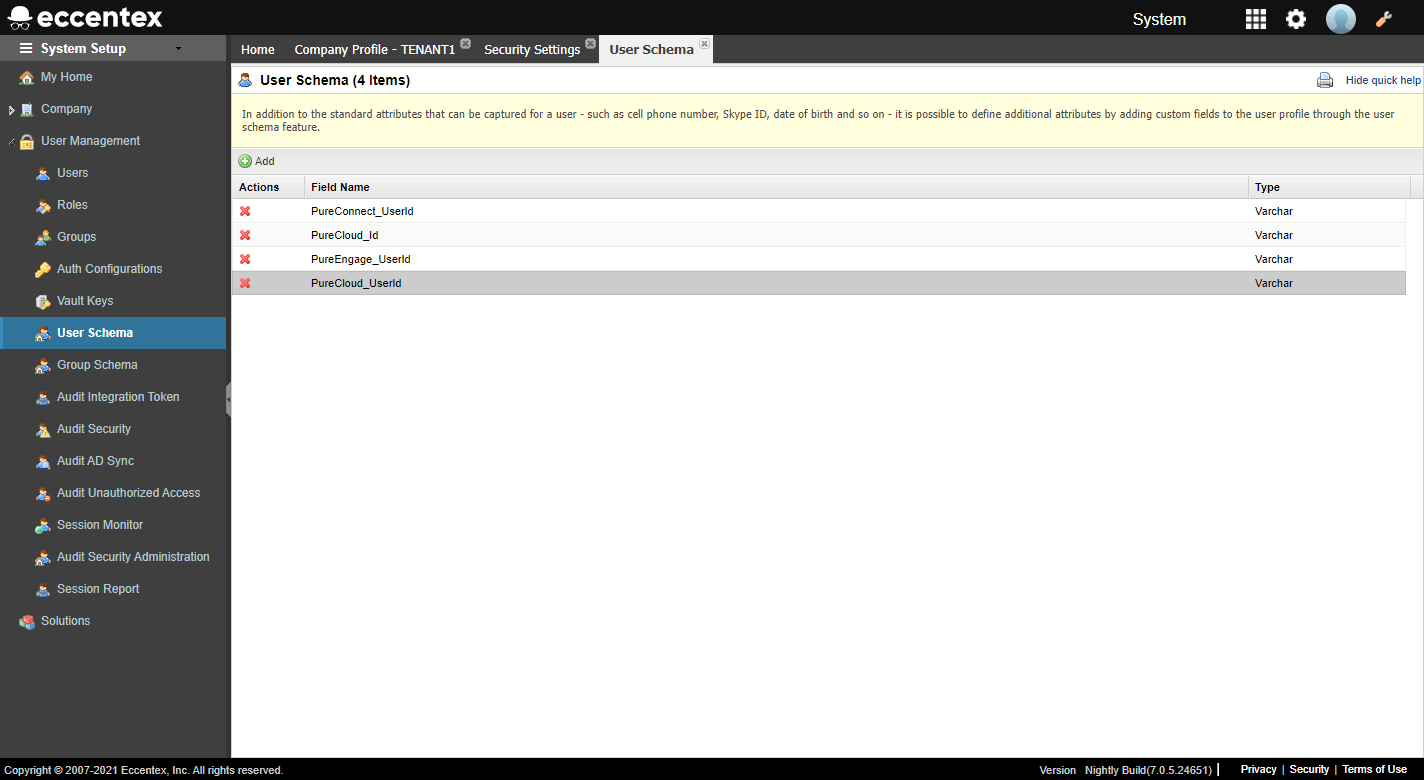
Step 3: Add additional fields to the user schema in ServiceJourney
Genesys Cloud and ServiceJourney each have their own user management systems. ServiceJourney will try to automatically match the users using an email address, but sometimes it's helpful to explicitly set the mapping. We won't be using these fields for normal operation, but you should add them anyways in case you will need this in the future.
Log in to your ServiceJourney solution
On the top right, navigate to → System Setup Home
Navigate to User Management → User Schema
Click the Add button and add each of the items below individually:
Field Name: PureCloud_UserId, Type: Varchar
Field Name: PureEngage_UserId, Type: Varchar
Field Name: PureCloud_Id, Type: Varchar
Field Name: PureConnect_UserId, Type: Varchar
Validate that your user schema looks something like below:
Step 4: Create a system user in your ServiceJourney application
You will need to have a dedicated system user in ServiceJourney that Genesys Cloud will use for background tasks.
Create a user manually with an easily identifiable username like "genesys_cloud_sysuser"
Assign the following roles to that user:
System: Allow My Workspace (System, Configuration)
Solution Access (SJ_PROD)
Copy the SJ_INTEGRATION_USERNAME and SJ_INTEGRATION_PASSWORD into a text editor for future use:
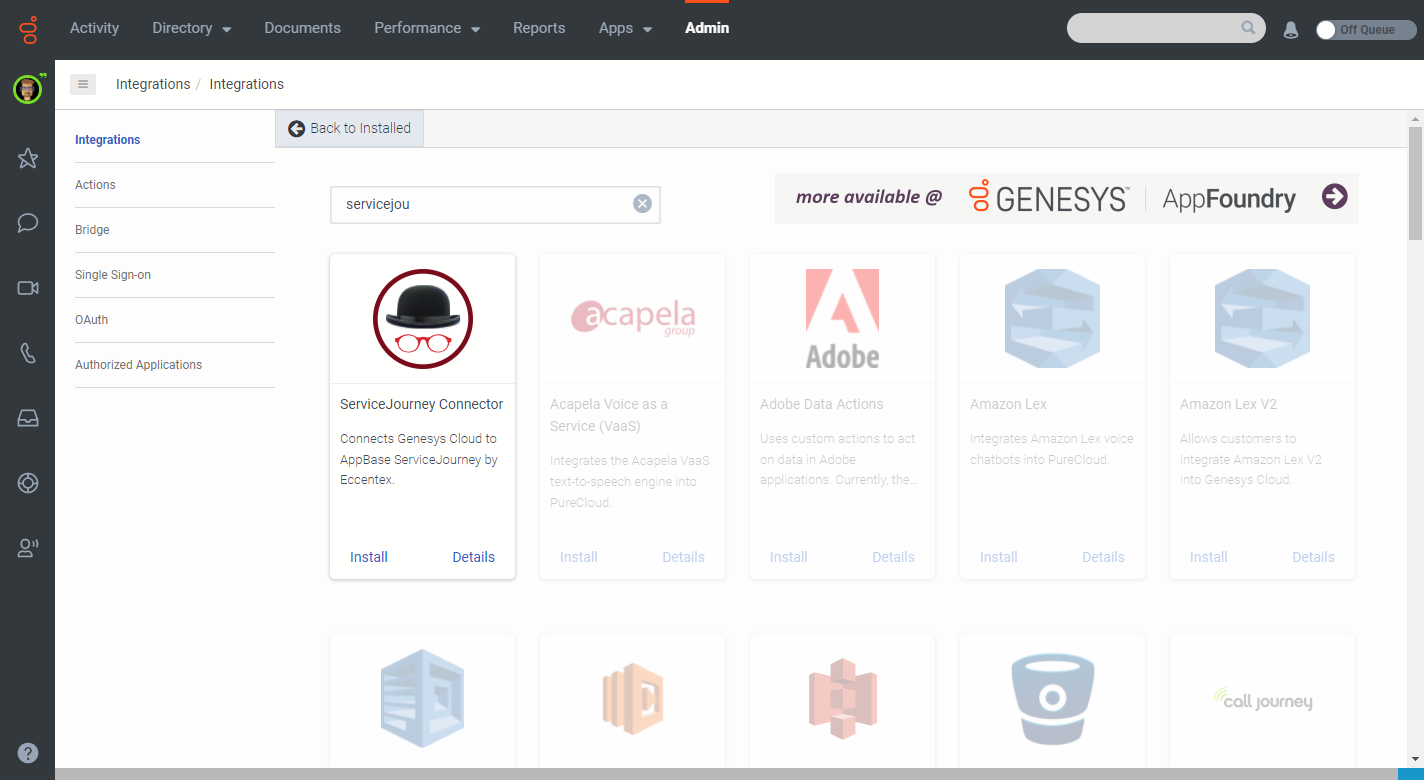
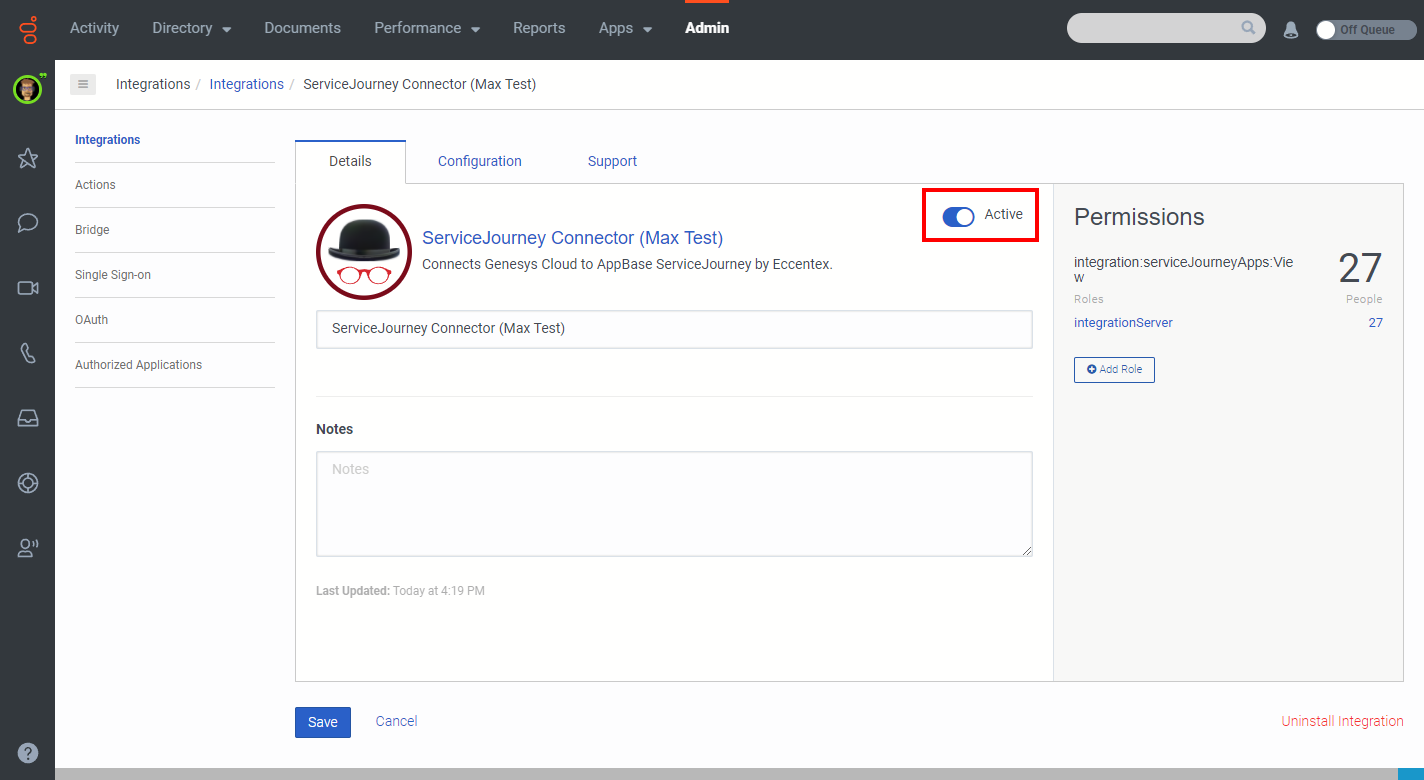
Step 5: Install the Premium App in Genesys Cloud
The first step is to install the Eccentex ServiceJourney Connector into your Genesys Cloud CX org.
Log in to your Genesys Cloud CX org as an administrator
Click Admin in the top toolbar
Click on the Integrations hyperlink in the Integrations section
Click on the Integrations button on the top right
Find the Eccentex ServiceJourney integration and click Install
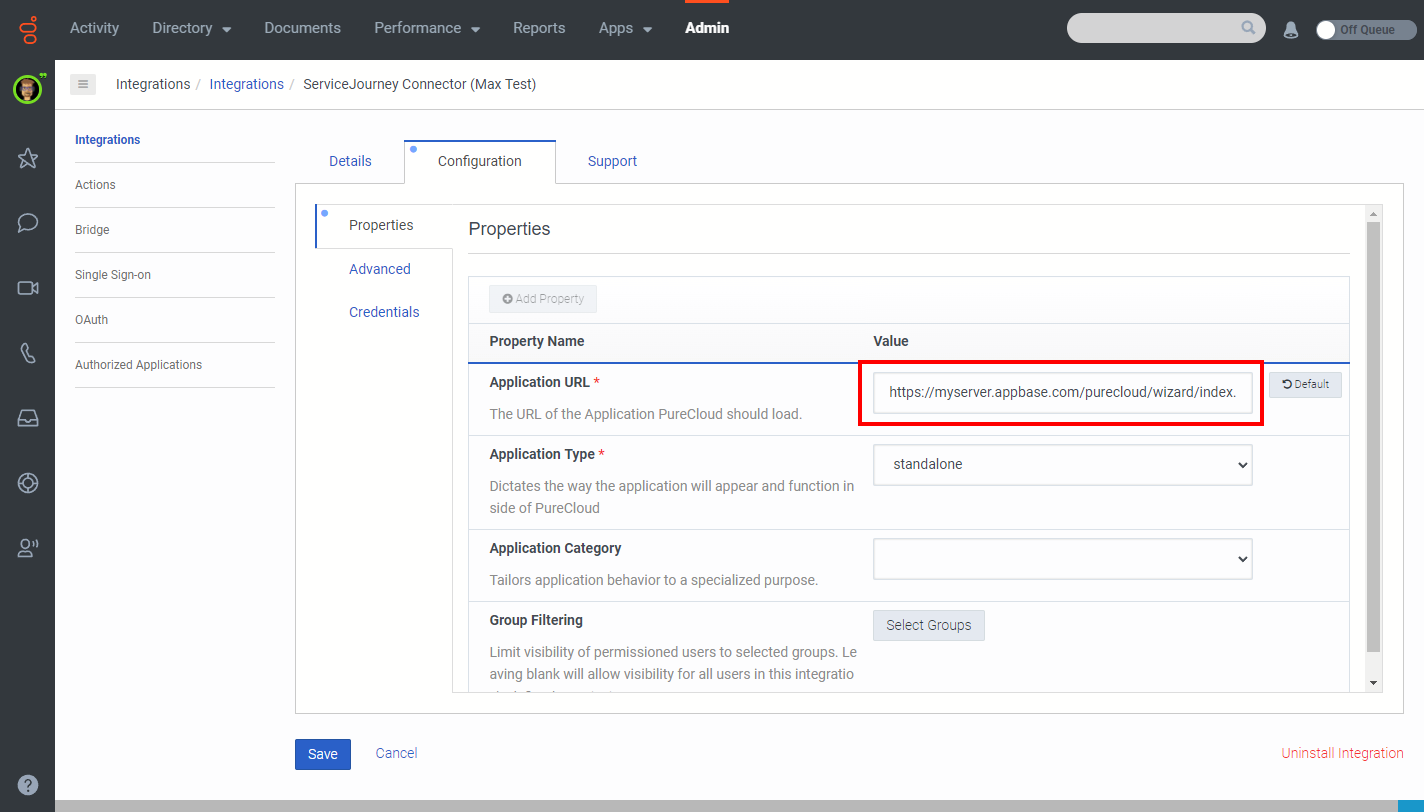
In the Permissions panel, ensure the integrationServer role is added to this integration. If not, add it.
Click the Configuration tab
In the Application URL field, type the URL of your ServiceJourney environment. The Application URL uses the following format: @SJ_SERVER_ADDRESS@/dcm-connect-docs/wizard/index.html?langTag={{pcLangTag}}&environment={{pcEnvironment}}
Do the following:
Keep the {{pcLangTag}} and {{pcEnvironment}} tags as-is
Click the Save button
Go back to the Details tab and set the integration to Active
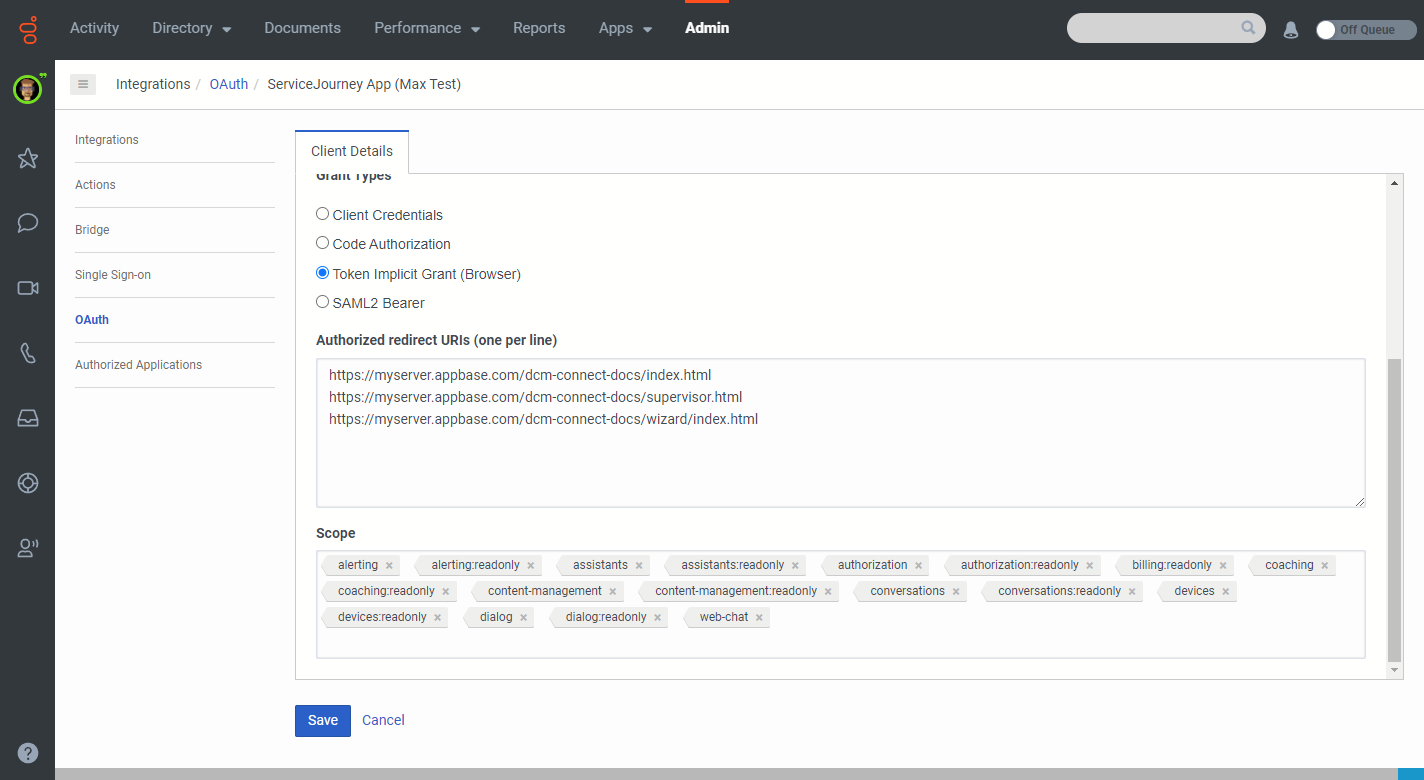
Step 6: Create a new "Token Implicit Grant (Browser)" OAuth client in Genesys Cloud
This OAuth client will enable ServiceJourney to receive a user-specific token allowing it to make requests to the Genesys Cloud Platform API.
In Genesys Cloud, navigate to Admin → Integration → OAuth
Click on the Add Client button
Set the App Name field to something recognizable like "ServiceJourney Implicit Grant"
Set the Grant Type option to Token Implicit Grant (Browser)
Fill out the Authorized redirect URIs field with the following values.
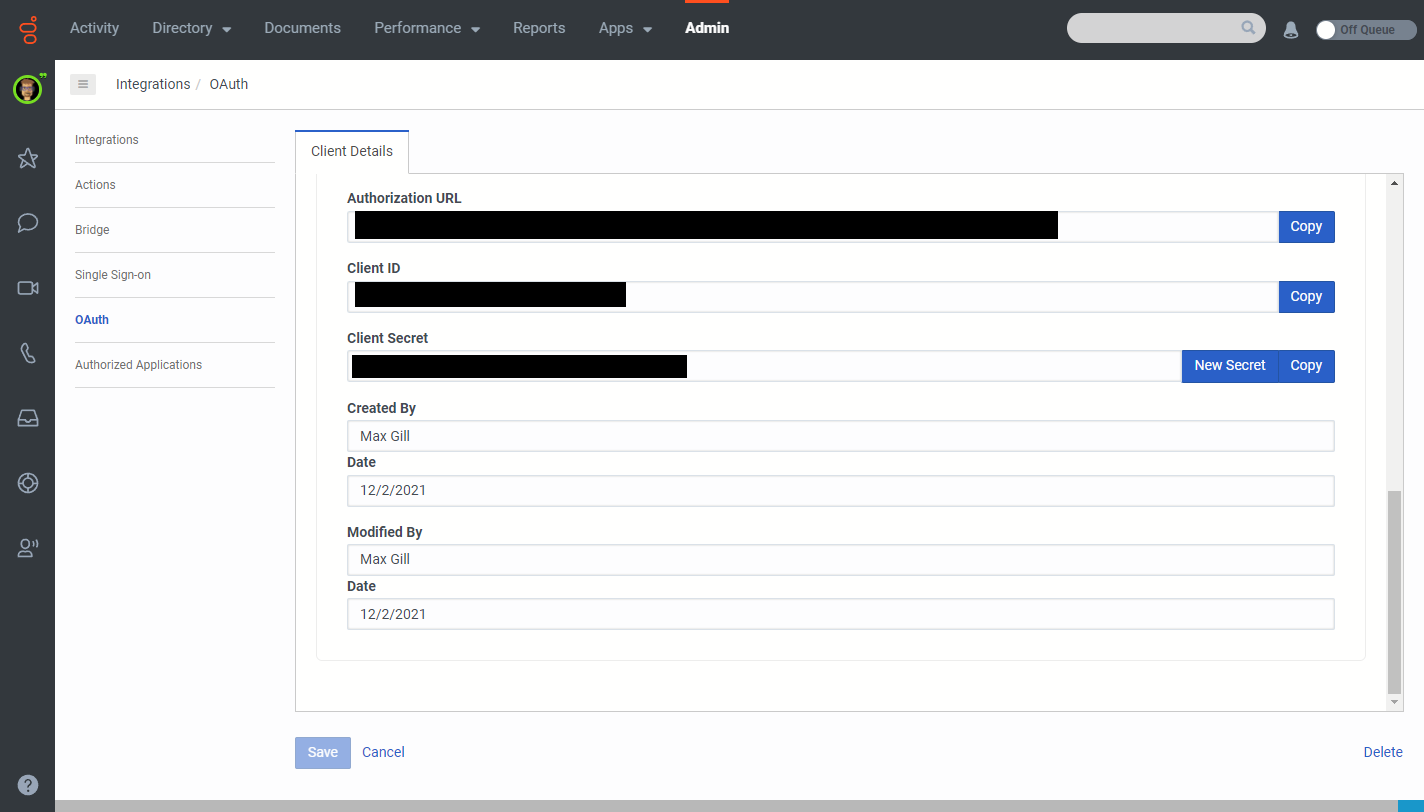
The page will refresh, scroll down to the Client Details section that is now visible
Copy the CLIENT ID (Implicit Grant) and CLIENT SECRET(Implicit Grant) a text editor to be used for later
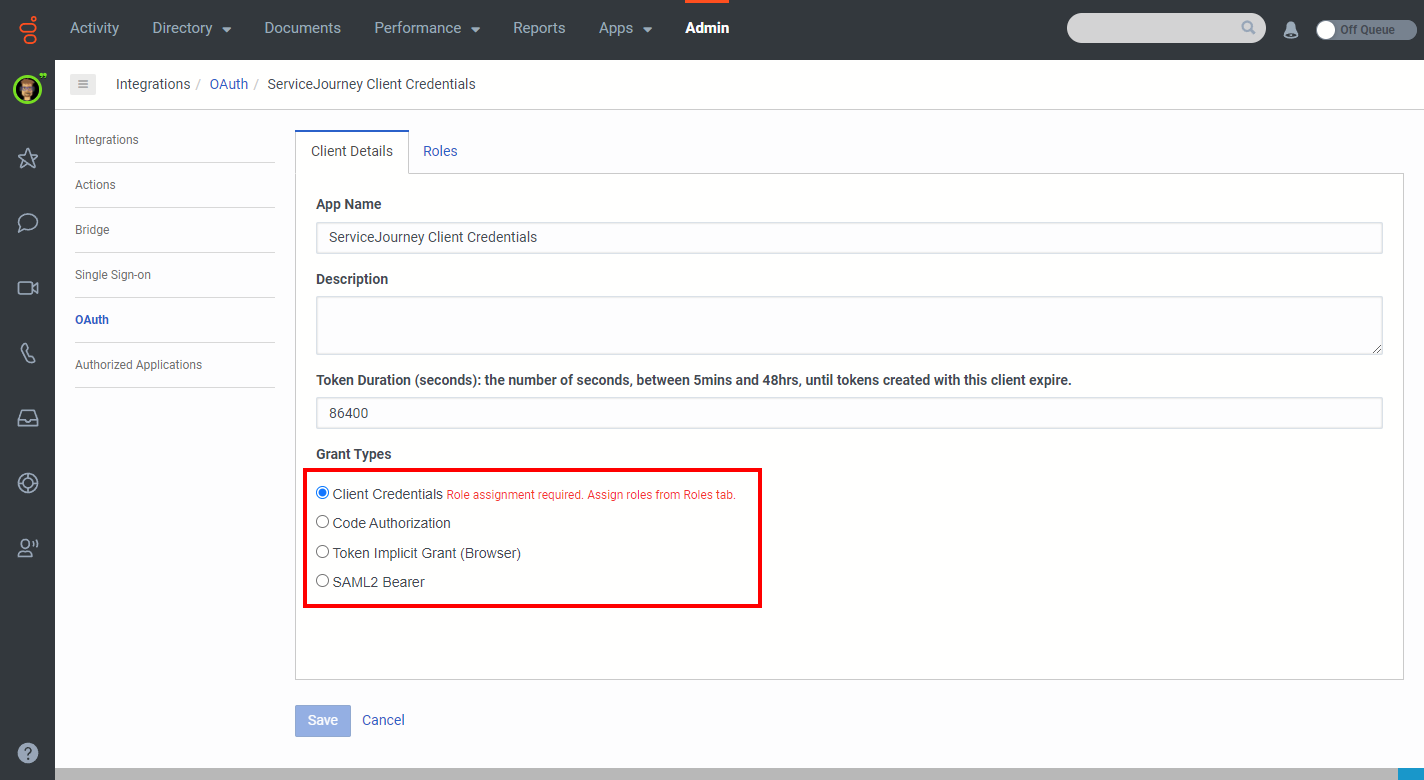
Step 7: Create a new "Client Credentials" OAuth client in Genesys Cloud
This OAuth client will enable ServiceJourney to receive a user-agnostic token allowing it to make requests to the Genesys Cloud Platform API. This is used by ServiceJourney to make background requests.
In Genesys Cloud, navigate to Admin → Integration → OAuth
Click on the Add Client button
Set the App Name field to something recognizable like "ServiceJourney Client Credentials"
Navigate to the Roles tab
Assign the following roles:
Master Admin
integrationServer
For each of the assigned roles, add Home to the Divisions box
Click Save
The page will refresh, scroll down to the Client Details section that is now visible
Copy the CLIENT ID (Client Credentials Grant) and CLIENT SECRET (Client Credentials Grant) to a text editor to be used for later
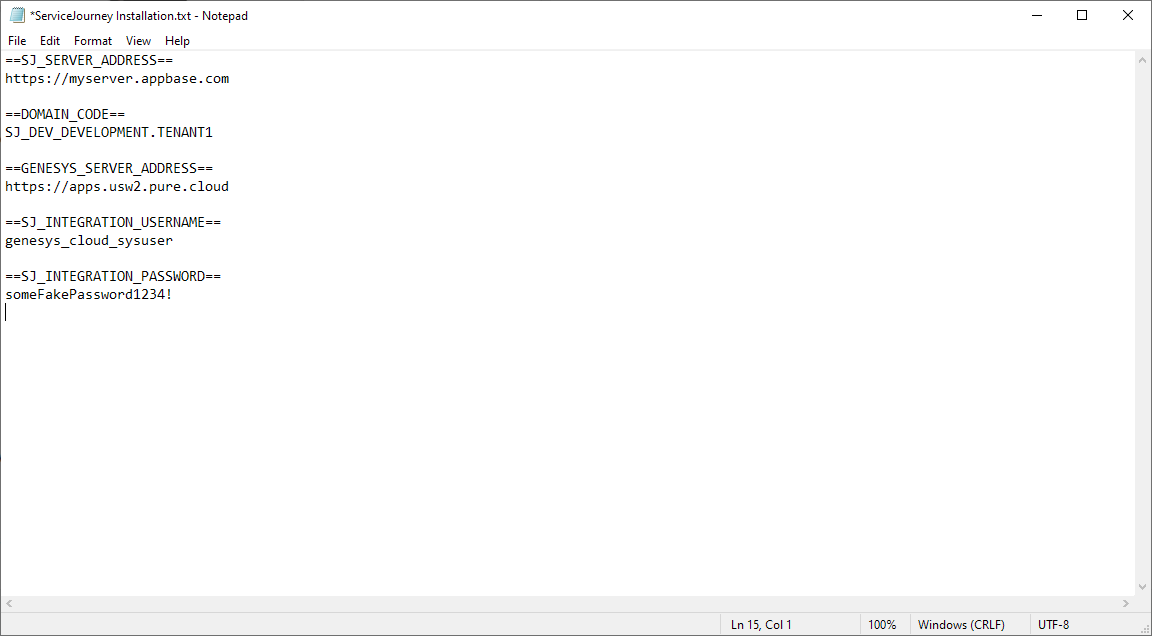
Step 8: Copy and configure installation files on the ServiceJourney server
You will need remote desktop access to the ServiceJourney server for the steps below. Also, some of the steps below requires you to download installation files from Eccentex. Pleasecontact support if you are missing these files.
Access the ServiceJourney's application server using a tool Windows Remote Desktop or similiar tool
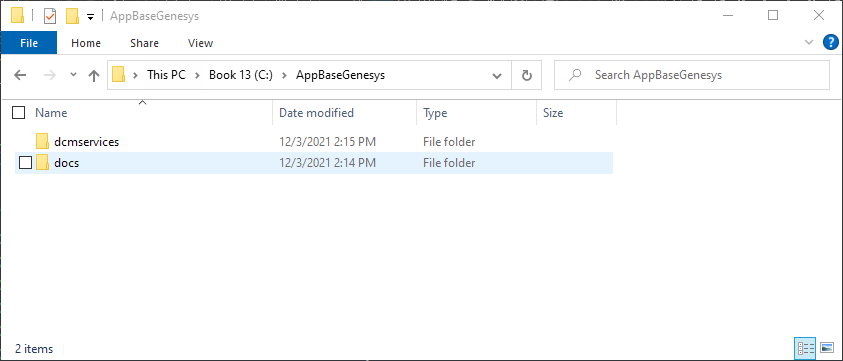
Create folder C:\AppBaseGenesys
Create folder C:\AppBaseGenesys\dcmservices and place the contents of dcmservice.zip into it
Create folder C:\AppBaseGenesys\docs and place the contents of docs.zip into it
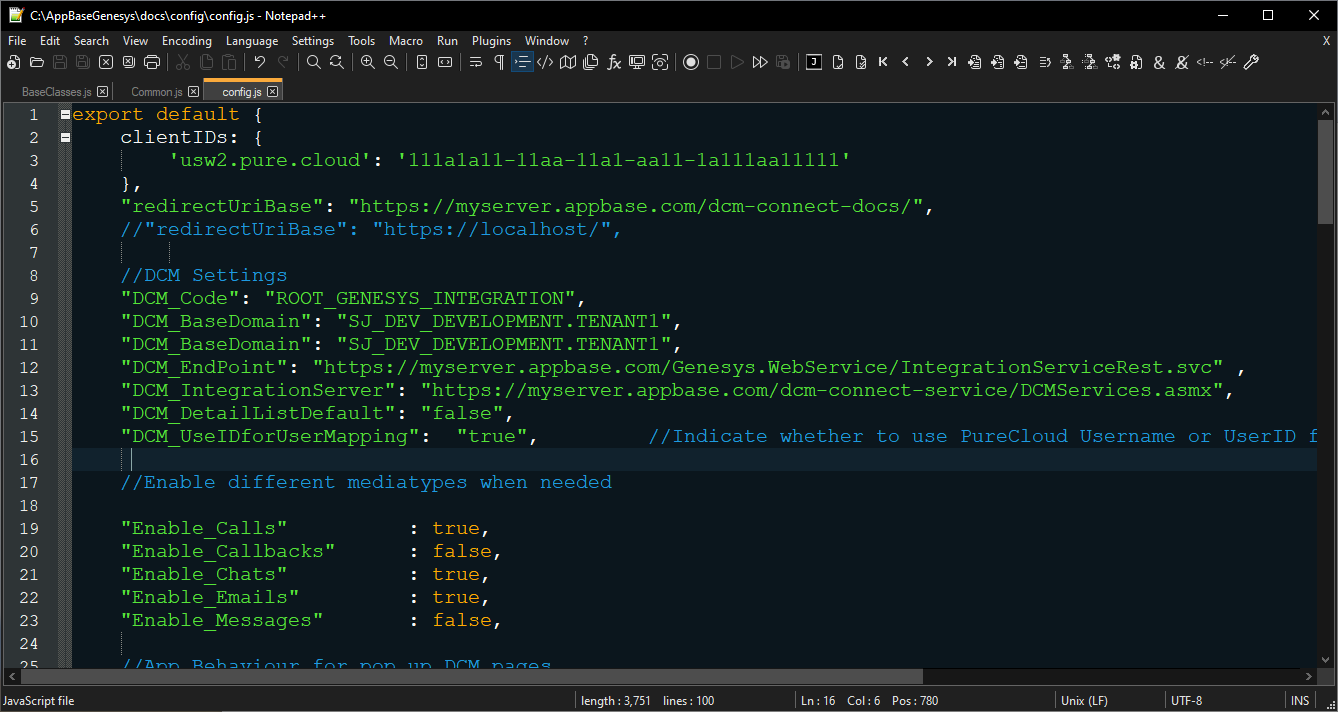
Navigate to file C:\AppBaseGenesys\docs\config\config.example.js and copy it with the name config.js
Open the file C:\AppBaseGenesys\docs\config\config.js for editing in a text editor like Windows Notepad
In the file, replace the placeholder values with appropriate ones that you've collected in the previous steps
@CLIENT_ID@ replace with your CLIENT ID (Implicit Grant)
@REDIRECT_URI@ replace with a URL formatted like @SJ_SERVER_ADDRESS@/dcm-connect-docs/ except with your SJ_SERVER_ADDRESS
@INTEGRATION_CODE@replace with the text ROOT_GENESYS_INTEGRATION
@DOMAIN_CODE@ replace with your DOMAIN_CODE
@SOLUTION_URL@replace with value for your SJ_SERVER_ADDRESS
@GENESYS_INTEGRATION_URL@ replace with a URL formatted like @SJ_SERVER_ADDRESS@/dcm-connect-service/DCMServices.asmx/ except with your SJ_SERVER_ADDRESS
@WIZARD_URL@ replace with a URL formatted like @SJ_SERVER_ADDRESS@/dcm-connect-docs/wizard/index.html?response_type=token&state=pcEnvironment=usw2.pure.cloudexcept with your SJ_SERVER_ADDRESS
Validate that your configuration looks similiar to the one below:
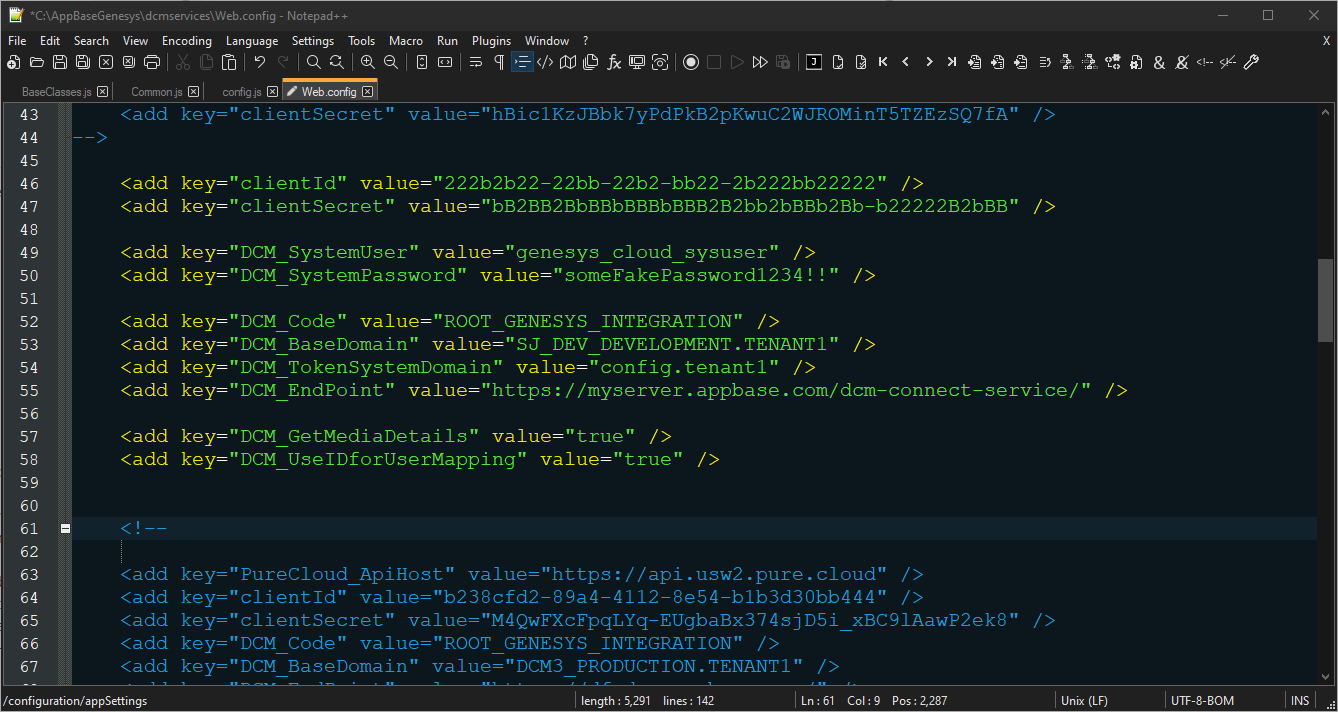
Open the file C:\AppBaseGenesys\dcmservices\Web.configfor editing in a text editor
In the file, replace the default values with appropriate ones that you've collected in the previous steps
Set DCM_SystemUser to your SJ_INTEGRATION_USERNAME
Set DCM_SystemPassword to your SJ_INTEGRATION_PASSWORD
Set clientId to your CLIENT ID (Client Credentials Grant)
Ser clientSecret to your CLIENT SECRET (Client Credentials Grant)
Set PureCloud_ApiHost to your GENESYS_CLOUD_ADDRESS
Set the correct PureCloud_Region using this article
Set DCM_BaseDomain to your DOMAIN_CODE
Set DCM_EndPointto a URL formatted like @SJ_SERVER_ADDRESS@/dcm-connect-service/ except with your SJ_SERVER_ADDRESS
Set DCM_TokenSystemDomain replace with
Validate that your configuration looks similiar to the one below:
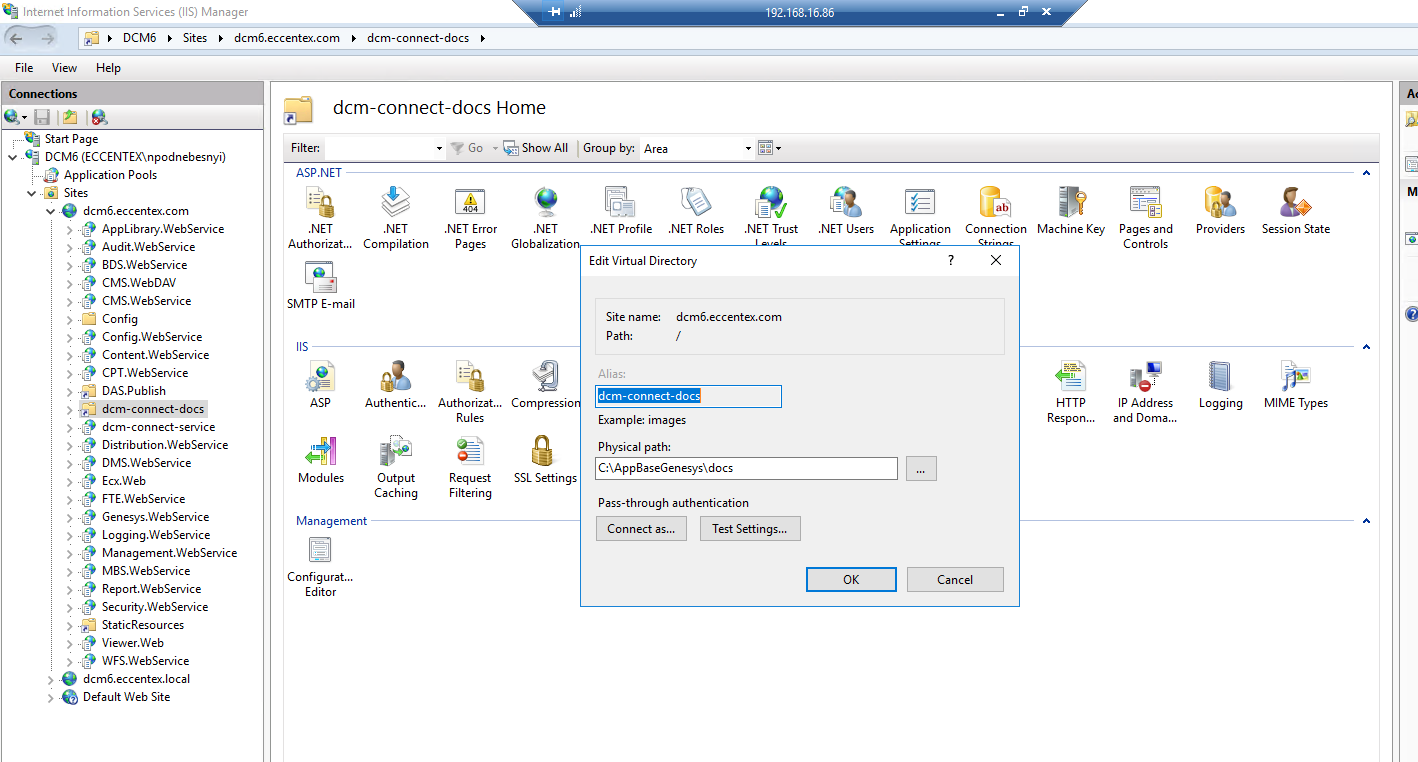
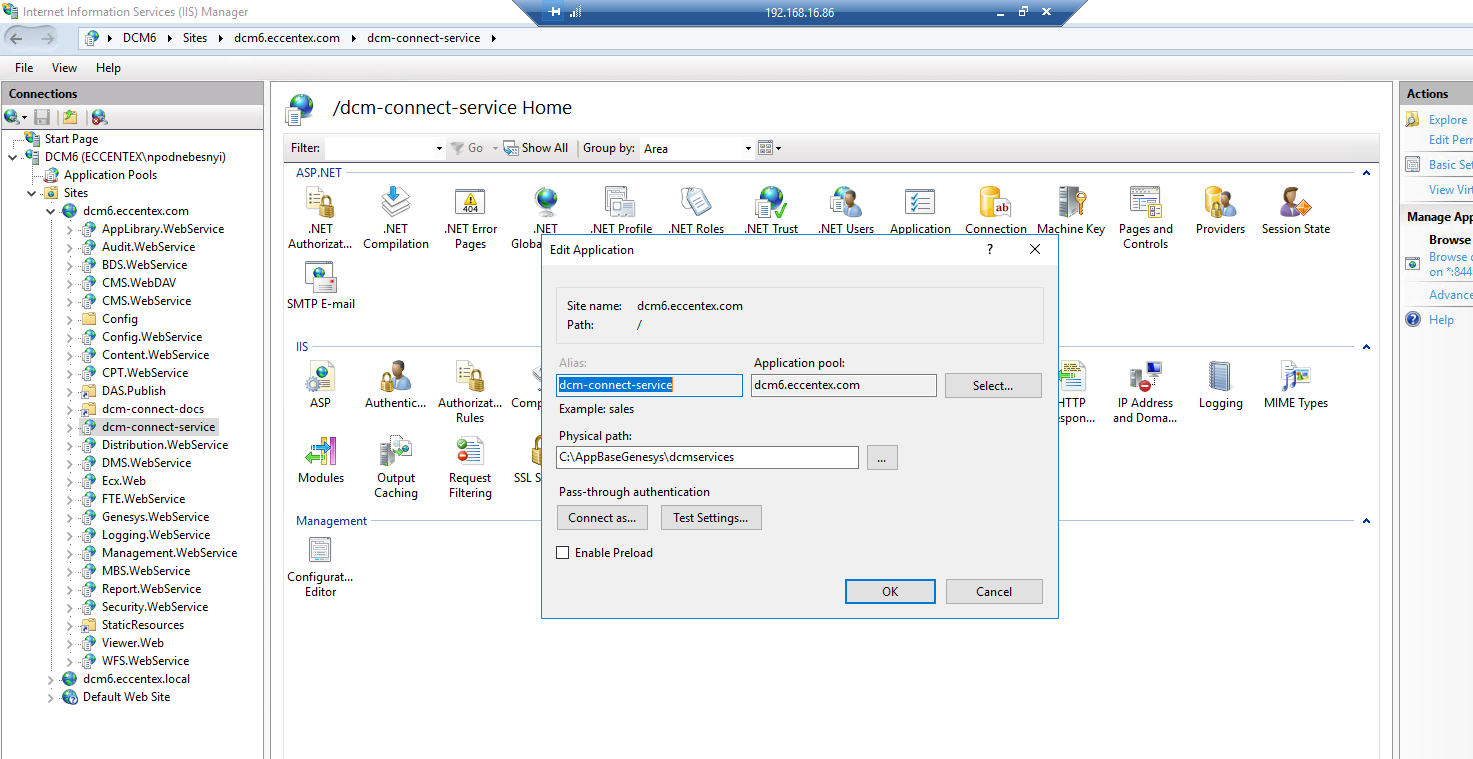
Step 9: Configure IIS on the ServiceJourney server
This step will create the proper web service endpoints for Genesys Cloud to communicate with ServiceJourney.
Access the ServiceJourney's application server using a tool Windows Remote Desktop or similiar tool
Open IIS Manager
Create a Virtual Directory in your site called dcm-connect-docs and set it's physical path to C:\AppBaseGenesys\docs
Create an Application in your site called dcm-connect-service and set it's physical path to C:\AppBaseGenesys\dcmservices
Step 10: Update security settings in the ServiceJourney server to allow embedding a login page
By default, ServiceJourney login pages are not allowed to be embedded into 3rd-party iFrames. This step is part one of allowing screen-popping ServiceJourney pages into the Genesys Cloud desktop.
Access the ServiceJourney's application server using a tool Windows Remote Desktop or similiar tool
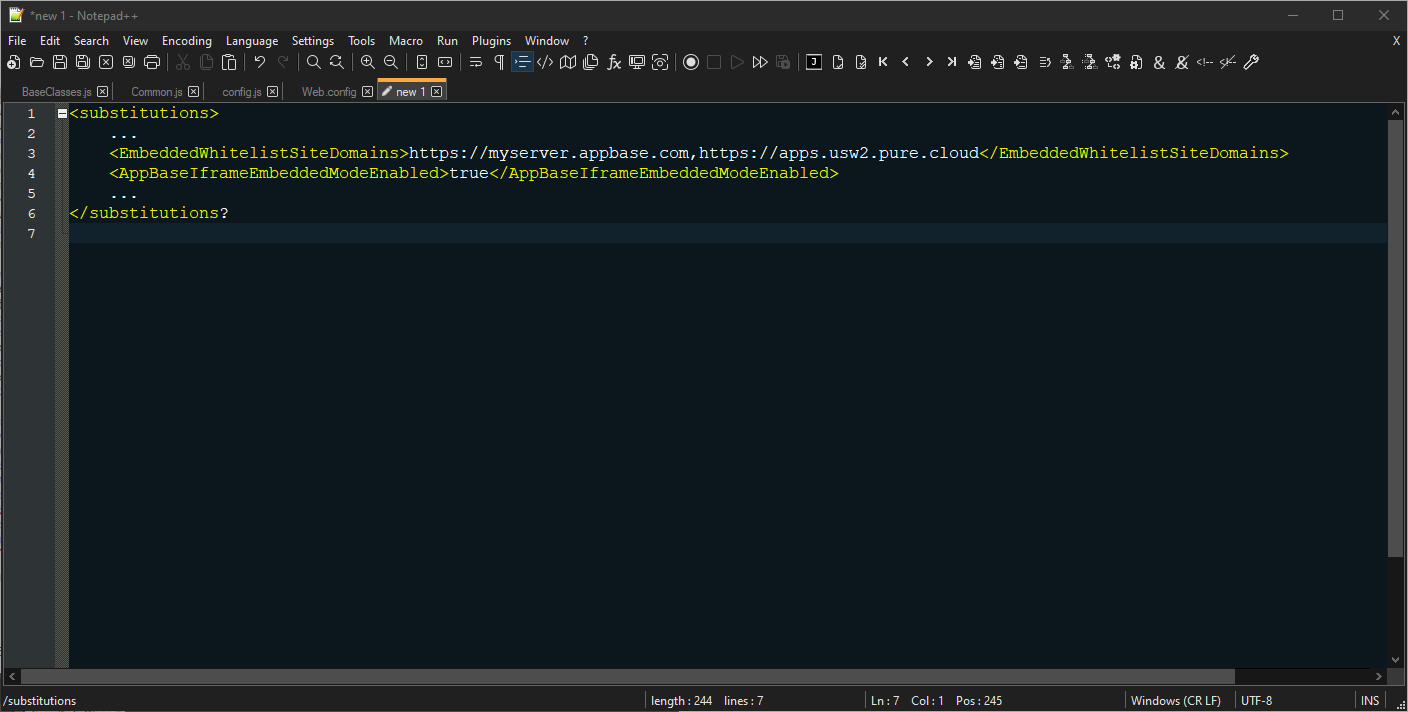
Open the file C:\UNKNOWN\... for editing in a text editor like Windows Notepad
In the file, replace the values below with appropriate ones that you've collected from previous steps
Set AppBaseIframeEmbeddedModeEnabled to true
Set DCM_EndPointto a URL formatted like @SJ_SERVER_ADDRESS@,@GENESYS_CLOUD_ADDRESS@except with your SJ_SERVER_ADDRESS and GENESYS_CLOUD_ADDRESS
Validate that your configuration looks similiar to the one below:
You can now close the remote desktop session
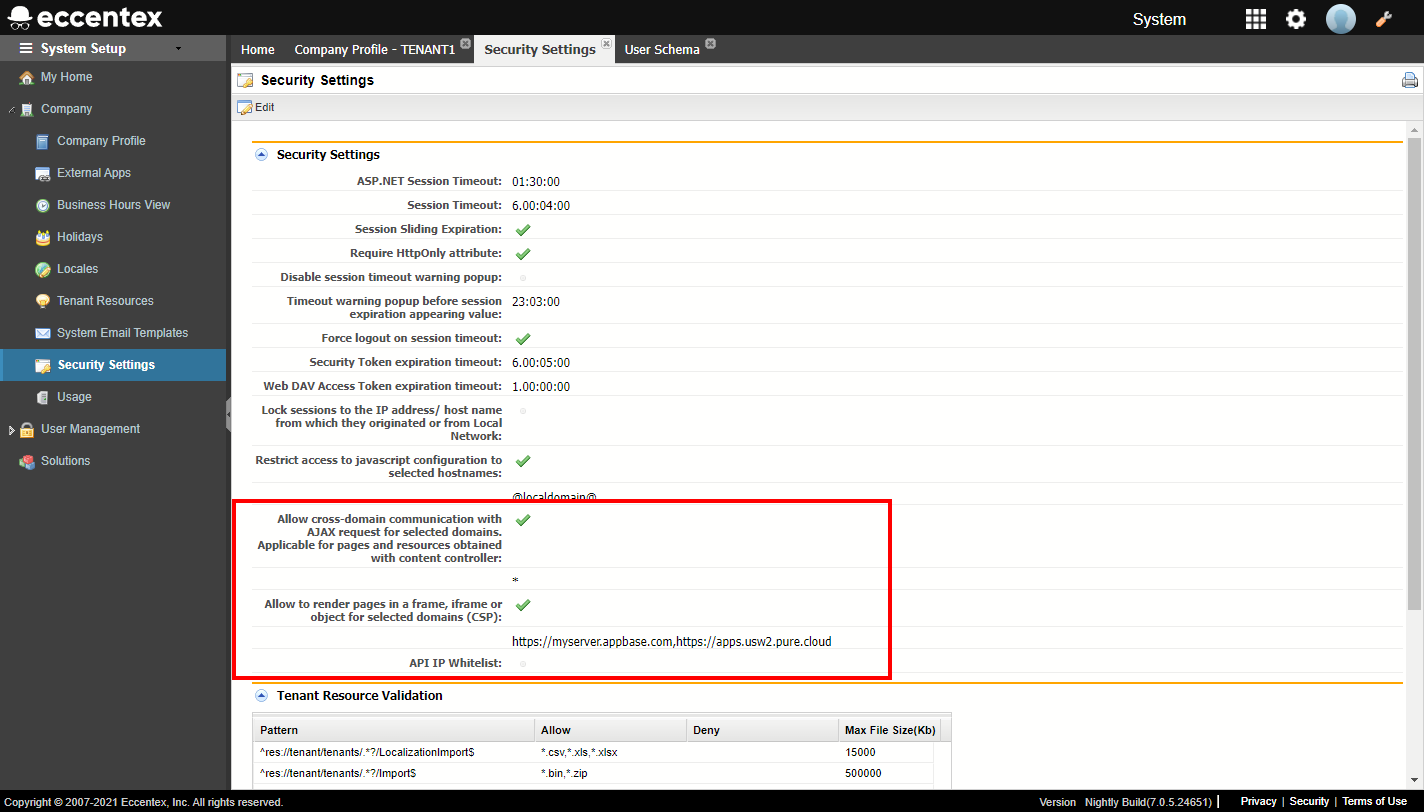
Step 11: Update security settings in ServiceJourney to allow embedding pages
By default, ServiceJourney pages are not allowed to be embedded into 3rd-party iFrames. This step is part two of allowing screen-popping ServiceJourney pages into the Genesys Cloud desktop.
Log in to your ServiceJourney solution
On the top right, navigate to → Company Setup
Navigate to Company → Security Settings
Click the Edit button
Do the following:
Allow cross-domain communication with AJAX request for selected domains. Applicable for pages and resources obtained with content controller and set the value to *
Click Save
Validate that your security settings looks something like below:
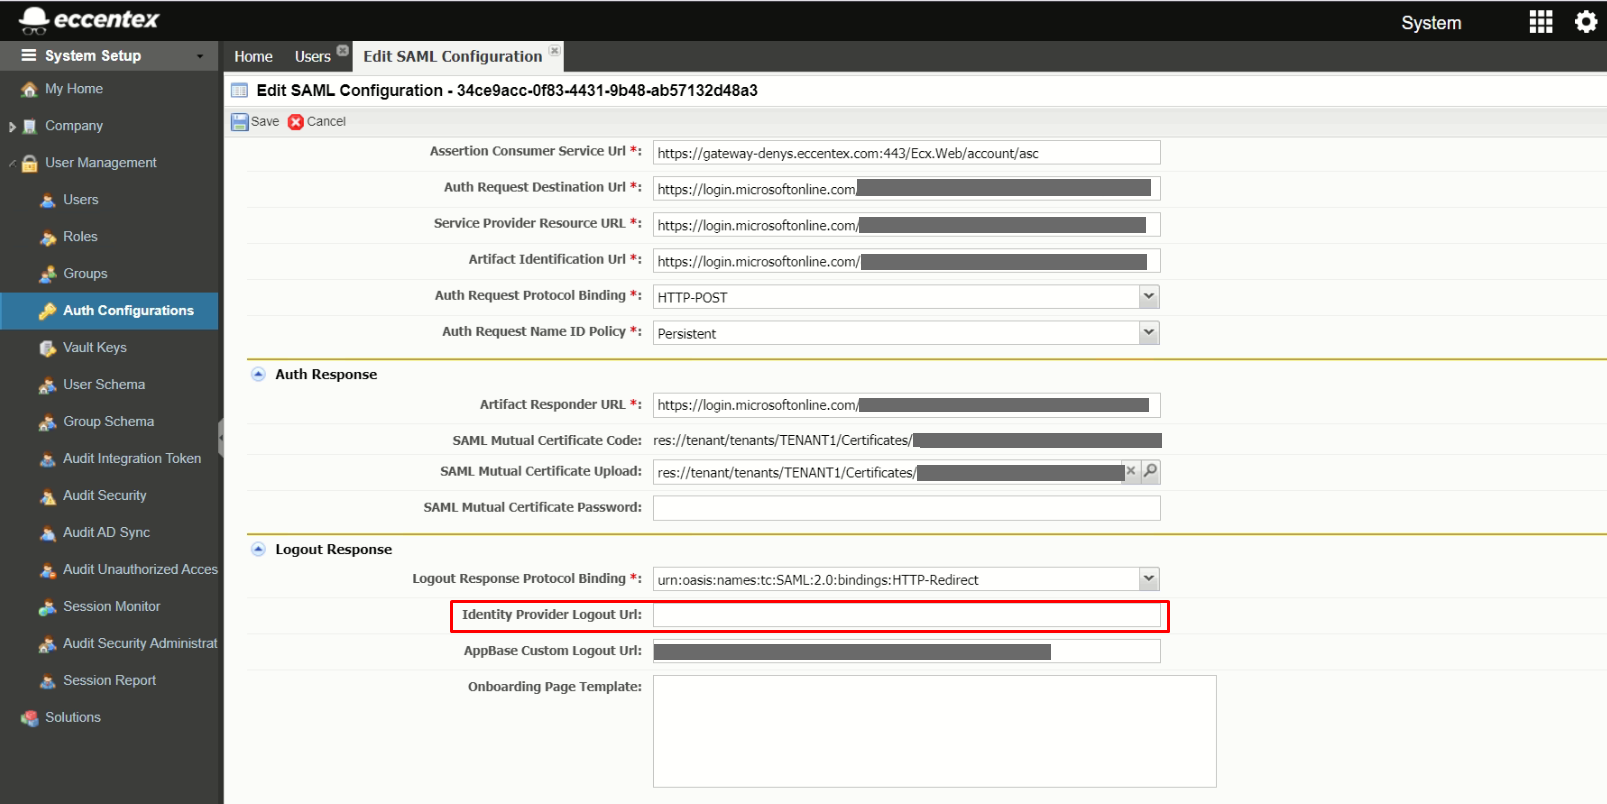
Step 12: (OPTIONAL) Set up Azure Single Sign-On
This step is only if you are planning to use Azure SAML SSO. This is necessary to ensure that there is a clean SSO logout process.